跳转到主内容

Garmin Nuvi 1490T Battery Replacement

你所需要的

  1. Garmin Nuvi 1490T Battery Replacement, Front Frame Panel: 步骤 1 中的图像 1,1
    • Power off your GPS before moving on.

    • Locate the crevice that separates the frame from the body.

    Front panel is very fragile. Exercise extreme care.

    May be able to purchase part separately from Garmin should you have a mishap.

    K Alphonso - 回复

  2. Garmin Nuvi 1490T Battery Replacement: 步骤 2 中的图像 1,1
    • Carefully insert the plastic prying tool into the crevice to separate the frame from the body.

    • Applying excessive force can lead to a damaged or scratched display screen.

  3. Garmin Nuvi 1490T Battery Replacement: 步骤 3 中的图像 1,2 Garmin Nuvi 1490T Battery Replacement: 步骤 3 中的图像 2,2
    • Slide the plastic prying tool around the perimeter to completely remove the frame.

  4. Garmin Nuvi 1490T Battery Replacement, Second Frame Panel: 步骤 4 中的图像 1,3 Garmin Nuvi 1490T Battery Replacement, Second Frame Panel: 步骤 4 中的图像 2,3 Garmin Nuvi 1490T Battery Replacement, Second Frame Panel: 步骤 4 中的图像 3,3
    • Remove the four 11.0 mm screws using the Torx T5 screwdriver.

  5. Garmin Nuvi 1490T Battery Replacement: 步骤 5 中的图像 1,3 Garmin Nuvi 1490T Battery Replacement: 步骤 5 中的图像 2,3 Garmin Nuvi 1490T Battery Replacement: 步骤 5 中的图像 3,3
    • Using the plastic prying tool, dislodge the frame from the body of the device.

    • Using your hands, completely disconnect the frame from the body.

    • Set the pieces of the frame aside.

  6. Garmin Nuvi 1490T Battery Replacement, Display Screen: 步骤 6 中的图像 1,3 Garmin Nuvi 1490T Battery Replacement, Display Screen: 步骤 6 中的图像 2,3 Garmin Nuvi 1490T Battery Replacement, Display Screen: 步骤 6 中的图像 3,3
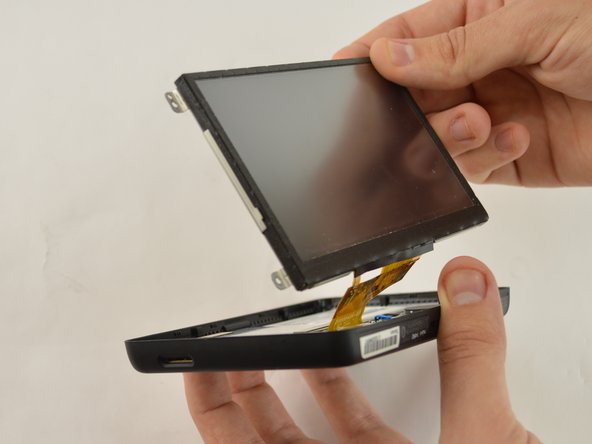
    • Gently lift up the display screen using your fingers to make sure the only thing connecting it to the body is the ribbon cable.

  7. Garmin Nuvi 1490T Battery Replacement: 步骤 7 中的图像 1,2 Garmin Nuvi 1490T Battery Replacement: 步骤 7 中的图像 2,2
    • Remove the piece of tape that is covering the connecting point of the motherboard and display.

  8. Garmin Nuvi 1490T Battery Replacement: 步骤 8 中的图像 1,3 Garmin Nuvi 1490T Battery Replacement: 步骤 8 中的图像 2,3 Garmin Nuvi 1490T Battery Replacement: 步骤 8 中的图像 3,3
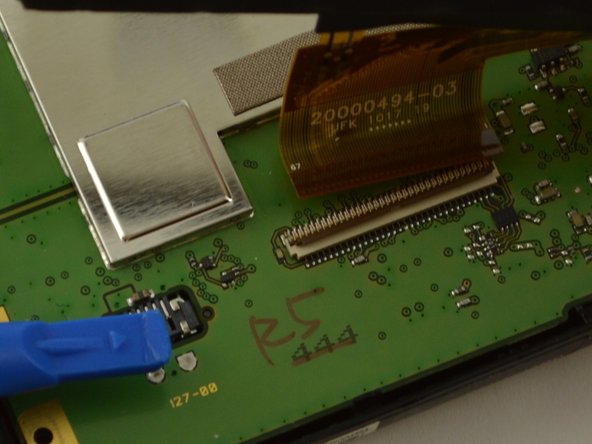
    • Using the plastic opening tool or your fingers, lift up the ZIF connector holding the ribbon cable in place.

    • Carefully pull the ribbon cable out of the connector with tweezers or two fingers.

    • Gently disconnect the display by pulling upward. Set display aside.

    • If the display screen does not disconnect easily, make sure the ZIF connector is no longer holding it in place.

    wow no idea what you are trying to say here...

    Karen Dennis - 回复

    You don't need to remove this. if you go to youtube there is a video of a little boy showing how to do this and it is much more helpful. This step is not clear and you can damage the device taking that ribbon off!

    Karen Dennis - 回复

    can you be more specific about video? I have no idea how to replace the flat cable into the ZIF connector

    Alex - 回复

    The ZIF (Zero Insertion Force) connector is a locking connector. You need to lift the dark plastic tab that runs across the connector so that it pivots up on the hinge located near the middle of the connector. This plastic tab is a lock that secures the ribbon cable in place for the screen to work. Once the hinge is lifted, the ribbon cable should be easy to slide out of the connector. To reassemble, you must slide the cable back into the connector as far as possible with the hinge open. Then gently close the hinge until it locks into place and reapply the tape.

    Dave Marzetti - 回复

    In the first photo, the ZIF is shown in the locked position, and in the second photo, you can see the locking tab in the unlocked position. Be careful not to force the tab or you will break it and will have a much more serious problem.

    Dave Marzetti - 回复

  9. Garmin Nuvi 1490T Battery Replacement, Battery: 步骤 9 中的图像 1,3 Garmin Nuvi 1490T Battery Replacement, Battery: 步骤 9 中的图像 2,3 Garmin Nuvi 1490T Battery Replacement, Battery: 步骤 9 中的图像 3,3
    • Using the T5 Torx screw driver, remove the two 5.0 mm screws.

    • Using your hands, lift up the motherboard and fold it over.

  10. Garmin Nuvi 1490T Battery Replacement: 步骤 10 中的图像 1,3 Garmin Nuvi 1490T Battery Replacement: 步骤 10 中的图像 2,3 Garmin Nuvi 1490T Battery Replacement: 步骤 10 中的图像 3,3
    • Fold motherboard out of the way to reveal the white plastic end of the battery plug.

    • Using the tweezers, pull the white plastic connector to disconnect the battery from the motherboard.

    • Let the cord hang unattached.

  11. Garmin Nuvi 1490T Battery Replacement: 步骤 11 中的图像 1,2 Garmin Nuvi 1490T Battery Replacement: 步骤 11 中的图像 2,2
    • Return motherboard back to original position by flipping it back over.

    • Using the nylon spudger, dislodge the battery out of its socket.

    • Use a tool that is ESD-safe such as a nylon spudger or a plastic prying tool. Never use a metal spudger to take out the battery.

结论

To reassemble your device, follow these instructions in reverse order.

7等其他人完成本指南。

Ricardo Solis

于01/20/16注册

1,037 声望

创作了6篇指南

团队

USF Tampa, Team 15-2, Remmell Spring 2016 USF Tampa, Team 15-2, Remmell Spring 2016 的会员

USFT-REMMELL-S16S15G2

4 名成员

创作了6篇指南

2条评论

Great guide and very informative. Here is a replacement battery that is reasonably priced and it comes with all of the tools needed for installation. It even has a 1 year replacement warranty!

Nuvi 1490T Battery 361-00019-16

Mike - 回复

Thanks for the great instructions! Had I not given up on Garmin's video instruction I'm sure I would have destroyed my GPS. You saved the day for me. Again, THANKS!

Mike Billmaier - 回复

添加评论

浏览统计数据:

过去 24 小时: 1

过去 7 天: 7

过去 30 天: 30

总计 5,812