跳转到主内容

Game Boy Micro Buttons Replacement

你所需要的

  1. Game Boy Micro Buttons Replacement, Remove the Cover: 步骤 1 中的图像 1,2 Game Boy Micro Buttons Replacement, Remove the Cover: 步骤 1 中的图像 2,2
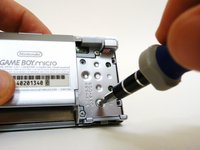
    • Remove the Phillips #00 screw on the side of the Game Boy closest to the directional pad.

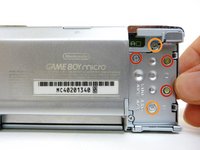
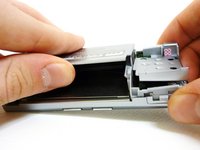
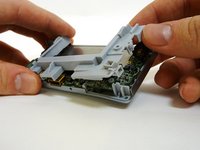
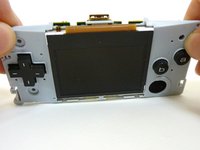
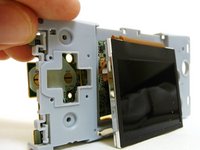
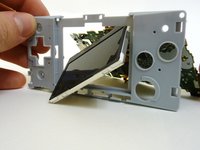
    • Once the screw has been loosened, lift the cover off the back of the device.

  2. Game Boy Micro Buttons Replacement, Faceplate: 步骤 2 中的图像 1,2 Game Boy Micro Buttons Replacement, Faceplate: 步骤 2 中的图像 2,2
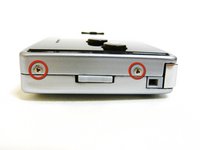
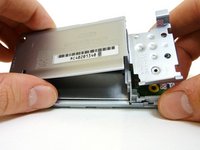
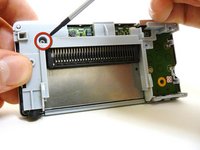
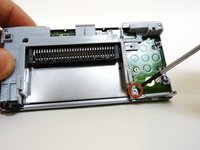
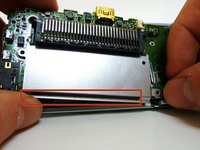
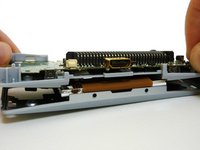
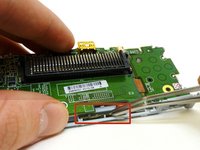
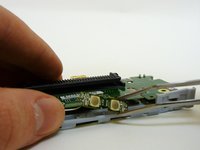
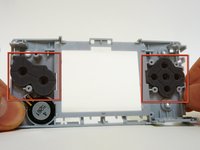
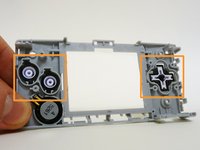
    • Locate the two circular holes on the side of the Game Boy nearest to the directional pad.

  3. Game Boy Micro Buttons Replacement: 步骤 3 中的图像 1,3 Game Boy Micro Buttons Replacement: 步骤 3 中的图像 2,3 Game Boy Micro Buttons Replacement: 步骤 3 中的图像 3,3
    • Straighten the end of a paper clip and push it into each of the circular holes.

    • You may hear a faint click afterwards.

    • Use the paper clip to lever the faceplate off from the unit.

  4. Game Boy Micro Buttons Replacement, Unscrew the Outer Cover: 步骤 4 中的图像 1,2 Game Boy Micro Buttons Replacement, Unscrew the Outer Cover: 步骤 4 中的图像 2,2
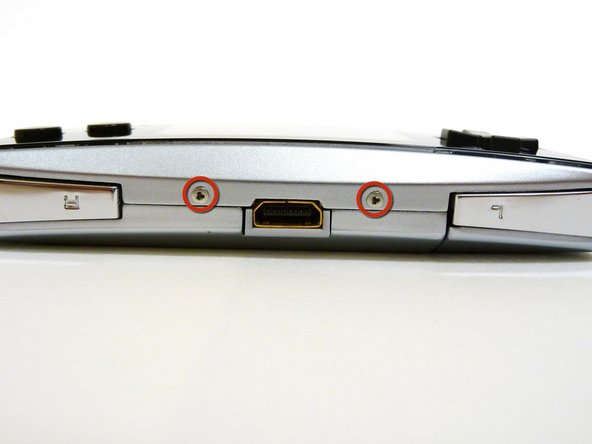
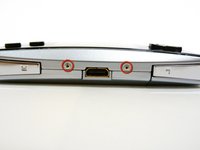
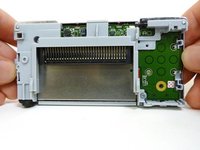
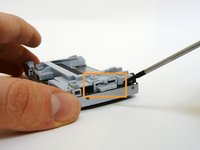
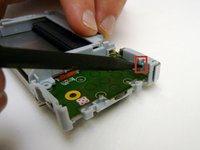
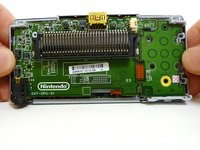
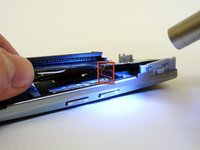
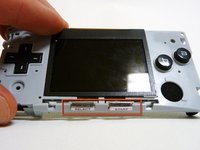
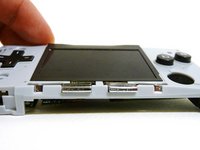
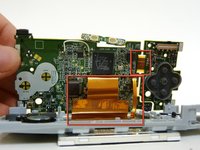
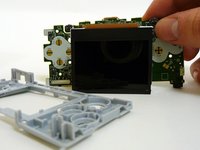
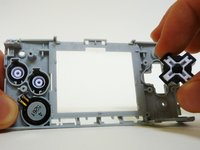
    • Remove the two tri-wing screws on the top of the Game Boy and the two screws next to the volume/contrast switch.

  5. Game Boy Micro Buttons Replacement: 步骤 5 中的图像 1,3 Game Boy Micro Buttons Replacement: 步骤 5 中的图像 2,3 Game Boy Micro Buttons Replacement: 步骤 5 中的图像 3,3
    • Remove the three Phillips #00 screws.

    • Remove the two tri-wing screws.

  6. Game Boy Micro Buttons Replacement: 步骤 6 中的图像 1,3 Game Boy Micro Buttons Replacement: 步骤 6 中的图像 2,3 Game Boy Micro Buttons Replacement: 步骤 6 中的图像 3,3
    • Lift the back cover off of the Game Boy.

  7. Game Boy Micro Buttons Replacement: 步骤 7 中的图像 1,3 Game Boy Micro Buttons Replacement: 步骤 7 中的图像 2,3 Game Boy Micro Buttons Replacement: 步骤 7 中的图像 3,3
    • Remove the two Phillips #00 screws from the plastic frame.

    • As you are pulling off the plastic frame, the shoulder buttons and the volume switch may fall out of the device.

    • Underneath each shoulder button is a small spring. Do not lose them.

  8. Game Boy Micro Buttons Replacement: 步骤 8 中的图像 1,2 Game Boy Micro Buttons Replacement: 步骤 8 中的图像 2,2
    • With a spudger, depress the small clip on the lower right corner of the plastic guard.

    • Grab the edges of the plastic frame and lift the frame off the motherboard.

  9. Game Boy Micro Buttons Replacement: 步骤 9 中的图像 1,1
    • Remove the two gold Phillips #00 screws from the motherboard.

  10. Game Boy Micro Buttons Replacement: 步骤 10 中的图像 1,2 Game Boy Micro Buttons Replacement: 步骤 10 中的图像 2,2
    • With one hand, gently slide the top left end of the motherboard up and out of the front case.

    • With your other hand, pull out the EMI shield until the tab comes out of the front case.

    • Once the tab is pulled out from the bottom, slide the EMI shield down and out of the device.

  11. Game Boy Micro Buttons Replacement: 步骤 11 中的图像 1,3 Game Boy Micro Buttons Replacement: 步骤 11 中的图像 2,3 Game Boy Micro Buttons Replacement: 步骤 11 中的图像 3,3
    • The entire motherboard is now accessible.

    • Take extreme care when working with the motherboard to avoid damaging the device and its components.

    • A small ribbon cable connects the start and select buttons to the motherboard. It can rip very easily, so do not pull on it.

    • Lift the motherboard and the front plastic cover assembly off of the front case.

    • Once the front case is removed, the plastic on/off switch will fall out of place.

  12. Game Boy Micro Buttons Replacement: 步骤 12 中的图像 1,3 Game Boy Micro Buttons Replacement: 步骤 12 中的图像 2,3 Game Boy Micro Buttons Replacement: 步骤 12 中的图像 3,3
    • When you remove the motherboard from the front case, the start and select buttons may fall out.

    • If the buttons do not fall out, remove them with a pair of tweezers.

  13. Game Boy Micro Buttons Replacement: 步骤 13 中的图像 1,3 Game Boy Micro Buttons Replacement: 步骤 13 中的图像 2,3 Game Boy Micro Buttons Replacement: 步骤 13 中的图像 3,3
    • Without the front case, you will be left with the motherboard and the plastic mount. The LCD screen is attached to the motherboard by a ribbon and can fall off the plastic mount.

    • Using metal tweezers, grab the start/select board and slide it out gently.

  14. Game Boy Micro Buttons Replacement: 步骤 14 中的图像 1,2 Game Boy Micro Buttons Replacement: 步骤 14 中的图像 2,2
    • Lift the entire motherboard assembly off the plastic guard.

    • Take caution not to damage any of the gold ribbon cables on the motherboard.

    • The LCD screen is the only thing connecting the motherboard and plastic guard.

  15. Game Boy Micro Buttons Replacement: 步骤 15 中的图像 1,2 Game Boy Micro Buttons Replacement: 步骤 15 中的图像 2,2
    • To remove the LCD screen, carefully angle it until it is diagonal to the square hole in the plastic guard and slide it out.

    • It is now possible to remove the entire motherboard assembly from the plastic guard.

  16. Game Boy Micro Buttons Replacement: 步骤 16 中的图像 1,3 Game Boy Micro Buttons Replacement: 步骤 16 中的图像 2,3 Game Boy Micro Buttons Replacement: 步骤 16 中的图像 3,3
    • On the plastic guard, there are two rubber pads that cover the buttons. Remove them.

    • These pads rest on the motherboard and sometimes stick to it. If they do, peel them off.

    • With the rubber pads off, you may use your fingers to remove the buttons to clean or replace them.

    • When returning the buttons to the guard, they have to be put back in exactly the way they were pulled out.

结论

To reassemble your device, follow these instructions in reverse order.

9等其他人完成本指南。

Jack

于01/21/10注册

396 声望

创作了3篇指南

团队

Cal Poly, Team 8-46, Regan Winter 2010 Cal Poly, Team 8-46, Regan Winter 2010 的会员

CPSU-REGAN-W10S8G46

5 名成员

创作了25篇指南

3条评论

Buenas abra el modo de reparar o puentear la placa de los botones start y selec ya que el flex se rompió

Good open the way to repairing or bypassing the plate and start buttons selec since the flex broke

Jesus Briones - 回复

Con ayuda de un cúter pela la terminales y solda nuevamente debes verificar si el flex tiene dos placas por ambos lados o solo es una

eshemoc - 回复

Any one know the right size shoulder buttons are for replacement ? Are they the same size as a ds lite R and L button ?

Philip Fuentes - 回复

添加评论

浏览统计数据:

过去 24 小时: 2

过去 7 天: 33

过去 30 天: 187

总计 26,631