简介
根据本指南来更换Game Boy的按键。
你所需要的
-
-
将回形针的一端掰直并依次插入每个圆孔中。
-
用回形针将面板从设备上撬起来。
schlechte erklärung an dieser stelle. ich hab vorsichtig gedrückt. da kam kein klicken also habe ich nach und nach etwas mehr gedrückt. das “klicken” was ich dann gehört habe war dann wie die halterung innen abgebrochen ist…..
entfernt diesen zusatzpunkt “du solltest ein leichtes klicken hören” daran sollte man sich nicht orientieren weil es blödsinn ist
-
-
-
-
卸下三颗#00十字形螺丝。
-
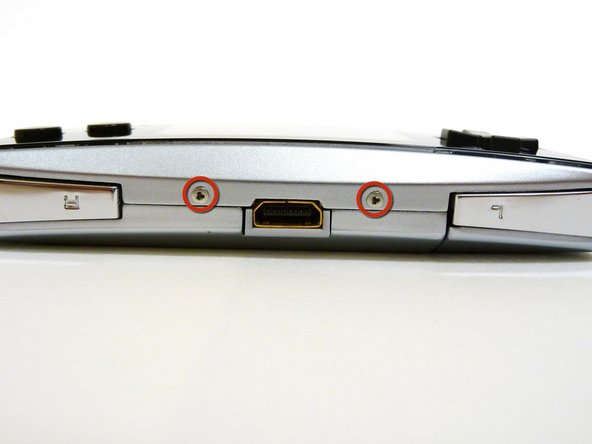
卸下两颗Y字形螺丝。
If the color of the inner plastic discolors, the durability is weakened. Do not remove the screws.
If it is broken and damaged, there is no way to recover it.
kimhyojong - 回复
-
-
-
卸下塑料框架上的两颗#00十字形螺丝。
-
当你在取下塑料框架的时候,设备的肩键与音量键可能会掉下来。
-
-
-
卸下主板上两颗金黄色的#00十字形螺丝。
-
-
-
用一只手轻轻滑动主板使其左上端与设备前面板分离。
-
用另一只手将电磁防护板拔出来,直到其卡扣从设备前面板上取下来。
-
一旦卡扣从底部脱离,就将电磁防护板往下滑动以取下来。
When putting the console back together, it is vital that you remember this step and slide the EMI shield back UNDERNEATH the outer shell of the console. It’s easy to miss, and placing the EMI shield ABOVE the outer shell of the console will result in the motherboard becoming lopsided, making the last piece of the console not slide into place.
-
-
-
现在整个主板已经触手可及了。
-
start和select这两个按键通过一根小小的排线与主板相连。它非常容易断裂,所以不要拉拽它。
-
将主板与塑料支架从设备前面板上提起分离。
-


按照指南的倒序重新组装好你的设备。
按照指南的倒序重新组装好你的设备。
9等其他人完成本指南。

团队

Cal Poly, Team 8-46, Regan Winter 2010 Cal Poly, Team 8-46, Regan Winter 2010 的会员
CPSU-REGAN-W10S8G46
5 名成员
创作了25篇指南
3条评论
Buenas abra el modo de reparar o puentear la placa de los botones start y selec ya que el flex se rompió
Good open the way to repairing or bypassing the plate and start buttons selec since the flex broke
Any one know the right size shoulder buttons are for replacement ? Are they the same size as a ds lite R and L button ?