跳转到主内容

Game Boy Advance LCD Screen and Front Cover Replacement

你所需要的

视频概述

  1. Game Boy Advance LCD Screen and Front Cover Replacement, Remove the Battery Cover/Batteries: 步骤 1 中的图像 1,3 Game Boy Advance LCD Screen and Front Cover Replacement, Remove the Battery Cover/Batteries: 步骤 1 中的图像 2,3 Game Boy Advance LCD Screen and Front Cover Replacement, Remove the Battery Cover/Batteries: 步骤 1 中的图像 3,3
    • Take the battery cover off by releasing the locking tab and hinging the cover away. Remove the batteries inside the cover

    • Do not forget to remove the batteries! This applies to working with any electronic device as working with live electricity may damage the device or cause malfunctions

  2. Game Boy Advance LCD Screen and Front Cover Replacement, Unscrew the Back Panel: 步骤 2 中的图像 1,2 Game Boy Advance LCD Screen and Front Cover Replacement, Unscrew the Back Panel: 步骤 2 中的图像 2,2
    • Remove the six back panel screws using a Tri-wing Screwdriver.

    • Remove bottom back panel screw with a Phillips #1 screw driver. (Image #2)

  3. Game Boy Advance LCD Screen and Front Cover Replacement, Remove the Back Panel: 步骤 3 中的图像 1,1
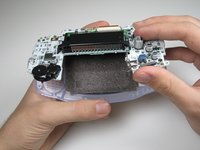
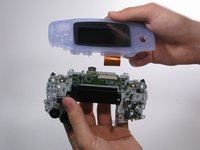
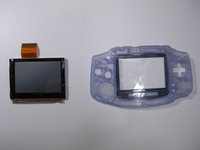
    • Remove the back panel by pulling away with one hand and the front secured in the other hand.

    • Removal of the back panel may cause shoulder buttons and side panels to come loose and fall off.

  4. Game Boy Advance LCD Screen and Front Cover Replacement, Remove Triggers: 步骤 4 中的图像 1,2 Game Boy Advance LCD Screen and Front Cover Replacement, Remove Triggers: 步骤 4 中的图像 2,2
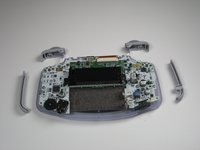
    • Remove left and right triggers by lifting and pulling them away from the system.

    • Do the same for side panels

    • For finicky or jammed triggers only! Adjust and correct triggers and reassemble. Most jammed triggers are caused by buttons misplaced or jammed in its enclosure.

  5. Game Boy Advance LCD Screen and Front Cover Replacement, Remove the On/Off Switch: 步骤 5 中的图像 1,1
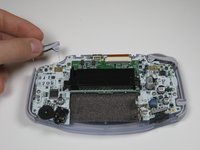
    • Remove the gray On/Off Switch by pulling up and away from the unit. Replace with another switch if necessary.

  6. Game Boy Advance LCD Screen and Front Cover Replacement, Buttons and LCD Screen: 步骤 6 中的图像 1,1
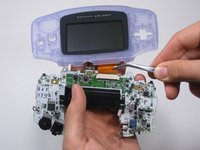
    • Remove the three screws on the circuit board with a Phillips #1 screw driver.

  7. Game Boy Advance LCD Screen and Front Cover Replacement: 步骤 7 中的图像 1,2 Game Boy Advance LCD Screen and Front Cover Replacement: 步骤 7 中的图像 2,2
    • Pull circuit board away from the front panel by pulling up at the bottom of the circuit board, keeping the top ribbon still connected.

    • Handle with care! The ribbon connecting the circuit board to the LCD screen can easily be damaged and will require replacement if broken.

  8. Game Boy Advance LCD Screen and Front Cover Replacement, Buttons: 步骤 8 中的图像 1,3 Game Boy Advance LCD Screen and Front Cover Replacement, Buttons: 步骤 8 中的图像 2,3 Game Boy Advance LCD Screen and Front Cover Replacement, Buttons: 步骤 8 中的图像 3,3
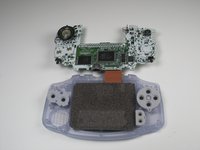
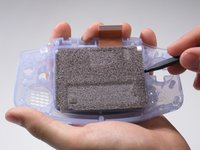
    • Remove the rubber button pads from their pockets.

    • Remove the plastic buttons and the D-pad from beneath the rubber pads with tweezers or by hand.

  9. Game Boy Advance LCD Screen and Front Cover Replacement, LCD Screen: 步骤 9 中的图像 1,3 Game Boy Advance LCD Screen and Front Cover Replacement, LCD Screen: 步骤 9 中的图像 2,3 Game Boy Advance LCD Screen and Front Cover Replacement, LCD Screen: 步骤 9 中的图像 3,3
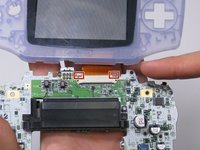
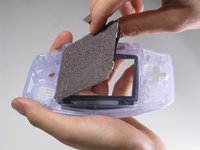
    • Use a spudger/tweezers/fingernail to unlatch the LCD ribbon port by pulling the grey tabs on the sides upwards (towards the top edge of the PCB).

    • Once the LCD ribbon port has been unlatched, the LCD ribbon should very easily slide out and can be removed with zero force using fingers or tweezers.

  10. Game Boy Advance LCD Screen and Front Cover Replacement: 步骤 10 中的图像 1,3 Game Boy Advance LCD Screen and Front Cover Replacement: 步骤 10 中的图像 2,3 Game Boy Advance LCD Screen and Front Cover Replacement: 步骤 10 中的图像 3,3
    • Use the spudger to lift the screen from the front panel. Place the spudger in the space directly left of the D-pad.

    • The screen and the front panel is connected by a black tape that could rip if not removed carefully.

终点

6等其他人完成本指南。

Aldo Corona

于01/25/10注册

799 声望

创作了6篇指南

团队

Cal Poly, Team 16-29, Maness Winter 2010 Cal Poly, Team 16-29, Maness Winter 2010 的会员

CPSU-MANESS-W10S16G29

5 名成员

创作了61篇指南

一条评论

I think the rating for this is too high. As long as you keep track of small screws and buttons & be wary of the ribbon cable, it's an easy replacement. But thank you for the detailed guide!

Noah - 回复

添加评论

浏览统计数据:

过去 24 小时: 1

过去 7 天: 9

过去 30 天: 52

总计 18,096