跳转到主内容

Fugoo Tough XL Battery Replacement

你所需要的

  1. Fugoo Tough XL Battery Replacement, Case: 步骤 1 中的图像 1,1
    • Remove the four 3 mm screws located in each corner using a 3 mm Hex screwdriver.

  2. Fugoo Tough XL Battery Replacement: 步骤 2 中的图像 1,2 Fugoo Tough XL Battery Replacement: 步骤 2 中的图像 2,2
    • Gently pull up and off the outer casing.

    • Do not feel afraid to use a bit of force if necessary.

  3. Fugoo Tough XL Battery Replacement: 步骤 3 中的图像 1,2 Fugoo Tough XL Battery Replacement: 步骤 3 中的图像 2,2
    • Remove the internal device from the outer casing.

    • Remove the four 12 mm screws on each corner using a T10 Torx screwdriver.

    • Remove the eight 6 mm screws on the top and bottom using a T10 Torx screwdriver.

  4. Fugoo Tough XL Battery Replacement: 步骤 4 中的图像 1,3 Fugoo Tough XL Battery Replacement: 步骤 4 中的图像 2,3 Fugoo Tough XL Battery Replacement: 步骤 4 中的图像 3,3
    • Use your hands to gently remove the side plates.

    • Use an opening tool to pry off the back plate with the Fugoo trademark.

  5. Fugoo Tough XL Battery Replacement: 步骤 5 中的图像 1,1
    • Slowly pull the front casing from the back casing. Avoid putting any tension on the connected cables.

    • Separate the two slowly and consistently to avoid damaging the speaker cables.

  6. Fugoo Tough XL Battery Replacement, Motherboard: 步骤 6 中的图像 1,2 Fugoo Tough XL Battery Replacement, Motherboard: 步骤 6 中的图像 2,2
    • Carefully untangle the wires that connect the speaker to the motherboard.

  7. Fugoo Tough XL Battery Replacement: 步骤 7 中的图像 1,2 Fugoo Tough XL Battery Replacement: 步骤 7 中的图像 2,2
    • Use tweezers to remove the two ribbon wires on the left and right side of motherboard.

    • Do not pull the cables by the cord, as this could damage the cables and the motherboard. It is best to always disconnect the cables from the base, which is closest to the motherboard, using an iFixit opening tool.

  8. Fugoo Tough XL Battery Replacement: 步骤 8 中的图像 1,2 Fugoo Tough XL Battery Replacement: 步骤 8 中的图像 2,2
    • There is a hidden ribbon on the motherboard, that becomes visible once the motherboard has been pulled out.

    • Pull the motherboard halfway out.

    • Gently unplug the ribbon using tweezers.

  9. Fugoo Tough XL Battery Replacement: 步骤 9 中的图像 1,2 Fugoo Tough XL Battery Replacement: 步骤 9 中的图像 2,2
    • Remove the motherboard and battery.

    • Remove the four 3 mm screws from the motherboard using a 3 mm Hex screwdriver.

  10. Fugoo Tough XL Battery Replacement, Battery: 步骤 10 中的图像 1,2 Fugoo Tough XL Battery Replacement, Battery: 步骤 10 中的图像 2,2
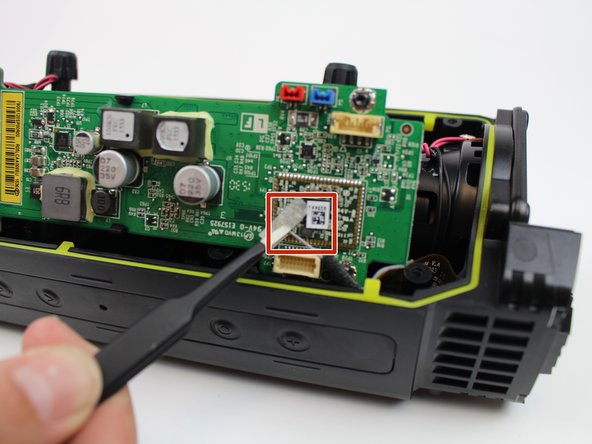
    • While holding the motherboard with one hand, remove the battery.

    • Once that is completed, replace the battery with a new, functional one.

结论

To reassemble your device, follow these instructions in reverse order.

5等其他人完成本指南。

Abdul

于02/17/17注册

527 声望

创作了4篇指南

团队

USF Tampa, Team S19-G1, Hoffman Spring 2017 USF Tampa, Team S19-G1, Hoffman Spring 2017 的会员

USFT-HOFFMAN-S17S19G1

4 名成员

创作了5篇指南

8条评论

What kind of battery is it? Which brands would be preferred? Where can I buy these batteries?

It's a good guide, but these questions remain.

Rob Robertson - 回复

Where can I buy this battery module or the circuit board. I replaced a dead cell and charged each one individually but the circuit board has no voltage output.

Can anyone tell me the correct voltage output on each pin of the battery connector?

John Thompson - 回复

Ciao, io ho lo stesso problema, dove posso trovare il pacco batteria oppure la scheda, perché cambiando le celle morte non ho nessuna tensione in uscita del modulo e non vengono ricaricate le batterie

Vasile Adrian Belea - 回复

Where do you get replacement batteries? Or are they just 18650s?

Tom Evans - 回复

i have a fugoo tough thats over 4 years old. The single battery has the following numbers on it: VPN: UP130034 M N: AE1665001 ….Made In China. UER Technology …. I was not able to find the replacement also, its 3.7v 8.70’Wh 2350 mAh, It is a 5 wire plug with a protector board ,, 2 reds, 1 white, and 2 blacks.. The darn thing about the five wires is the 2 reds and 2 blacks are soldered to one connector tab each. The 3 wire 18650 3 wires red, white,and black will work. Its only 2 mm bigger and it will fit in the original holder. Just solder the 5 wire connector to this battery by connecting both reds and blacks to the single ones and the one white to the other white.. I found the Onyx Harmon Kardon studio 2 replacement battery is perfect. Thanks, Rhett McCrady.

Rhett Mccrady - 回复

添加评论

浏览统计数据:

过去 24 小时: 1

过去 7 天: 2

过去 30 天: 25

总计 3,507