跳转到主内容

Filco Majestouch-2 Key Stabilizer and Key Cap Replacement

  1. Filco Majestouch-2 Key Stabilizer and Key Cap Replacement, Stabilizer and Key cap: 步骤 1 中的图像 1,1
    • Follow the keyboards USB connector to the back of the computer, and gently pull it out to power it off.

    • Always use caution when working with electrical components!

  2. Filco Majestouch-2 Key Stabilizer and Key Cap Replacement: 步骤 2 中的图像 1,1
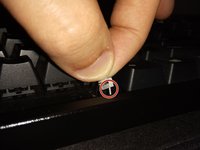
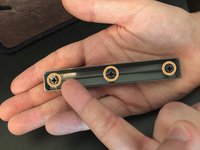
    • Lay out keycap stabilizer and keycap removal tool next to keyboard to ensure organization.

    • The key cap stabilizer tools are small, and we don't want to lose them!

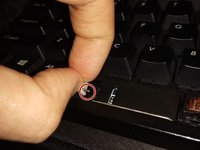
    • The Key Cap removal tool will work with any cap on your keyboard, so it is good to keep it around when the next repair comes along!

  3. Filco Majestouch-2 Key Stabilizer and Key Cap Replacement: 步骤 3 中的图像 1,1
    • Grab the key cap removal tool, and while holding vertically, gently press down on the space bar until an audible "click" is heard.

    • Gently lift up to release the key from its foundation.

    • Remember "Gently" is the key here (no pun intended). Too much force may break off a piece of the key.

  4. Filco Majestouch-2 Key Stabilizer and Key Cap Replacement: 步骤 4 中的图像 1,3 Filco Majestouch-2 Key Stabilizer and Key Cap Replacement: 步骤 4 中的图像 2,3 Filco Majestouch-2 Key Stabilizer and Key Cap Replacement: 步骤 4 中的图像 3,3
    • Insert the two key stabilizers by guiding each piece through the metal bar and setting them upright in their holder.

    • Upright signifies that the “+” is facing upward, this is important as the space bar has the same styled holes underneath.

  5. Filco Majestouch-2 Key Stabilizer and Key Cap Replacement: 步骤 5 中的图像 1,1
    • Ensure that both stabilizers have been positioned upright, it should look like this.

    • Now could also be a good time to take a small cloth and clean possible dust around the area before the space bar is replaced.

  6. Filco Majestouch-2 Key Stabilizer and Key Cap Replacement: 步骤 6 中的图像 1,1
    • Grab the space bar key cap and gently press down on its foundation until you hear an audible click.

    • It is very good practice to press down on multiple areas of they key cap to ensure it is in firmly and not lopsided.

  7. Filco Majestouch-2 Key Stabilizer and Key Cap Replacement: 步骤 7 中的图像 1,1
    • Reconnect the USB power cable to computer and test keycap in all areas for consistency. You have completed your repair!

    • Remember, you can use what you have learned in this guide to help others who experience the same issue!

结论

If you want to repair any other key cap on this keyboard, you can return to this guide and follow the same instructions.

另外一个人完成了本指南。

theaustinbartley

于04/17/14注册

181 声望

撰写一个指南

团队

0条评论

添加评论

浏览统计数据:

过去 24 小时: 3

过去 7 天: 18

过去 30 天: 74

总计 5,340