跳转到主内容

Eton FRX3 Motherboard Assembly Replacement

仅作为前提条件
本指南仅用作其他指南的先决条件。不能单独食用。

你所需要的

  1. Eton FRX3 Motherboard Assembly Replacement, Rechargeable Battery Pack: 步骤 1 中的图像 1,1
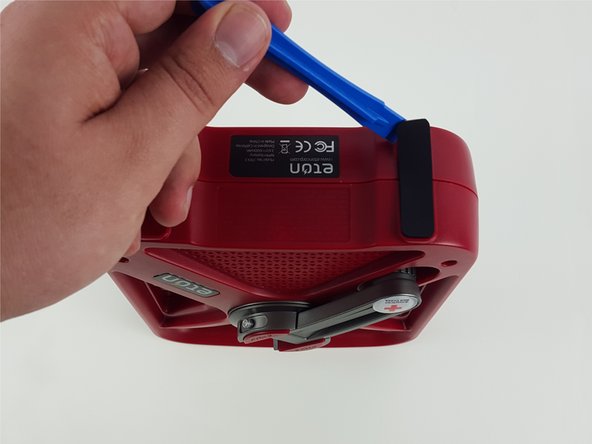
    • Pull the plastic tab on the battery compartment cover panel to loosen it, then pull the panel off.

  2. Eton FRX3 Motherboard Assembly Replacement: 步骤 2 中的图像 1,1
    • Disconnect the battery pack wires from the device and remove the battery pack.

  3. Eton FRX3 Motherboard Assembly Replacement, Case Assembly: 步骤 3 中的图像 1,1
    • Use the T10 hexagonal tip from the iFixit Bit Driver Kit or comparable tool to remove the two 22 mm hexagonal screws on the front face of the device.

  4. Eton FRX3 Motherboard Assembly Replacement: 步骤 4 中的图像 1,1
    • Remove the two 22 mm hexagonal screws on the upper rear of the device.

  5. Eton FRX3 Motherboard Assembly Replacement: 步骤 5 中的图像 1,1
    • Use a long, slender screwdriver to reach and remove the two 10 mm Phillips #00 screws recessed deep in the body of the device.

    • If you're using the 54-bit toolkit, the female hexagonal bit can be used to extend the reach of the Phillips #00 bit.

  6. Eton FRX3 Motherboard Assembly Replacement: 步骤 6 中的图像 1,1
    • On the bottom of the device are two rubber feet. Using the blue plastic opening tool, pry them up and pull straight off.

    • It’s best to place these on their non-sticky side while you work, as you’ll want them to keep as much tackiness as possible for reassembly.

  7. Eton FRX3 Motherboard Assembly Replacement: 步骤 7 中的图像 1,1
    • Pull apart the two halves of the device at the seam.

    • Three components from the back half will prevent you from fully opening the device, just unplug these connections as shown in the image.

  8. Eton FRX3 Motherboard Assembly Replacement, Tuning Dial: 步骤 8 中的图像 1,1
    • Unplug the socket connection from the motherboard as shown in the image.

  9. Eton FRX3 Motherboard Assembly Replacement: 步骤 9 中的图像 1,1
    • Remove the two 1 cm Phillips #0 screws that secure the tuning dial panel to the motherboard.

  10. Eton FRX3 Motherboard Assembly Replacement: 步骤 10 中的图像 1,1
    • Gently lift the dial upwards to remove it.

  11. Eton FRX3 Motherboard Assembly Replacement, Motherboard Assembly: 步骤 11 中的图像 1,1
    • Unplug all the component socket connections from the motherboard as shown in the image.

  12. Eton FRX3 Motherboard Assembly Replacement: 步骤 12 中的图像 1,1
    • Remove the six 1 cm Phillips #0 screws that secure the motherboard to the case.

  13. Eton FRX3 Motherboard Assembly Replacement: 步骤 13 中的图像 1,1
    • Fold the motherboard over the bottom of the device case.

    • Be careful not to damage the wires leading to the speaker.

结论

To reassemble your device, follow these instructions in reverse order.

另外一个人完成了本指南。

团队

USF Tampa, Team 1-6, Nance Spring 2016 USF Tampa, Team 1-6, Nance Spring 2016 的会员

USFT-NANCE-S16S1G6

4 名成员

创作了13篇指南

0条评论

添加评论

浏览统计数据:

过去 24 小时: 0

过去 7 天: 0

过去 30 天: 0

总计 219