你所需要的
-
-
So you've got a Technics SA-DX1050 or SA-DX950 that is displaying an F70 code. That sucks. Lets fix it.
-
-
-
-
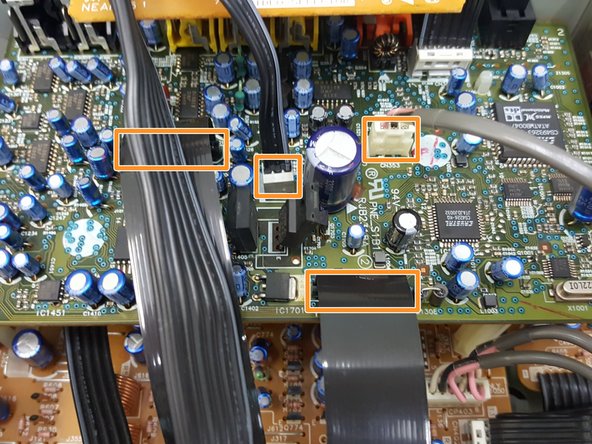
Remove six screws securing the Digital Board to the Rear Panel.
-
Remove two flex cables and two other connectors from the Digital Board.
-
Note: If you're having issues removing the connector in the third picture you should be able to rotate the Digital Board after removing everything else then pull up on the white plastic latch.
-
-
-
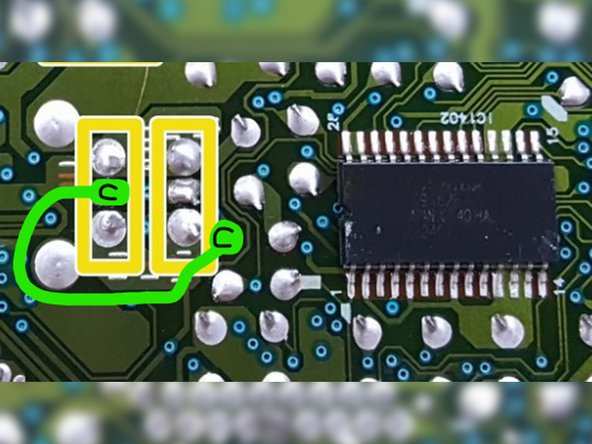
The marked solder joints tend to crack when exposed to repeated heating and cooling.
-
Make sure that there is a connection between C points in the second picture - if there's a resistance or open line add wire bridge as described with green line from C to C point. This is power so DO NOT use signal wires/kynar.
-
Note: While you have your soldering iron out make sure to inspect pretty much every other solder joint on the board and re-flow it if necessary.
-


To reassemble your device, follow these instructions in reverse order.
To reassemble your device, follow these instructions in reverse order.
18等其他人完成本指南。
团队

6条评论
Thank you - barely perceptable break on one of the joints. Reflowed and looking good.
Thanks for your help. Your suggested method saved the day.
another unit, same model. Was working. Unit shut down, now no power. Making a sound like a dripping faucet.
Suggestions?
Ken Wockey - 回复
Hello everyone, unfortunately I tried this yesterday, i took mine completely apart and cleaned it real good. To my knowledge it's not 1 lose soldier joint "tht I can c". So idk what to do now? I can't seem to find a electronic's repair shop n my area. Ima leave my zip code 27574 if anyone could lead me n the right direction of a good electronic's shop please let me know 🙏 carolinaoutlaw.69@gmail.com
Thank u, Keith
"I hope everyone has a GREAT Christmas" ! 12-9-2022
Funny Keith. You and I are the same wavelength. I'm on other side of US in Seattle. Same time. Same issue. Same error. I'm not too psyched to throw down the $ to replace this thing. My next plan is to head to a thrift store and see if I can find something similar. Someone said this in the notes on other site which seems like not a bad idea.
George H -