跳转到主内容

Electric Eel Drain Cleaner Auto-Feeder Replacement

你所需要的

  1. Electric Eel Drain Cleaner Auto-Feeder Replacement, Remove the Guide Spring: 步骤 1 中的图像 1,3 Electric Eel Drain Cleaner Auto-Feeder Replacement, Remove the Guide Spring: 步骤 1 中的图像 2,3 Electric Eel Drain Cleaner Auto-Feeder Replacement, Remove the Guide Spring: 步骤 1 中的图像 3,3
    • Unplug your drain cleaner before starting this guide. Because this device may have been used in a septic setting, it should be cleaned and disinfected as much as possible before disassembly.

    • Wear gloves to protect your hands from injury when handling the cable.

    • Ensure the cable is completely retracted into the auto-feeder.

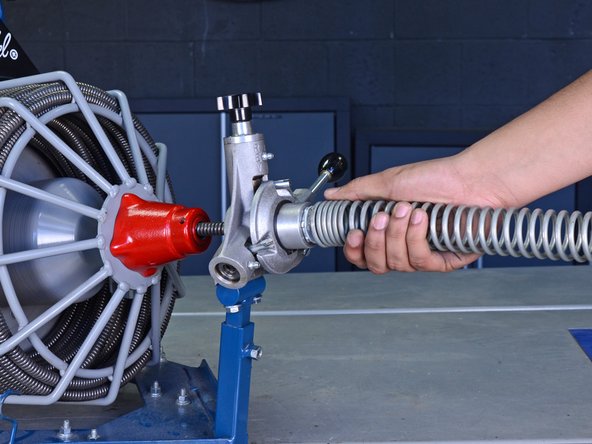
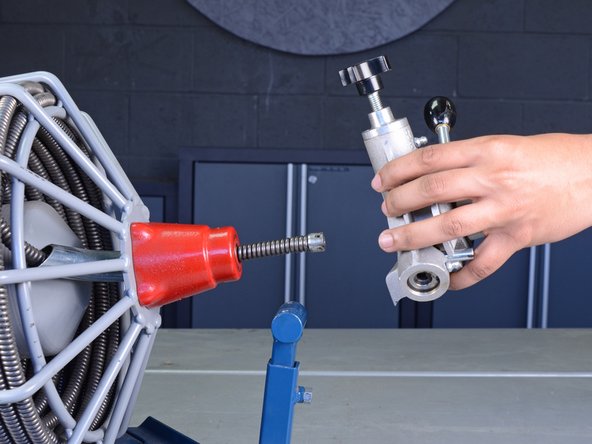
    • Twist the guide spring counter-clockwise to unscrew it from the auto-feeder.

    • Remove the guide spring.

  2. Electric Eel Drain Cleaner Auto-Feeder Replacement, Release the Tension Spring: 步骤 2 中的图像 1,3 Electric Eel Drain Cleaner Auto-Feeder Replacement, Release the Tension Spring: 步骤 2 中的图像 2,3 Electric Eel Drain Cleaner Auto-Feeder Replacement, Release the Tension Spring: 步骤 2 中的图像 3,3
    • Unscrew the tension knob to loosen the tension spring in the top feeder assembly.

  3. Electric Eel Drain Cleaner Auto-Feeder Replacement, Set the Feeder in Neutral Position: 步骤 3 中的图像 1,3 Electric Eel Drain Cleaner Auto-Feeder Replacement, Set the Feeder in Neutral Position: 步骤 3 中的图像 2,3 Electric Eel Drain Cleaner Auto-Feeder Replacement, Set the Feeder in Neutral Position: 步骤 3 中的图像 3,3
    • Set the feeder adjustment knob in the neutral position, in between the "FWD" and "REV" positions.

  4. Electric Eel Drain Cleaner Auto-Feeder Replacement, Disengage the Top Bearing: 步骤 4 中的图像 1,2 Electric Eel Drain Cleaner Auto-Feeder Replacement, Disengage the Top Bearing: 步骤 4 中的图像 2,2
    • Push the top control finger up as far as possible.

    • This disengages the top feeder assembly and allows the cable to freely move through the feeder. The finger may fall back down on its own and restrict cable movement. If this occurs, simply push the finger back up.

  5. Electric Eel Drain Cleaner Auto-Feeder Replacement, Remove the Auto-Feeder: 步骤 5 中的图像 1,1
    • Use a 1/2" open-ended wrench to remove the two bolts from the bottom of the feeder body mounting arm.

  6. Electric Eel Drain Cleaner Auto-Feeder Replacement: 步骤 6 中的图像 1,2 Electric Eel Drain Cleaner Auto-Feeder Replacement: 步骤 6 中的图像 2,2
    • Remove the auto-feeder from the cable.

    • If the end of the cable won't pass through the feeder, ensure that the top bearing is completely disengaged as described in step 4 of this guide.

结论

To reassemble your device, follow these instructions in reverse order.

另外一个人完成了本指南。

Tarun Thiruma

于11/20/19注册

35,382 声望

创作了134篇指南

3条评论

Removal of what part number? Replace with part number xxx.. Needed to do the job of replacing a part IS the part and it's part number.

KEVIN - 回复

Bearing part number

DE-10SET

Mark W -

So how do you take the rest apart to change out the bearings.

TIMOTHY - 回复

添加评论

浏览统计数据:

过去 24 小时: 0

过去 7 天: 12

过去 30 天: 45

总计 1,596