跳转到主内容

EchoMaster MRC-WLP43 Display Replacement

你所需要的

  1. EchoMaster MRC-WLP43 Display Replacement, Display: 步骤 1 中的图像 1,1
    • Take your monitor and face in down so that the back is facing up. There will be four screws on each corner of the monitors back cover. Unscrew each one and set them to the side. Remove four 1.2 mm Phillips #1 screws.

    • Don't lose your screws!

  2. EchoMaster MRC-WLP43 Display Replacement: 步骤 2 中的图像 1,2 EchoMaster MRC-WLP43 Display Replacement: 步骤 2 中的图像 2,2
    • Carefully lift the back along with the screen then flip it around slowly so the back is placed down on the table.

    • The back is connected to the motherboard and screen so lift with caution!

    • Lift your screen above the motherboard and set it down.

  3. EchoMaster MRC-WLP43 Display Replacement: 步骤 3 中的图像 1,2 EchoMaster MRC-WLP43 Display Replacement: 步骤 3 中的图像 2,2
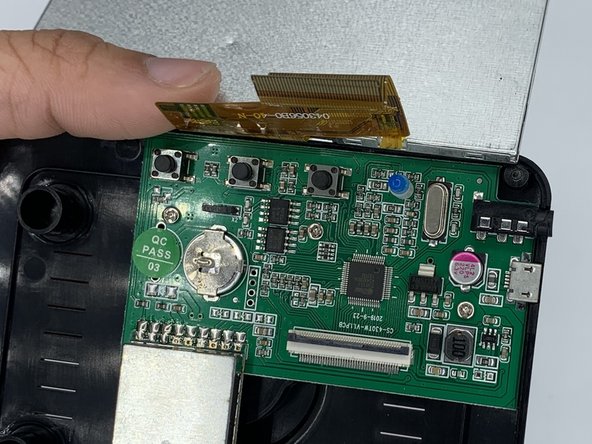
    • Once the screws are out, you can then remove the yellow strip connecting the screen to the motherboard.

    • There is a black tab that you can carefully flip up with your fingernail or a flathead screwdriver. Once it's flipped up you can easily slide the yellow ribbon out.

  4. EchoMaster MRC-WLP43 Display Replacement: 步骤 4 中的图像 1,1
    • Once your yellow ribbon is removed from the motherboard you can take out your screen.

    • To reinstall a new screen all you need to do is retrace these steps.

结论

To reassemble your device, follow these instructions in reverse order.

0条评论

添加评论

浏览统计数据:

过去 24 小时: 0

过去 7 天: 1

过去 30 天: 15

总计 110