跳转到主内容

EVGA Supernova Nex 650 G Power Supply Replacement Fan Replacement

你所需要的

  1. EVGA Supernova Nex 650 G Power Supply Replacement Fan Replacement, Power Supply Cooling Fan: 步骤 1 中的图像 1,3 EVGA Supernova Nex 650 G Power Supply Replacement Fan Replacement, Power Supply Cooling Fan: 步骤 1 中的图像 2,3 EVGA Supernova Nex 650 G Power Supply Replacement Fan Replacement, Power Supply Cooling Fan: 步骤 1 中的图像 3,3
    • Disconnect all wires attached to the power supply before performing any actions on the power supply.

    • If the power supply was recently plugged into the wall, allow 10 minutes for the internal capacitors to discharge. '

    • Caution: Failure to complete this action can result in harm to you or the power supply!

  2. EVGA Supernova Nex 650 G Power Supply Replacement Fan Replacement: 步骤 2 中的图像 1,1
    • Using the 2mm Hex Key, remove the four screws located on the four corners on the bottom (fan side) of the power supply.

  3. EVGA Supernova Nex 650 G Power Supply Replacement Fan Replacement: 步骤 3 中的图像 1,1
    • Using the 2.5 mm Hex Key, remove the four screws holding the fan and its vent on the power supply.

  4. EVGA Supernova Nex 650 G Power Supply Replacement Fan Replacement: 步骤 4 中的图像 1,3 EVGA Supernova Nex 650 G Power Supply Replacement Fan Replacement: 步骤 4 中的图像 2,3 EVGA Supernova Nex 650 G Power Supply Replacement Fan Replacement: 步骤 4 中的图像 3,3
    • Use a flat head screwdriver under the tab to remove the top from the bottom.

    • Once the top has been removed, move the fan out of the way to expose the wiring and circuit board.

    • Note the relative location of the fan. To align the fan again during reassembly, it may be beneficial to have the vent for the fan off and use your hands to align the fan with the four holes. Use two of the screws removed in the previous in opposite corners to ensure the fan is properly aligned.

  5. EVGA Supernova Nex 650 G Power Supply Replacement Fan Replacement: 步骤 5 中的图像 1,1
    • Cut the zip ties that wrap all the wire together to remove the fan wire. There are 3 zip ties to be removed. Use a xacto knife or scissors.

    • CAUTION: Be careful not to cut yourself or the lining on the wires.

  6. EVGA Supernova Nex 650 G Power Supply Replacement Fan Replacement: 步骤 6 中的图像 1,1
    • Cut the gray welding caulk material so that you can remove the fan from the motherboard

    • CAUTION: Be careful not to cut yourself or the lining on the wires.

  7. EVGA Supernova Nex 650 G Power Supply Replacement Fan Replacement: 步骤 7 中的图像 1,2 EVGA Supernova Nex 650 G Power Supply Replacement Fan Replacement: 步骤 7 中的图像 2,2
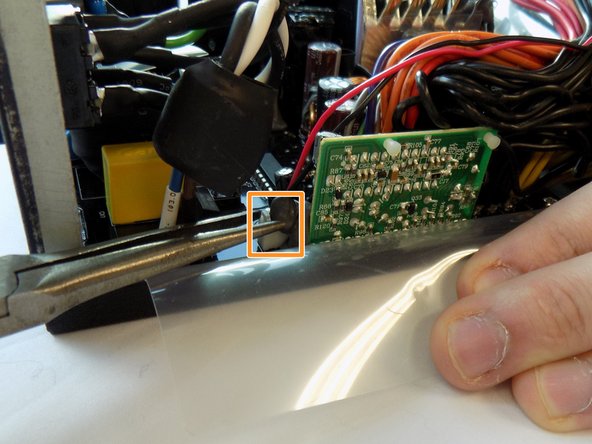
    • Follow the wire to find where the fan connects to the board.

    • Using the needle nose pliers grab onto the plastic end of the wire and pull very lightly up on the plastic. Simultaneously, use the corner of the screwdriver to apply light pressure to the two holes to release the from being connected to the board. Doing this should allow for the the fan to be released from the board.

    • Remove the defective fan from the power supply.

    • When reassembling, make sure that pins are properly lined up with the holes on the connector. Failing to do this can cause the pins to bend or break.

结论

To reassemble your device, follow these instructions in reverse order.

3等其他人完成本指南。

Jason Haisma

于10/02/17注册

155 声望

撰写一个指南

团队

Michigan Tech, Team S5-G7, Galliah Fall 2017 Michigan Tech, Team S5-G7, Galliah Fall 2017 的会员

MTU-GALLIAH-F17S5G7

2 名成员

创作了2篇指南

一条评论

Hey, I appreciate the guide! Is the owner who created this guide still around? If so please comment back. I have a few questions in regards to this power supply that I think you could answer.

Thank you!

Darren Brar - 回复

添加评论

浏览统计数据:

过去 24 小时: 3

过去 7 天: 11

过去 30 天: 54

总计 4,911