跳转到主内容

DualShock 4 CHU-ZCT2U Buttons Replacement

已存档的指南
本指南只作为历史记录保留。请使用指南的最新版本来进行维修。

你所需要的

  1. DualShock 4 CHU-ZCT2U Buttons Replacement, Outer Shell: 步骤 1 中的图像 1,3 DualShock 4 CHU-ZCT2U Buttons Replacement, Outer Shell: 步骤 1 中的图像 2,3 DualShock 4 CHU-ZCT2U Buttons Replacement, Outer Shell: 步骤 1 中的图像 3,3
    • Unscrew the four 6.5mm screws, using a Phillips-Head screwdriver.

    • Pry the two halves of the shell apart using a plastic opening tool.

    • Be careful, as there will be a ribbon connecting the inner workings of the controller. It will not separate into two parts just by pulling apart the shell.

  2. DualShock 4 CHU-ZCT2U Buttons Replacement: 步骤 2 中的图像 1,3 DualShock 4 CHU-ZCT2U Buttons Replacement: 步骤 2 中的图像 2,3 DualShock 4 CHU-ZCT2U Buttons Replacement: 步骤 2 中的图像 3,3
    • Pull the ribbon cable out of the motherboard port to fully separate the two halves, using a pair of tweezers.

  3. DualShock 4 CHU-ZCT2U Buttons Replacement, Battery: 步骤 3 中的图像 1,3 DualShock 4 CHU-ZCT2U Buttons Replacement, Battery: 步骤 3 中的图像 2,3 DualShock 4 CHU-ZCT2U Buttons Replacement, Battery: 步骤 3 中的图像 3,3
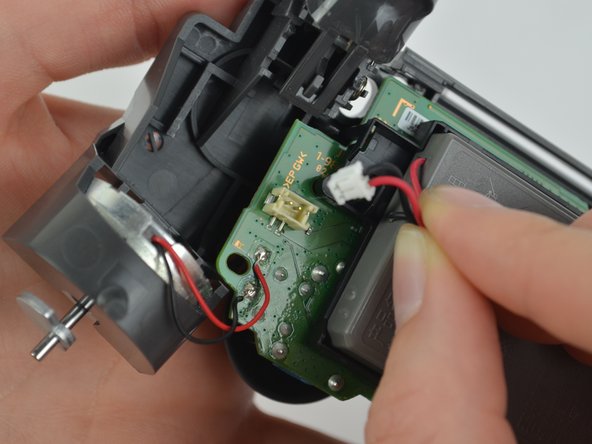
    • Unplug the black and red wires from the power port located on the motherboard.

    • Remove the old battery from the controller.

  4. DualShock 4 CHU-ZCT2U Buttons Replacement: 步骤 4 中的图像 1,2 DualShock 4 CHU-ZCT2U Buttons Replacement: 步骤 4 中的图像 2,2
    • Remove the 6.43mm screw connecting the motherboard to the inner workings of the controller, using a Phillips-Head screwdriver.

  5. DualShock 4 CHU-ZCT2U Buttons Replacement: 步骤 5 中的图像 1,3 DualShock 4 CHU-ZCT2U Buttons Replacement: 步骤 5 中的图像 2,3 DualShock 4 CHU-ZCT2U Buttons Replacement: 步骤 5 中的图像 3,3
    • Unhook the battery case from the motherboard, and pull it off.

  6. DualShock 4 CHU-ZCT2U Buttons Replacement, Buttons: 步骤 6 中的图像 1,3 DualShock 4 CHU-ZCT2U Buttons Replacement, Buttons: 步骤 6 中的图像 2,3 DualShock 4 CHU-ZCT2U Buttons Replacement, Buttons: 步骤 6 中的图像 3,3
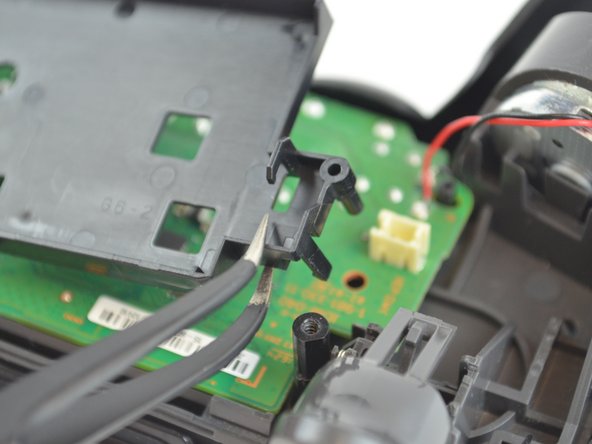
    • Pull out the second ribbon cable to separate the inner workings from the top of the outer shell.

  7. DualShock 4 CHU-ZCT2U Buttons Replacement: 步骤 7 中的图像 1,3 DualShock 4 CHU-ZCT2U Buttons Replacement: 步骤 7 中的图像 2,3 DualShock 4 CHU-ZCT2U Buttons Replacement: 步骤 7 中的图像 3,3
    • Remove the rubber pads that secure the buttons in place for the arrow buttons, shape buttons, and Playstation Home button.

    • Do not turn the front shell cover upside down after completing this step, because some of the buttons may fall out.

  8. DualShock 4 CHU-ZCT2U Buttons Replacement: 步骤 8 中的图像 1,2 DualShock 4 CHU-ZCT2U Buttons Replacement: 步骤 8 中的图像 2,2
    • Remove the old buttons, and replace them with new ones using a pair of tweezers.

结论

To reassemble your device, follow these instructions in reverse order.

41等其他人完成本指南。

Michelle Joseph

于10/09/17注册

1,762 声望

创作了3篇指南

团队

USF Tampa, Team S1-G5, Leahy Fall 2017 USF Tampa, Team S1-G5, Leahy Fall 2017 的会员

USFT-LEAHY-F17S1G5

3 名成员

创作了22篇指南

2条评论

Where can I buy cuh zct2e spares from please

Paramdeep Dhaliwal - 回复

Can’t see an updated guide, and this one worked perfectly fine. Used to replace the buttons on a knock-off DualShock 4 from AliExpress. Construction was largely the same, only devoid of a screw anchoring the battery cradle. Would argue this was an extremely easy repair!

Casey - 回复

添加评论

浏览统计数据:

过去 24 小时: 11

过去 7 天: 97

过去 30 天: 361

总计 28,005