跳转到主内容

DualShock 4 (CUH-ZCT1U) Buttons Replacement

你所需要的

  1. DualShock 4 (CUH-ZCT1U) Buttons Replacement, Check your controller model: 步骤 1 中的图像 1,1
    • Check the model number on the back of your controller. This guide was written using model CUH-ZCT1U. If you have another model, the guide procedure and replacement parts may differ slightly.

    • If you have the second generation DualShock 4, model CUH-ZCT2U, use these guides.

  2. DualShock 4 (CUH-ZCT1U) Buttons Replacement, Unfasten the rear case: 步骤 2 中的图像 1,2 DualShock 4 (CUH-ZCT1U) Buttons Replacement, Unfasten the rear case: 步骤 2 中的图像 2,2
    在这个步骤中使用的工具:
    Microfiber Cleaning Cloths
    $3.99
    购买
    • If you need to stabilize your controller during this repair, lay it on a soft surface such as a microfiber cloth.

    • Use a Phillips screwdriver to remove the four 6.4 mm-long screws securing the rear case.

  3. DualShock 4 (CUH-ZCT1U) Buttons Replacement, Remove the L1 button: 步骤 3 中的图像 1,3 DualShock 4 (CUH-ZCT1U) Buttons Replacement, Remove the L1 button: 步骤 3 中的图像 2,3 DualShock 4 (CUH-ZCT1U) Buttons Replacement, Remove the L1 button: 步骤 3 中的图像 3,3
    • Use an opening pick to pry each corner of the L1 button from the front case.

    • Cover the button to prevent it from ejecting out of your workspace.

    • Remove the button.

  4. DualShock 4 (CUH-ZCT1U) Buttons Replacement, Remove the R1 button: 步骤 4 中的图像 1,1
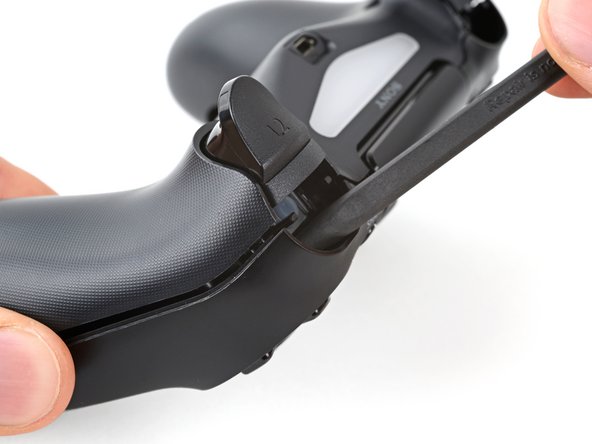
    • Use your opening pick to pry and remove the R1 button, just as you did for the L1 button.

  5. DualShock 4 (CUH-ZCT1U) Buttons Replacement, Unclip the rear case: 步骤 5 中的图像 1,3 DualShock 4 (CUH-ZCT1U) Buttons Replacement, Unclip the rear case: 步骤 5 中的图像 2,3 DualShock 4 (CUH-ZCT1U) Buttons Replacement, Unclip the rear case: 步骤 5 中的图像 3,3
    • Six plastic clips secure the rear case to the front case. The next four steps demonstrate how to release these clips before you can open the controller.

    • Insert your opening pick at a downward angle between the front case and rear case, halfway between the handle and the action buttons.

    • Slide your pick toward the handle and pry up to release the first clip.

    • Repeat this procedure on the other side of the controller to release the second clip.

  6. DualShock 4 (CUH-ZCT1U) Buttons Replacement: 步骤 6 中的图像 1,3 DualShock 4 (CUH-ZCT1U) Buttons Replacement: 步骤 6 中的图像 2,3 DualShock 4 (CUH-ZCT1U) Buttons Replacement: 步骤 6 中的图像 3,3
    • Two more clips secure the rear case near the extension port and the headphone jack.

    • Insert your opening pick between the front case and rear case at either side of the ports.

    • Twist your pick to unclip this section of the rear case from the front case.

    • If the rear case feels stuck, insert and twist your pick from different angles.

    • Don't open the controller yet, as it's still held together by two very delicate clips near the triggers.

  7. DualShock 4 (CUH-ZCT1U) Buttons Replacement: 步骤 7 中的图像 1,1
    • The final two clips are very delicate, and must be disengaged from inside the controller. If you break them, don't worry—it won't affect this repair or your controllers functionality.

    • Locate the clips by looking through the gap above the R2 or L2 buttons.

  8. DualShock 4 (CUH-ZCT1U) Buttons Replacement: 步骤 8 中的图像 1,3 DualShock 4 (CUH-ZCT1U) Buttons Replacement: 步骤 8 中的图像 2,3 DualShock 4 (CUH-ZCT1U) Buttons Replacement: 步骤 8 中的图像 3,3
    • Insert the point of a spudger through the gap above the R2 button and push the retaining clip outward.

    • While pushing the clip outward, slowly pull the rear case away from the front case until you feel them separate.

    • Don't fully open the controller until each of the R2 and L2 clips have been disengaged.

    • Repeat this procedure for the clip near the L2 button.

  9. DualShock 4 (CUH-ZCT1U) Buttons Replacement, Remove the rear case: 步骤 9 中的图像 1,3 DualShock 4 (CUH-ZCT1U) Buttons Replacement, Remove the rear case: 步骤 9 中的图像 2,3 DualShock 4 (CUH-ZCT1U) Buttons Replacement, Remove the rear case: 步骤 9 中的图像 3,3
    • Press the R2 button and slide the rear case over it.

  10. DualShock 4 (CUH-ZCT1U) Buttons Replacement: 步骤 10 中的图像 1,1
    • Press the L2 button and slide the rear case over it.

  11. DualShock 4 (CUH-ZCT1U) Buttons Replacement: 步骤 11 中的图像 1,3 DualShock 4 (CUH-ZCT1U) Buttons Replacement: 步骤 11 中的图像 2,3 DualShock 4 (CUH-ZCT1U) Buttons Replacement: 步骤 11 中的图像 3,3
    • Flip the rear case over the top of the controller and lay it down, being careful not to strain the interconnect cable.

  12. DualShock 4 (CUH-ZCT1U) Buttons Replacement, Disconnect the interconnect cable: 步骤 12 中的图像 1,3 DualShock 4 (CUH-ZCT1U) Buttons Replacement, Disconnect the interconnect cable: 步骤 12 中的图像 2,3 DualShock 4 (CUH-ZCT1U) Buttons Replacement, Disconnect the interconnect cable: 步骤 12 中的图像 3,3
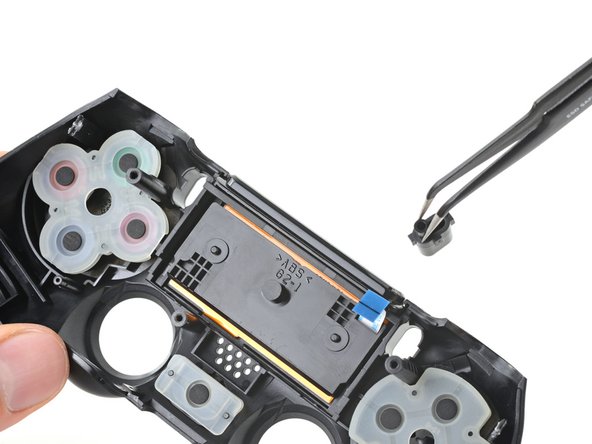
    • Use tweezers or your fingers to remove the interconnect cable by pulling its blue pull tab straight out of the socket.

    • During reassembly, reconnect the cable with its blue pull tab facing the outside of the controller.

  13. DualShock 4 (CUH-ZCT1U) Buttons Replacement, Disconnect the battery: 步骤 13 中的图像 1,2 DualShock 4 (CUH-ZCT1U) Buttons Replacement, Disconnect the battery: 步骤 13 中的图像 2,2
    • Use tweezers or your fingers to grab and disconnect the head of the battery cable from the motherboard.

    • Only pull on the head of the connector—don't pull on the cable itself.

  14. DualShock 4 (CUH-ZCT1U) Buttons Replacement, Remove the battery: 步骤 14 中的图像 1,1
    • Remove the battery.

  15. DualShock 4 (CUH-ZCT1U) Buttons Replacement, Remove the reset button extension: 步骤 15 中的图像 1,2 DualShock 4 (CUH-ZCT1U) Buttons Replacement, Remove the reset button extension: 步骤 15 中的图像 2,2
    • Grab and remove the reset button extension from its recess in the battery bracket.

  16. DualShock 4 (CUH-ZCT1U) Buttons Replacement, Remove the battery bracket: 步骤 16 中的图像 1,3 DualShock 4 (CUH-ZCT1U) Buttons Replacement, Remove the battery bracket: 步骤 16 中的图像 2,3 DualShock 4 (CUH-ZCT1U) Buttons Replacement, Remove the battery bracket: 步骤 16 中的图像 3,3
    • Locate the two clips securing the battery bracket to the motherboard.

    • Insert the point of your spudger into the opening behind the right bracket clip.

    • Depress the clip to disengage it from the motherboard.

    • Lift up the right edge of the battery bracket.

  17. DualShock 4 (CUH-ZCT1U) Buttons Replacement: 步骤 17 中的图像 1,2 DualShock 4 (CUH-ZCT1U) Buttons Replacement: 步骤 17 中的图像 2,2
    • Insert the point of your spudger in the opening behind the left bracket clip.

    • Depress the clip to disengage it from the motherboard.

    • Remove the battery bracket.

  18. DualShock 4 (CUH-ZCT1U) Buttons Replacement, Disconnect the touch pad: 步骤 18 中的图像 1,3 DualShock 4 (CUH-ZCT1U) Buttons Replacement, Disconnect the touch pad: 步骤 18 中的图像 2,3 DualShock 4 (CUH-ZCT1U) Buttons Replacement, Disconnect the touch pad: 步骤 18 中的图像 3,3
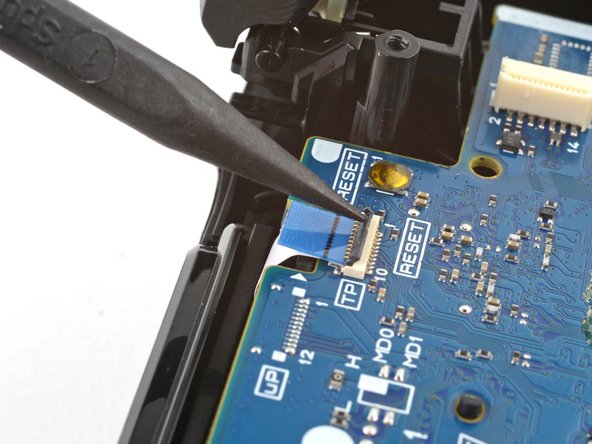
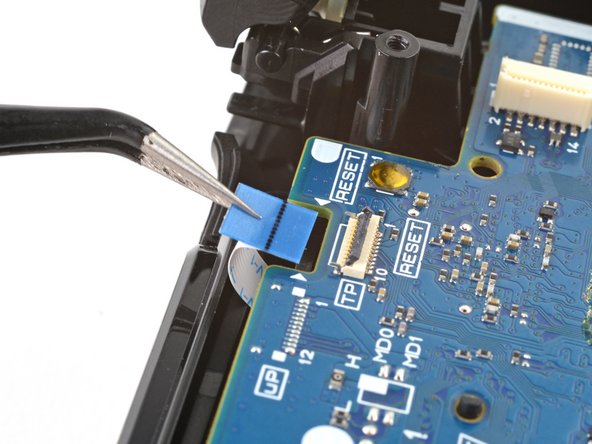
    • Use the point of your spudger to flip up the locking flap securing the touch pad cable ZIF connector.

    • Use tweezers or your fingers to disconnect the cable using its blue pull tab.

  19. DualShock 4 (CUH-ZCT1U) Buttons Replacement, Unfasten the motherboard: 步骤 19 中的图像 1,1
    • Use your Phillips screwdriver to remove the 6.4 mm screw securing the motherboard.

    • During reassembly, hold the motherboard tight to the front case before fastening it. Test each button to ensure the silicone button pads are properly aligned. If each button presses as expected, fasten the motherboard.

  20. DualShock 4 (CUH-ZCT1U) Buttons Replacement, Remove the midframe: 步骤 20 中的图像 1,2 DualShock 4 (CUH-ZCT1U) Buttons Replacement, Remove the midframe: 步骤 20 中的图像 2,2
    • Grab the midframe by its plastic protrusions or the vibration motors and remove it.

    • Be careful not to separate the motherboard from the midframe, as they're only connected to each other by the vibration motor cables.

    • During reassembly, take your time positioning the midframe. Use the alignment posts to help guide it into place, and make sure the touch pad cable doesn't become trapped underneath.

  21. DualShock 4 (CUH-ZCT1U) Buttons Replacement, Remove the Share and Options buttons: 步骤 21 中的图像 1,3 DualShock 4 (CUH-ZCT1U) Buttons Replacement, Remove the Share and Options buttons: 步骤 21 中的图像 2,3 DualShock 4 (CUH-ZCT1U) Buttons Replacement, Remove the Share and Options buttons: 步骤 21 中的图像 3,3
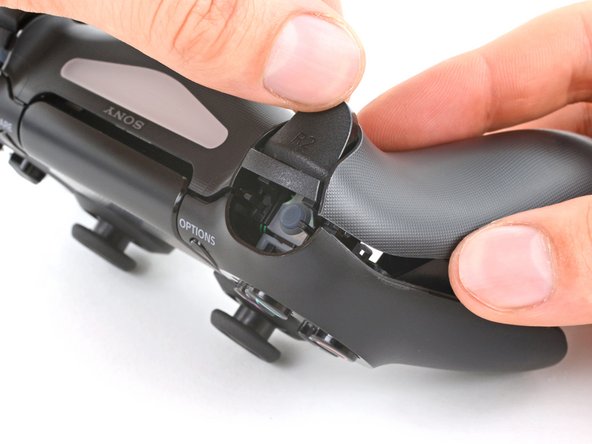
    • Remove the Share and Options buttons from the front case.

    • During reassembly, there's only one way for each button to insert. If one doesn't fit, flip it and try the other recess.

    On the model CUH-ZCT2E the share and options buttons are not removable. Skip this step.

    Konrad Skeri Ekblad - 回复

  22. DualShock 4 (CUH-ZCT1U) Buttons Replacement, Remove the silicone button pads: 步骤 22 中的图像 1,3 DualShock 4 (CUH-ZCT1U) Buttons Replacement, Remove the silicone button pads: 步骤 22 中的图像 2,3 DualShock 4 (CUH-ZCT1U) Buttons Replacement, Remove the silicone button pads: 步骤 22 中的图像 3,3
    • Remove the three silicone button pads from their buttons in the front case:

    • The squared off pad for the directional pad

    • The rounded pad for the action buttons

    • The small pad for the home button

    • If you wish to remove the silicone button pads for the touch pad, Share, and Options buttons, follow this step. Otherwise, continue for the standard set of buttons.

    • During reassembly, align the pads over their cutouts in the front case and apply pressure to secure them. The directional pad and action button pad can be rotated in any direction. Orient the home button pad with the opening of the U-shaped cutout facing the touch pad.

  23. DualShock 4 (CUH-ZCT1U) Buttons Replacement, Remove the remaining buttons: 步骤 23 中的图像 1,3 DualShock 4 (CUH-ZCT1U) Buttons Replacement, Remove the remaining buttons: 步骤 23 中的图像 2,3 DualShock 4 (CUH-ZCT1U) Buttons Replacement, Remove the remaining buttons: 步骤 23 中的图像 3,3
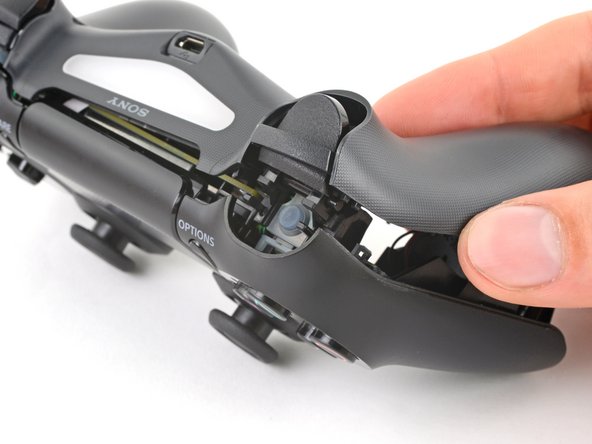
    • Remove the directional pad, action buttons, and home button from the front case.

    • During reassembly, use the alignment tabs to orient each button into its recess. Each one is keyed specifically for its recess and proper orientation.

结论

Compare your new replacement part to the original part—you may need to transfer remaining components or remove adhesive backings from the new part before installing.

To reassemble your device, follow these instructions in reverse order.

Take your e-waste to an R2 or e-Stewards certified recycler.

Repair didn’t go as planned? Try some basic troubleshooting, or ask our Answers community for help.

119等其他人完成本指南。

Clay Eickemeyer

于09/19/22注册

66,007 声望

创作了453篇指南

团队

iFixit iFixit 的会员

Staff

135 名成员

创作了16,757篇指南

23条评论

I pulled out my touch pad along with the motherboard when it was still attached how can I put this back in

Landen Nipper - 回复

Pull out the ribbon the way the tutorial says and then you can place the touchpad back correctly. It needs to be put in from the inside of the controller, not the outside.

Luis Rodriguez -

where is how replace L2/R2? D=

ps4 - 回复

This guide could be enhanced by showing the L1/L2, R1/R2 button cluster in some photos. I needed to replace the silicone grommet underneath the buttons due to Sony's design flaw of having R2/L2 press on the silicone with a blade shaped extension.

Joseph Bruni - 回复

What to do If after cleaning some buttons no longer work? I was very careful when disassembling and reassembling the remote.

Amanda G Clark - 回复

You might wanna make sure that flimsy plastic lining the buttons push is in its proper place. Sometimes it moves and if it doesn't line up just right it won't work.

Luis Rodriguez -

I took the "caveman" approach to this tutorial because I spilled soda near the controller and the circle button was sticky. It was an emergency operation done with a Phillips one size too large, a pocket knife for a spudger, and my cigar fingers for forceps. I must say, after some initial confusion, this tutorial helped me put it back together easily without breaking anything (a minor miracle all on its own). Thank for this.

Luis Rodriguez - 回复

I need help. The up and right direction on the d-pad are not functioning. I took controller apart and made sure everything was clean and unfortunately did not fix problem. My question is has anyone else had this issue and if I buy a new silicon part for the d-pad will that fix it?

Borg914 - 回复

My R2 button is constant being pressed. Even after I opened it and cleaned it. Please help me with this??

I connected it to pc and even removed the R2 button while checking for the buttons on pc,and button 8 (I.e R2 button on controller) shows as pressed all the time even when it's not there.

Obaid Haideri - 回复

The “up" button on my d-pad has not been working recently so I followed the tutorial (helpful by the way), found no obvious problems, put it all back together, but the button still will not work. Any tips?

Fragasha - 回复

Are the contacts lining up right? That might be the problem.

Luis Rodriguez -

how to clean the green circuit board because ps button is unresponsive? the true circuit button how to clean or repair it? cause mine is not responding in the motherboard assembly

ruzzyricor - 回复

My vibration motor has fallen out and the wires are disconnected, how can I fix it?

Morris Vahla - 回复

After I did this my right dpad button stopped functioning, is there a way to fix this?

maltamirano26 - 回复

Where can I buy Grey Reset Button Extension

mcj0064 - 回复

This is the original model. How about an update since there have been about 3 new assemblies and a new version of the DS4?

Eli Hanson - 回复

Here is a solution to a broken R2 button. Really simple fix.

https://youtu.be/Lx3La8a169Q

Alex Manzano - 回复

My PS4 is registering R2 button input without me pressing anything on the Dualshock 4. How can I fix it? This is only apparent when I play games… For example, when I play Spiderman where R2 is used for sprinting and web swinging, Spiderman will alternate between running and jogging, without me actually providing any kind of input via R2.

vinaymenon64 - 回复

I have a triangle button sticking when i play a combat game it just happen the other day.

It seems stuck down in the controler it still work but it hard to press down when i need to use it.

What do you think the problem is?

jac02874 - 回复

Thank you so much

Hussain Safaa - 回复

After reassembling the controller won’t connect to the ps4. It will connect to the iPhone though.. what can I do?

ren smith - 回复

Le bouton carré ne fonctionne pas, que dois-je faire ?

adel25001 - 回复

As of March 14, 2023, this guide has been updated! Comments regarding step procedures may no longer be relevant.

Clay Eickemeyer - 回复

添加评论

浏览统计数据:

过去 24 小时: 54

过去 7 天: 268

过去 30 天: 1,194

总计 255,855