跳转到主内容
加入维修社区 - 创建账户

此翻译由机器生成,尚未经过人工审核。 会说这种语言吗? 查看评论

拆卸JBLCharge Casing

你所需要的

    1. 拆卸JBLCharge Casing, 外壳: 步骤 1 中的图像 1,3 拆卸JBLCharge Casing, 外壳: 步骤 1 中的图像 2,3 拆卸JBLCharge Casing, 外壳: 步骤 1 中的图像 3,3
      • 在开始拆卸扬声器之前,请确保设备已断开电源。

      • 使用Jimmy或金属撬棒从扬声器上拆下外壳。

      询问修复机器人

      添加评论

    2. 拆卸JBLCharge Casing: 步骤 2 中的图像 1,2 拆卸JBLCharge Casing: 步骤 2 中的图像 2,2
      • 使用PH1螺丝刀从电池盖板上取下全部五颗6毫米螺丝。

      • 取出电池盖板并将盖板放在一边。

      询问修复机器人

      添加评论

    3. 拆卸JBLCharge Casing: 步骤 3 中的图像 1,2 拆卸JBLCharge Casing: 步骤 3 中的图像 2,2
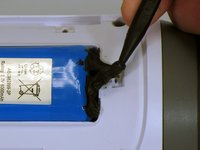
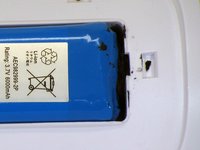
      • 使用撬棒小心地清除将电池固定在电池仓内的液态电工胶带。

      • 小心不要刺穿电池,或损坏液态电工胶带下的电池线。

      添加评论

    4. 拆卸JBLCharge Casing: 步骤 4 中的图像 1,2 拆卸JBLCharge Casing: 步骤 4 中的图像 2,2
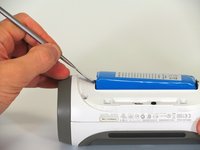
      • 使用撬棒将电池从设备中撬出。

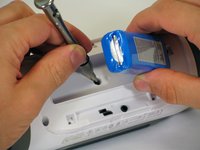
      • 抬起电池末端(不带连接线的一端),将其下方的 16 mm PH2 螺丝拧下。

      • 注意连接电池和设备的电线。完全拆下电池可能会损坏电线。不要使用金属撬棒拆卸电池,否则可能会造成损坏。

      询问修复机器人

      添加评论

    5. 拆卸JBLCharge Casing: 步骤 5 中的图像 1,2 拆卸JBLCharge Casing: 步骤 5 中的图像 2,2
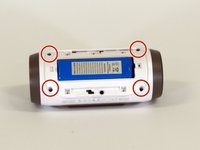
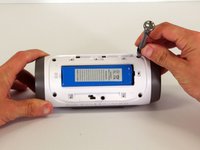
      • 用PH2螺丝刀从白色塑料外壳上拆下四颗16 mm螺丝。

      添加评论

    6. 拆卸JBLCharge Casing: 步骤 6 中的图像 1,2 拆卸JBLCharge Casing: 步骤 6 中的图像 2,2
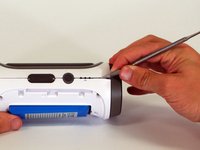
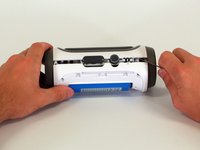
      • 从设备外壳与侧面接合的角落开始,用尖头金属撬棒撬开后盖与扬声器之间的接缝,并分离胶水。

      • 沿着这些接缝滑动金属撬棒,将后盖与扬声器的其余部分分开。

      询问修复机器人

      添加评论

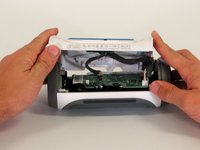
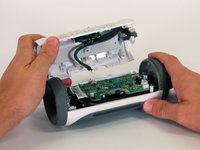
    7. 拆卸JBLCharge Casing: 步骤 7 中的图像 1,2 拆卸JBLCharge Casing: 步骤 7 中的图像 2,2
      • 一旦后盖打开,请断开主板上的三个白色连接器。

      • 取下上层外壳。

      添加评论

结论

要重新组装您的设备,请按照本指南并按照相反的顺序执行操作。

取消:我没有完成这个指南。

36等其他人完成本指南。

由衷感谢以下译者:

en zh

100%

笑得像个300斤的孩子正在帮助我们修复这个世界! 您也想加入吗?
开始翻译 ›

Joe Durand

于04/01/15注册

2,313 声望

创作了2篇指南

团队

Cal Poly, Team 12-4, Lancaster Spring 2015 Cal Poly, Team 12-4, Lancaster Spring 2015 的会员

CPSU-LANCASTER-S15S12G4

2 名成员

创作了48篇指南

11指南评论

Breaking apart the halves takes patience. Took 30 minutes. Mine was glued together like a tank, and it was not easy at all to separate the halves. Maybe JBL saw this post and doubled the glue to dissuade DIY fixes. Once I separated the halves, it was easy, but be prepared to get moderately frustrated in doing so. Also, don't get angry and try to force them apart, because from my experience, I do believe there is a high risk potential of cracking either halve if attempting to brute force the issue. Remember, patience is a virtue here. Lastly, you can get a good set of spudger tools at Harbor Freight Tools for cheap. They are actually called Wax Carving tools made in India of stainless steel. Excellent set to complete this fix, and I can see that they will be very useful in the future if needed. 10/10 for the author for the breakdown instructions. Cheers!

Zabrot - 回复 分享

Follow these directions, Do not deviate from the path and you shall find Success awaits at journey's end.

rufusleehung - 回复 分享

one essential moment. when you're trying to disasemble a cover there is also one bolt under the battery socket! it not shown on step 5!

freddyfresh90 - 回复 分享

It is told in step 4, but not shown. I looked up this guide when I was stuck after step 5 lol

Btw I am the editor as of Saturday, 27/August/2016. Mine had 4 PH2 screws around the outside and 1 ph2 under the battery. I am not sure if that is how it always was

ion418 - 回复 分享

smooth sailing until step 6. Finally gave up and trashed it out of frustration.

fredblue - 回复 分享

添加评论

浏览统计数据:

过去 24 小时: 15

过去 7 天: 103

过去 30 天: 382

总计 93,031