跳转到主内容
Dell XPS 15 9510 SSD Replacement

Dell XPS 15 9510 SSD Replacement

Austin Sa

Austin Sa3 其他贡献者

最后更新于 March 8, 2023

没有估计
中等
需要更多图片
更好的介绍
缺少细节

你所需要的

修复工具包

本套装包含完成指南所需的所有零件和工具。

配件

工具

  • Spudger
    Spudger
  • T5 Torx Screwdriver
    T5 Torx Screwdriver
  • Phillips #00 Screwdriver
    Phillips #00 Screwdriver

查看更多...

  1. Dell XPS 15 9510 SSD Replacement, Lower Case: 步骤 1 中的图像 1,1
    • Make sure the laptop is powered off and unplug all cables before beginning any repair.

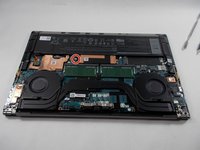
    • Remove eight 3 mm screws from the underside of the case using a T5 Torx screwdriver.

  2. Dell XPS 15 9510 SSD Replacement: 步骤 2 中的图像 1,1
    • The metal case of the XPS 15 9510 is extremely sharp, so be careful not to run your fingers along the edge when disassembling the laptop.

    • Wedge the case apart with a nylon spudger.

    • If the plastic one isn't possible to insert, use the metal spudger to carefully create a small gap first.

    • Slide spudger along each side of the laptop

  3. Dell XPS 15 9510 SSD Replacement: 步骤 3 中的图像 1,1
    • The metal case of the XPS 15 9510 is extremely sharp, so be careful not to run your fingers along the edge when disassembling the laptop.

    • Lift the back panel of the laptop off and set it aside.

  4. Dell XPS 15 9510 SSD Replacement, SSD: 步骤 4 中的图像 1,2 Dell XPS 15 9510 SSD Replacement, SSD: 步骤 4 中的图像 2,2
    • Remove the single screw from the left side of the SSD using a Phillips #00 screwdriver.

    • The SSD is spring-released; it will pop up after removing the screw.

  5. Dell XPS 15 9510 SSD Replacement: 步骤 5 中的图像 1,1
    • Use your fingers to carefully remove the SSD from the laptop.

结论

To reassemble your device, follow these instructions in reverse order.

3等其他人完成本指南。

Austin Sa

于03/30/22注册

432 声望

创作了3篇指南

团队

UMass Dartmouth, Team 1-3, Mellen Spring 2022 UMass Dartmouth, Team 1-3, Mellen Spring 2022 的会员

UMASSD-MELLEN-S22S1G3

3 名成员

创作了5篇指南

0指南评论

添加评论

浏览统计数据:

过去 24 小时: 4

过去 7 天: 12

过去 30 天: 68

总计 4,405