跳转到主内容

当前版本的文档还未经巡查,您可以查看最新的已查核版本

已存档的指南
本指南只作为历史记录保留。请使用指南的最新版本来进行维修。

你所需要的

  1. , 后盖: 步骤 1 中的图像 1,2 , 后盖: 步骤 1 中的图像 2,2
    • 从底盖上卸下八颗4毫米 T5 梅花螺丝。

  2. : 步骤 2 中的图像 1,2 : 步骤 2 中的图像 2,2
    • 使用塑料撬棒撬开中间的“ XPS”挡板。

  3. : 步骤 3 中的图像 1,1
    • 卸下隐藏在挡板下面的单个十字螺丝。

  4. : 步骤 4 中的图像 1,1
    • 从后盖边缘开始,使用撬片或塑料撬棒撬开卡扣。

  5. : 步骤 5 中的图像 1,1
    • 移除后盖。

  6. , 断开电池的连接: 步骤 6 中的图像 1,2 , 断开电池的连接: 步骤 6 中的图像 2,2
    • 将电池电缆连接器拉向电池以将其与插座断开。

    • 如果连接器很顽固,请在一侧轻轻推一下,然后在另一侧推,让它从插座中“走”出来。

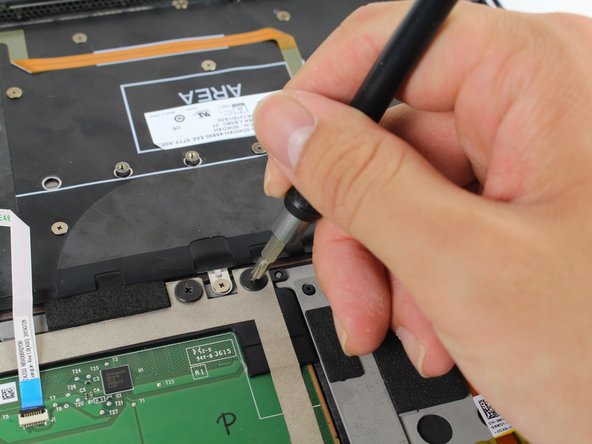
    • 如果你无法将连接器从插座中取出,请使用撬棒尖轻轻推动连接器凹口,将连接器滑出。

    • 千万不要拉起电池。

    • 打开显示屏并按住电源按钮五秒钟以耗尽系统中的所有剩余电量。

  7. 这个步骤还没有翻译 帮忙翻译一下

    : 步骤 7 中的图像 1,2 : 步骤 7 中的图像 2,2
    • Remove the four 3 mm Phillips #0 screws located on each corner of the battery.

  8. 这个步骤还没有翻译 帮忙翻译一下

    : 步骤 8 中的图像 1,2 : 步骤 8 中的图像 2,2
    • Pull the battery cable connector towards the battery to disconnect it from its socket.

    • Do not pull up.

  9. 这个步骤还没有翻译 帮忙翻译一下

    : 步骤 9 中的图像 1,1
    • Peel up any tape securing the speaker cables to the battery.

    • You do not need to remove the speakers, only the tape, allowing the battery to be removed out under the speaker cables.

  10. 这个步骤还没有翻译 帮忙翻译一下

    : 步骤 10 中的图像 1,1
    • Remove the battery.

  11. 这个步骤还没有翻译 帮忙翻译一下

    : 步骤 11 中的图像 1,2 : 步骤 11 中的图像 2,2
    • Remove the four 3 mm Phillips #1 screws from the trackpad.

  12. 这个步骤还没有翻译 帮忙翻译一下

    : 步骤 12 中的图像 1,1
    • Use tweezers to gently lift the upper-right corner of the track pad.

    • Remove the track pad by slowly pulling it up and away from you.

终点

4等其他人完成本指南。

Arvind Krish

于04/26/17注册

179 声望

撰写一个指南

团队

Cal Poly, Team S21-G6, Livingston Spring 2017 Cal Poly, Team S21-G6, Livingston Spring 2017 的会员

CPSU-LIVINGSTON-S17S21G6

5 名成员

创作了30篇指南

0条评论

添加评论

浏览统计数据:

过去 24 小时: 6

过去 7 天: 34

过去 30 天: 136

总计 13,291