跳转到主内容

Dell Wyse Xn0m Fan Replacement

你所需要的

  1. Dell Wyse Xn0m Fan Replacement, Fan: 步骤 1 中的图像 1,3 Dell Wyse Xn0m Fan Replacement, Fan: 步骤 1 中的图像 2,3 Dell Wyse Xn0m Fan Replacement, Fan: 步骤 1 中的图像 3,3
    • Use a spudger to unclip the keyboard from the main body by disengaging the clips lined around the top and sides of the keyboard.

    • Once lifted, push the white slider holding blue ribbon cable and put keyboard to the side.

  2. Dell Wyse Xn0m Fan Replacement: 步骤 2 中的图像 1,1
    • With the spudger, remove sliders that are holding the purple ribbon cable.

    • Disconnect cable by the power button.

  3. Dell Wyse Xn0m Fan Replacement: 步骤 3 中的图像 1,1
    • Remove the five 7mm Phillips #1 screws underneath the keyboard.

  4. Dell Wyse Xn0m Fan Replacement: 步骤 4 中的图像 1,1
    • Close the laptop and flip it over.

    • Remove eight 7mm Phillips #1 screws along the edges of laptop.

    • Put these screws to the side (make sure to keep them apart from keyboard screws).

  5. Dell Wyse Xn0m Fan Replacement: 步骤 5 中的图像 1,1
    • After removing the screws, flip the laptop back over and open the screen.

    • Lift the laptop's keyboard/mouse pad top with an opening tool.

  6. Dell Wyse Xn0m Fan Replacement: 步骤 6 中的图像 1,2 Dell Wyse Xn0m Fan Replacement: 步骤 6 中的图像 2,2
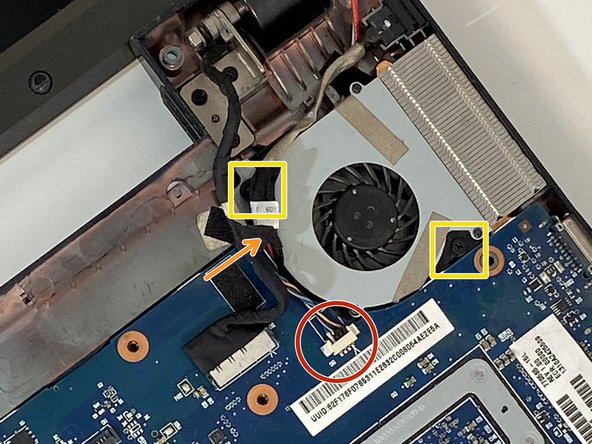
    • Unplug the cable connecting the fan to the motherboard.

    • Lift the tape holding down the cables over the fan.

    • Undo two 5mm Phillips #1 screws.

    • The top left screw is covered by the cables. Use a spudger to get it out of the way.

    • Lift the fan out of its slot.

结论

The process is simple but tedious. Be patient, keep the screws organized, be gentle with the clips and you are good to go!

2等其他人完成本指南。

一条评论

excelent work. thanks for share

Asimple Guy - 回复

添加评论

浏览统计数据:

过去 24 小时: 1

过去 7 天: 5

过去 30 天: 16

总计 940