跳转到主内容

Dell Studio 1537 Hard Drive Replacement

你所需要的

  1. Dell Studio 1537 Hard Drive Replacement, Battery: 步骤 1 中的图像 1,2 Dell Studio 1537 Hard Drive Replacement, Battery: 步骤 1 中的图像 2,2
    • Ensure the laptop is turned off and unplugged before attempting to remove any piece.

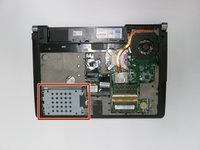
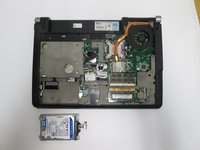
    • Place the laptop lid down so the underside is visible.

    • Pull battery release switch and gently pull the battery directly away from the switch.

  2. Dell Studio 1537 Hard Drive Replacement, Back Cover: 步骤 2 中的图像 1,1
    • Identify the back cover of the laptop.

  3. Dell Studio 1537 Hard Drive Replacement: 步骤 3 中的图像 1,1
    • Unscrew and remove all of the 6.0mm screws with a Phillips #1 screwdriver.

  4. Dell Studio 1537 Hard Drive Replacement: 步骤 4 中的图像 1,1
    • Lift the back cover off of the laptop.

  5. Dell Studio 1537 Hard Drive Replacement, Hard Drive: 步骤 5 中的图像 1,2 Dell Studio 1537 Hard Drive Replacement, Hard Drive: 步骤 5 中的图像 2,2
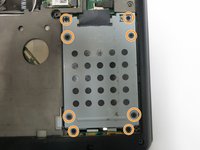
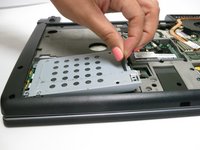
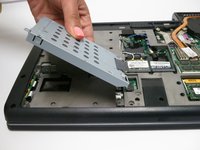
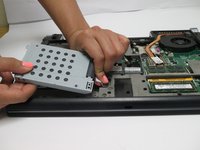
    • Unscrew all of the 6.0 mm screws with a Phillips #1 screwdriver holding the hard drive cage on the computer.

  6. Dell Studio 1537 Hard Drive Replacement: 步骤 6 中的图像 1,2 Dell Studio 1537 Hard Drive Replacement: 步骤 6 中的图像 2,2
    • Lift the hard drive cage out of the laptop.

  7. Dell Studio 1537 Hard Drive Replacement: 步骤 7 中的图像 1,3 Dell Studio 1537 Hard Drive Replacement: 步骤 7 中的图像 2,3 Dell Studio 1537 Hard Drive Replacement: 步骤 7 中的图像 3,3
    • Pull tab to unplug the drive from the computer

    • Pull the hard drive out of the hard drive tray.

结论

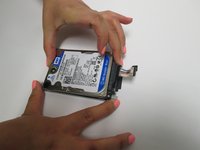
To reassemble your device, follow these instructions in reverse order.

3等其他人完成本指南。

Zach Dylag

于03/24/15注册

575 声望

创作了4篇指南

团队

Baylor, Team 6-2, Shaver Spring 2015 Baylor, Team 6-2, Shaver Spring 2015 的会员

BU-SHAVER-S15S6G2

3 名成员

创作了4篇指南

一条评论

Straightforward process with step by step guide. Thank you Zach.

Katharine Church - 回复

添加评论

浏览统计数据:

过去 24 小时: 0

过去 7 天: 6

过去 30 天: 9

总计 2,481