跳转到主内容

Dell Latitude E7440 WLAN Card Replacement

你所需要的

  1. Dell Latitude E7440 WLAN Card Replacement, Prepare the laptop: 步骤 1 中的图像 1,1
    • Power off your laptop before starting.

    • Flip the device over so that the vents on the bottom are facing away from you.

  2. Dell Latitude E7440 WLAN Card Replacement, Release the battery: 步骤 2 中的图像 1,3 Dell Latitude E7440 WLAN Card Replacement, Release the battery: 步骤 2 中的图像 2,3 Dell Latitude E7440 WLAN Card Replacement, Release the battery: 步骤 2 中的图像 3,3
    • Place your finger on the latch located in the center of the laptop.

    • Slide the latch to the right, applying enough force to reveal a red indicator.

    • You will hear a soft click when the latch has been disengaged.

  3. Dell Latitude E7440 WLAN Card Replacement, Remove the battery: 步骤 3 中的图像 1,1
    • Lift the battery by the top, away from the laptop body.

  4. Dell Latitude E7440 WLAN Card Replacement, WLAN Card: 步骤 4 中的图像 1,2 Dell Latitude E7440 WLAN Card Replacement, WLAN Card: 步骤 4 中的图像 2,2
    • Remove two M2 x 3mm Phillips #0 screws from the base cover.

  5. Dell Latitude E7440 WLAN Card Replacement: 步骤 5 中的图像 1,3 Dell Latitude E7440 WLAN Card Replacement: 步骤 5 中的图像 2,3 Dell Latitude E7440 WLAN Card Replacement: 步骤 5 中的图像 3,3
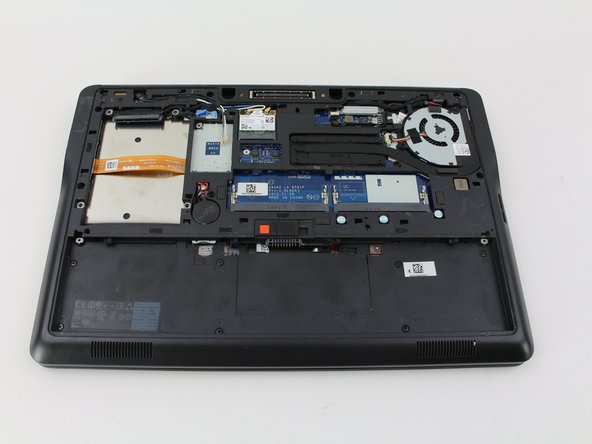
    • Slide the base cover down slightly and remove it to find the WLAN card.

  6. Dell Latitude E7440 WLAN Card Replacement: 步骤 6 中的图像 1,3 Dell Latitude E7440 WLAN Card Replacement: 步骤 6 中的图像 2,3 Dell Latitude E7440 WLAN Card Replacement: 步骤 6 中的图像 3,3
    • Disconnect the white and black wires attached to the WLAN card by pulling them away from the card.

    • You can use the nylon spudger to disconnect a wire by placing it between the curved part of the wire and gently pulling.

    • When attaching the wires to the WLAN card, place the wire head directly above the connectors and apply pressure to the head to reconnect it.

  7. Dell Latitude E7440 WLAN Card Replacement: 步骤 7 中的图像 1,3 Dell Latitude E7440 WLAN Card Replacement: 步骤 7 中的图像 2,3 Dell Latitude E7440 WLAN Card Replacement: 步骤 7 中的图像 3,3
    • Remove a M2 x 3mm Phillips #0 screw from the WLAN card.

    • Gently pull the WLAN card out of its socket.

结论

To reassemble your device, follow these instructions in reverse order.

7等其他人完成本指南。

Akash Kedia

于01/24/19注册

1,373 声望

创作了5篇指南

团队

Cal Poly, Team S2-G5, White Winter 2019 Cal Poly, Team S2-G5, White Winter 2019 的会员

CPSU-WHITE-W19S2G5

4 名成员

创作了5篇指南

0条评论

添加评论

浏览统计数据:

过去 24 小时: 4

过去 7 天: 11

过去 30 天: 45

总计 3,886