跳转到主内容

Dell Inspiron N4010 Hard Drive Replacement

你所需要的

  1. Dell Inspiron N4010 Hard Drive Replacement, Remove the Screws: 步骤 1 中的图像 1,1
    • WARNING: Before working inside your computer, read the safety information that shipped with your computer. Follow the instructions in Before You Begin.

    • CAUTION: To avoid electrostatic discharge, ground yourself by using a wrist grounding strap or by periodically touching an unpainted metal surface (such as a connector on your computer).

    • Remove the two screws that secure the hard-drive assembly to the system board.

  2. Dell Inspiron N4010 Hard Drive Replacement, Sliding the Hard-Drive Assembly: 步骤 2 中的图像 1,1
    • Slide the hard-drive assembly to disconnect it from the connector on the system board.

  3. Dell Inspiron N4010 Hard Drive Replacement, Lifting the Hard Drive Assembly: 步骤 3 中的图像 1,1
    • Lift the hard-drive assembly away from the system board.

  4. Dell Inspiron N4010 Hard Drive Replacement, Remove the Screws: 步骤 4 中的图像 1,1
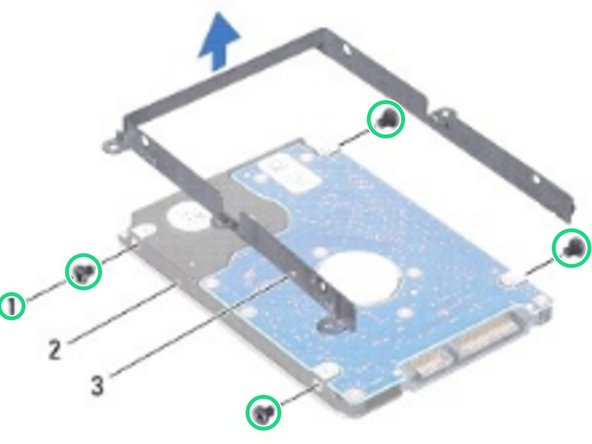
    • Remove the four screws that secure the hard-drive bracket to the hard drive.

  5. Dell Inspiron N4010 Hard Drive Replacement, Lifting the Hard-Drive Bracket: 步骤 5 中的图像 1,1
    • Lift the hard-drive bracket off the hard drive.

  6. Dell Inspiron N4010 Hard Drive Replacement, Align the Screw Holes: 步骤 6 中的图像 1,1
    • Align the screw holes on the hard-drive bracket with the screw holes on the NEW hard drive and replace the four screws.

  7. Dell Inspiron N4010 Hard Drive Replacement, Sliding the Hard-Drive Assembly: 步骤 7 中的图像 1,1
    • Slide and push the hard-drive assembly to connect it to connector on the system board.

  8. Dell Inspiron N4010 Hard Drive Replacement, Replace the Screws: 步骤 8 中的图像 1,1
    • Replace the two screws that secure the hard-drive assembly to the system board.

终点

另外一个人完成了本指南。

Terrence15

于12/18/17注册

79,121 声望

创作了441篇指南

团队

RampUP America, Inc. RampUP America, Inc. 的会员

Community

42 名成员

创作了1,985篇指南

0条评论

添加评论

浏览统计数据:

过去 24 小时: 0

过去 7 天: 4

过去 30 天: 16

总计 788