跳转到主内容

Dell Inspiron M5010 Fan/Heatsink Replacement

你所需要的

  1. Dell Inspiron M5010 Fan/Heatsink Replacement, Remove keyboard retaining screw: 步骤 1 中的图像 1,1
    • Remove Keyboard retaining screw from bottom of laptop.

  2. Dell Inspiron M5010 Fan/Heatsink Replacement: 步骤 2 中的图像 1,3 Dell Inspiron M5010 Fan/Heatsink Replacement: 步骤 2 中的图像 2,3 Dell Inspiron M5010 Fan/Heatsink Replacement: 步骤 2 中的图像 3,3
    • Insert the 6 inch metal ruler, or another flat object into the holes in the top left of the keyboard, the top middle of the keyboard, and the top right of the keyboard to release the keyboard from the computer.

    • There are a number of screws on the bottom that required to be removed prior to the keyboard being able to be lifted up.

  3. Dell Inspiron M5010 Fan/Heatsink Replacement: 步骤 3 中的图像 1,1
    • Lift the keyboard up slightly and push forward in order to release bottom tabs.

  4. Dell Inspiron M5010 Fan/Heatsink Replacement: 步骤 4 中的图像 1,1
    • Pull the black tab up and then pull left on keyboard plug to release keyboard.

  5. Dell Inspiron M5010 Fan/Heatsink Replacement, Palm Rest: 步骤 5 中的图像 1,1
    • Flip the laptop, so the bottom of the laptop is facing up.

    • Remove the seven 6.0mm Phillip #000 screws indicated using the Phillips #000 screwdriver.

  6. Dell Inspiron M5010 Fan/Heatsink Replacement: 步骤 6 中的图像 1,2 Dell Inspiron M5010 Fan/Heatsink Replacement: 步骤 6 中的图像 2,2
    • Flip the laptop back over, so that the top of the laptop is facing up.

    • Open the laptop.

    • Remove all of the indicated 6.0 mm screws with the Phillips #000 screwdriver.

  7. Dell Inspiron M5010 Fan/Heatsink Replacement: 步骤 7 中的图像 1,1
    • Unplug the palm rest cables by lifting the black tab up and then pulling on the blue tabs.

  8. Dell Inspiron M5010 Fan/Heatsink Replacement: 步骤 8 中的图像 1,3 Dell Inspiron M5010 Fan/Heatsink Replacement: 步骤 8 中的图像 2,3 Dell Inspiron M5010 Fan/Heatsink Replacement: 步骤 8 中的图像 3,3
    • Carefully unsnap and remove the palm rest.

    • Place your fingers inside the large circle in the lower right corner to get a good grip.

  9. Dell Inspiron M5010 Fan/Heatsink Replacement, Fan/Heatsink: 步骤 9 中的图像 1,1
    • Flip the laptop over so the bottom is facing up.

    • Remove the indicated 17 6mm Phillips #000 screws on the back of the laptop using the Phillips #000 screwdriver.

  10. Dell Inspiron M5010 Fan/Heatsink Replacement: 步骤 10 中的图像 1,2 Dell Inspiron M5010 Fan/Heatsink Replacement: 步骤 10 中的图像 2,2
    • Pull the clear tab attached to the hard drive and gently lift up the hard drive to remove it.

  11. Dell Inspiron M5010 Fan/Heatsink Replacement: 步骤 11 中的图像 1,2 Dell Inspiron M5010 Fan/Heatsink Replacement: 步骤 11 中的图像 2,2
    • Flip the laptop back over and unplug the Speakers.

  12. Dell Inspiron M5010 Fan/Heatsink Replacement: 步骤 12 中的图像 1,2 Dell Inspiron M5010 Fan/Heatsink Replacement: 步骤 12 中的图像 2,2
    • Unplug the SD Card Slot.

    • You do not have to remove the SD Card Slot, just unplug it.

  13. Dell Inspiron M5010 Fan/Heatsink Replacement: 步骤 13 中的图像 1,1
    • Unplug the USB/VGA cable.

  14. Dell Inspiron M5010 Fan/Heatsink Replacement: 步骤 14 中的图像 1,1
    • Remove the 4 mm Phillips #000 motherboard screws using the Phillips #000 screwdriver.

  15. Dell Inspiron M5010 Fan/Heatsink Replacement: 步骤 15 中的图像 1,1
    • Remove the 4 indicated 6 mm Phillips #000 front hinge screws with the Phillips #000 screwdriver.

  16. Dell Inspiron M5010 Fan/Heatsink Replacement: 步骤 16 中的图像 1,2 Dell Inspiron M5010 Fan/Heatsink Replacement: 步骤 16 中的图像 2,2
    • Unplug the Wireless Antenna cables.

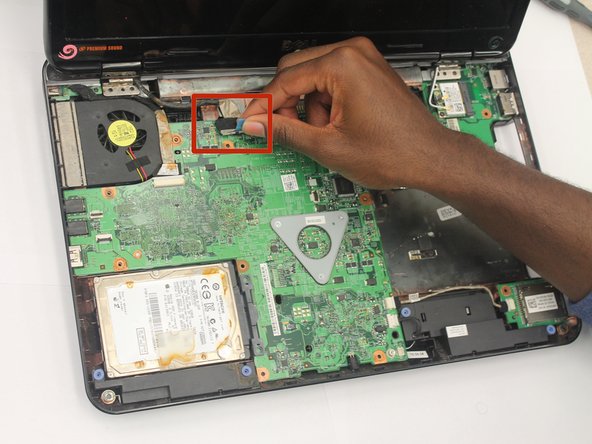
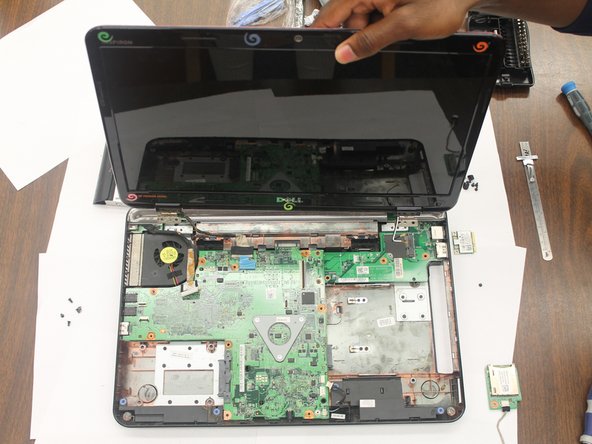
  17. Dell Inspiron M5010 Fan/Heatsink Replacement: 步骤 17 中的图像 1,3 Dell Inspiron M5010 Fan/Heatsink Replacement: 步骤 17 中的图像 2,3 Dell Inspiron M5010 Fan/Heatsink Replacement: 步骤 17 中的图像 3,3
    • Unplug the LCD cable.

    • Lift the screen from the computer.

  18. Dell Inspiron M5010 Fan/Heatsink Replacement: 步骤 18 中的图像 1,1
    • Remove the Middle Cover.

  19. Dell Inspiron M5010 Fan/Heatsink Replacement: 步骤 19 中的图像 1,1
    • Remove the Motherboard.

  20. Dell Inspiron M5010 Fan/Heatsink Replacement: 步骤 20 中的图像 1,2 Dell Inspiron M5010 Fan/Heatsink Replacement: 步骤 20 中的图像 2,2
    • Unplug the fan.

  21. Dell Inspiron M5010 Fan/Heatsink Replacement: 步骤 21 中的图像 1,2 Dell Inspiron M5010 Fan/Heatsink Replacement: 步骤 21 中的图像 2,2
    • Remove all 4 of the 6 mm Phillips #000 Heatsink screws with the Phillips #000 screwdriver.

  22. Dell Inspiron M5010 Fan/Heatsink Replacement: 步骤 22 中的图像 1,1
    • Lift the Heatsink from the Motherboard.

结论

To reassemble your device, follow these instructions in reverse order.

另外一个人完成了本指南。

April Poucher

于10/13/14注册

1,164 声望

创作了10篇指南

团队

Clemson, Team 1-5, Benson Fall 2014 Clemson, Team 1-5, Benson Fall 2014 的会员

CLEM-BENSON-F14S1G5

4 名成员

创作了11篇指南

0条评论

添加评论

浏览统计数据:

过去 24 小时: 0

过去 7 天: 0

过去 30 天: 2

总计 963