跳转到主内容

Dell Inspiron 1525 LCD Replacement

你所需要的

  1. Dell Inspiron 1525 LCD Replacement, Battery: 步骤 1 中的图像 1,1
    • Locate the battery release switch on the bottom of the laptop.

  2. Dell Inspiron 1525 LCD Replacement: 步骤 2 中的图像 1,2 Dell Inspiron 1525 LCD Replacement: 步骤 2 中的图像 2,2
    • Slide the battery release switch away from the lock symbol until you hear the battery click.

    • Slide the battery towards the back of the laptop until it comes free.

  3. Dell Inspiron 1525 LCD Replacement, Central Control Cover: 步骤 3 中的图像 1,1
    • Remove the two 4.00 mm Phillips #1 screws from the battery tray.

  4. Dell Inspiron 1525 LCD Replacement: 步骤 4 中的图像 1,3 Dell Inspiron 1525 LCD Replacement: 步骤 4 中的图像 2,3 Dell Inspiron 1525 LCD Replacement: 步骤 4 中的图像 3,3
    • Insert the flat end of a spudger into the slot on the right side of the central control cover and pry it up.

    • Carefully pull the central control cover up along its edges.

    • Do not attempt to completely remove the cover, as it is still attached via a ribbon cable.

  5. Dell Inspiron 1525 LCD Replacement: 步骤 5 中的图像 1,3 Dell Inspiron 1525 LCD Replacement: 步骤 5 中的图像 2,3 Dell Inspiron 1525 LCD Replacement: 步骤 5 中的图像 3,3
    • Peel back the silver tape securing the ribbon cable to the cover.

    • Pull the small brown latch on the ribbon cable connector out.

    • Disconnect the ribbon cable to completely free the central control cover.

  6. Dell Inspiron 1525 LCD Replacement, Keyboard: 步骤 6 中的图像 1,2 Dell Inspiron 1525 LCD Replacement, Keyboard: 步骤 6 中的图像 2,2
    • Remove the two 5.75 mm Phillips #1 screws securing the keyboard to the laptop.

    • Gently slide the keyboard towards the display until the tabs on its front side are free.

    • Do not force the keyboard too far forward or attempt to remove it yet, as there is still a ribbon cable connected to it.

  7. Dell Inspiron 1525 LCD Replacement: 步骤 7 中的图像 1,2 Dell Inspiron 1525 LCD Replacement: 步骤 7 中的图像 2,2
    • Use a spudger to gently lift the ribbon cable retaining flap.

    • Disconnect the ribbon cable.

    • Shift the keyboard sideways enough to free one side from it's retaining tab. Then lift the keyboard away from the laptop.

  8. Dell Inspiron 1525 LCD Replacement, Bottom Cover: 步骤 8 中的图像 1,2 Dell Inspiron 1525 LCD Replacement, Bottom Cover: 步骤 8 中的图像 2,2
    • Remove/loosen the eight 4.80 mm Phillips #1 screws securing the bottom panel.

    • The screws may only need to be loosened, as they are generally retained by plastic washers.

    • Remove the bottom panel.

  9. Dell Inspiron 1525 LCD Replacement, Display Assembly: 步骤 9 中的图像 1,3 Dell Inspiron 1525 LCD Replacement, Display Assembly: 步骤 9 中的图像 2,3 Dell Inspiron 1525 LCD Replacement, Display Assembly: 步骤 9 中的图像 3,3
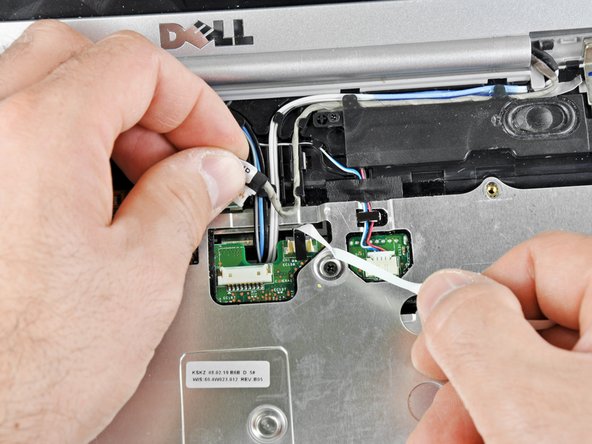
    • Disconnect the five antennas from their respective cards.

    • De-route the antennas from their routing retainers.

  10. Dell Inspiron 1525 LCD Replacement: 步骤 10 中的图像 1,1
    • Remove the two 5.70 mm Phillips #1 screws securing the display assembly to the bottom case half.

    • The screw holes will be denoted by an embossed "D" by the hole.

  11. Dell Inspiron 1525 LCD Replacement: 步骤 11 中的图像 1,3 Dell Inspiron 1525 LCD Replacement: 步骤 11 中的图像 2,3 Dell Inspiron 1525 LCD Replacement: 步骤 11 中的图像 3,3
    • Use the flat end of a spudger to push the camera connector out of its socket. Alternate pushing on either side to evenly remove the connector.

    • Carefully release the connector from its retaining tabs.

  12. Dell Inspiron 1525 LCD Replacement: 步骤 12 中的图像 1,2 Dell Inspiron 1525 LCD Replacement: 步骤 12 中的图像 2,2
    • Push the antenna wires up through their hole in the bottom case half.

    • Release the antennas from their retaining tabs on the upper case.

  13. Dell Inspiron 1525 LCD Replacement: 步骤 13 中的图像 1,2 Dell Inspiron 1525 LCD Replacement: 步骤 13 中的图像 2,2
    • Disconnect the flat LCD ribbon cable by pulling it up by the tab.

    • Free the ribbon cable from its retaining clips.

  14. Dell Inspiron 1525 LCD Replacement: 步骤 14 中的图像 1,1
    • Remove the four 3.45 mm Phillips #1 screws securing the display assembly to the laptop chassis.

    • Support the display assembly as you remove these screws to prevent damage to the screw and hole threads.

    • Remove the display assembly from the laptop.

  15. Dell Inspiron 1525 LCD Replacement, LCD: 步骤 15 中的图像 1,2 Dell Inspiron 1525 LCD Replacement, LCD: 步骤 15 中的图像 2,2
    • Use the pointed side of a spudger to peel the six small rubber feet off the display assembly.

    • Remove the six 6.05 mm Phillips #1 screws hidden beneath each of the rubber feet.

    • You may need to scrape glue out of the screw heads for the screwdriver to fit properly.

  16. Dell Inspiron 1525 LCD Replacement: 步骤 16 中的图像 1,3 Dell Inspiron 1525 LCD Replacement: 步骤 16 中的图像 2,3 Dell Inspiron 1525 LCD Replacement: 步骤 16 中的图像 3,3
    • Use the flat end of a spudger to gently pry the front bezel off the display assembly. Start at a corner and work your way around.

    • Remove the front display bezel when it comes free.

  17. Dell Inspiron 1525 LCD Replacement: 步骤 17 中的图像 1,2 Dell Inspiron 1525 LCD Replacement: 步骤 17 中的图像 2,2
    • Remove the two 5.70 mm Phillips #1 screws securing the LCD to the display assembly.

    • Remove the LCD from the display assembly.

结论

To reassemble your device, follow these instructions in reverse order.

15等其他人完成本指南。

0条评论

添加评论

浏览统计数据:

过去 24 小时: 0

过去 7 天: 1

过去 30 天: 9

总计 14,953