跳转到主内容

Dell Inspiron 15-7559 Back Panel Replacement

你所需要的

  1. Dell Inspiron 15-7559 Back Panel Replacement, Back Panel: 步骤 1 中的图像 1,1
    • Turn off the computer.

    • Disconnect the charging cable from the computer.

    • Failure to turn off the device and disconnect the cable could lead to personal injury or device damage.

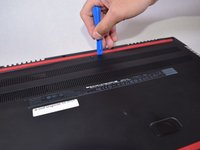
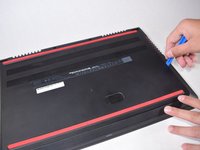
    • Flip the computer upside down.

  2. Dell Inspiron 15-7559 Back Panel Replacement: 步骤 2 中的图像 1,3 Dell Inspiron 15-7559 Back Panel Replacement: 步骤 2 中的图像 2,3 Dell Inspiron 15-7559 Back Panel Replacement: 步骤 2 中的图像 3,3
    • Remove the captive screw located on the top section of the back panel, using a Philips #1 screwdriver.

    • Keep in mind that the screw cannot be fully removed from the panel, even when fully loosened.

  3. Dell Inspiron 15-7559 Back Panel Replacement: 步骤 3 中的图像 1,3 Dell Inspiron 15-7559 Back Panel Replacement: 步骤 3 中的图像 2,3 Dell Inspiron 15-7559 Back Panel Replacement: 步骤 3 中的图像 3,3
    • Use the blue, plastic opening tool to gently pry a section of the back panel open.

    • Next slide the opening tool around the back panel to disconnect the clips holding the panel in place.

    • After the clips have been disconnected, the back panel can then be easily lifted off the computer.

结论

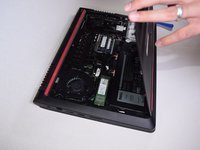
To reassemble your device, simply press the back panel on until all pins snap back into place and then screw the back panel back on.

3等其他人完成本指南。

团队

UW Tacoma, Team S3-G2, Liner Fall 2017 UW Tacoma, Team S3-G2, Liner Fall 2017 的会员

UWT-LINER-F17S3G2

5 名成员

创作了9篇指南

0条评论

添加评论

浏览统计数据:

过去 24 小时: 0

过去 7 天: 5

过去 30 天: 14

总计 3,205