跳转到主内容

Dell Inspiron 15-3567 Fan Replacement

你所需要的

  1. Dell Inspiron 15-3567 Fan Replacement, Equipment and tool - Screws: 步骤 1 中的图像 1,1
    • Three types of screws are used in Inspiron 15 3567. Be sure to keep the screws in a safe and organized place so you don't lose them.

    • M2.5 x 8mm screw.

    • M2.5 hinge screw.

    • M2 x 5mm screw.

  2. Dell Inspiron 15-3567 Fan Replacement, Warning - Shut Down and Unplug: 步骤 2 中的图像 1,1
    • Make sure your laptop is completely shut down and unplugged from any power source before beginning the repair process.

  3. Dell Inspiron 15-3567 Fan Replacement, Remove the Battery: 步骤 3 中的图像 1,3 Dell Inspiron 15-3567 Fan Replacement, Remove the Battery: 步骤 3 中的图像 2,3 Dell Inspiron 15-3567 Fan Replacement, Remove the Battery: 步骤 3 中的图像 3,3
    • Slide the lock to the unlocked position, and carefully remove the battery from the laptop.

  4. Dell Inspiron 15-3567 Fan Replacement, Remove the Screws - Battery: 步骤 4 中的图像 1,2 Dell Inspiron 15-3567 Fan Replacement, Remove the Screws - Battery: 步骤 4 中的图像 2,2
    • Carefully remove the screws.

    • 2 M2 x 5 mm screws under the battery.

  5. Dell Inspiron 15-3567 Fan Replacement, Remove Screws - Bottom Case Left: 步骤 5 中的图像 1,1
    • Carefully remove the screws.

    • 4 M2.5 x 8mm screws are located at the left side of the bottom case (the side with the battery lock).

  6. Dell Inspiron 15-3567 Fan Replacement, Remove Screws - Bottom Case Right: 步骤 6 中的图像 1,1
    • Carefully remove the screws.

    • 4 M2.5 x 8mm screws are located at the right side of the case (the side with the DVD plastic cover).

  7. Dell Inspiron 15-3567 Fan Replacement, Remove the DVD Plastic Cover: 步骤 7 中的图像 1,3 Dell Inspiron 15-3567 Fan Replacement, Remove the DVD Plastic Cover: 步骤 7 中的图像 2,3 Dell Inspiron 15-3567 Fan Replacement, Remove the DVD Plastic Cover: 步骤 7 中的图像 3,3
    • Carefully remove an M2.5 x 8mm screw located in the middle of the bottom case.

    • Slide or pull the DVD plastic cover from the case.

  8. Dell Inspiron 15-3567 Fan Replacement, Remove the Screws - DVD Plastic Cover: 步骤 8 中的图像 1,1
    • Carefully remove the screws

    • 3 M2.5 hinge screws under the DVD plastic cover.

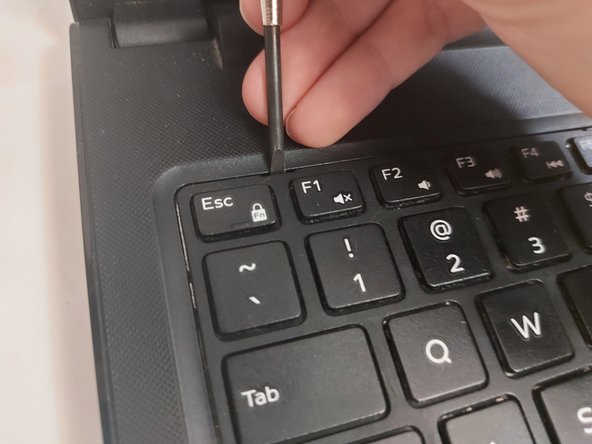
  9. Dell Inspiron 15-3567 Fan Replacement, Remove the Keyboard - Release the Tabs: 步骤 9 中的图像 1,2 Dell Inspiron 15-3567 Fan Replacement, Remove the Keyboard - Release the Tabs: 步骤 9 中的图像 2,2
    • 5 little tabs are located on the keyboard.

    • Use a flat-head screwdriver to poke into those tabs.

  10. Dell Inspiron 15-3567 Fan Replacement, Remove the Keyboard - Lift the Keyboard: 步骤 10 中的图像 1,3 Dell Inspiron 15-3567 Fan Replacement, Remove the Keyboard - Lift the Keyboard: 步骤 10 中的图像 2,3 Dell Inspiron 15-3567 Fan Replacement, Remove the Keyboard - Lift the Keyboard: 步骤 10 中的图像 3,3
    • After all 5 tabs are pushed, you should be able to lift the keyboard up a litte

    • Slowly pull the keyboard up toward the screen.

    • A cable is connected between the laptop and the keyboard, so be very careful while lifting the keyboard up.

  11. Dell Inspiron 15-3567 Fan Replacement, Remove the Keyboard - Disconnect the Cable: 步骤 11 中的图像 1,3 Dell Inspiron 15-3567 Fan Replacement, Remove the Keyboard - Disconnect the Cable: 步骤 11 中的图像 2,3 Dell Inspiron 15-3567 Fan Replacement, Remove the Keyboard - Disconnect the Cable: 步骤 11 中的图像 3,3
    • A cable is connected between the laptop and the keyboard.

    • Carefully open the connector.

    • Carefully remove the cable from the connector.

  12. Dell Inspiron 15-3567 Fan Replacement, Remove Screws - Keyboard: 步骤 12 中的图像 1,1
    • Carefully remove the screws.

    • 5 M2 x 5mm screws are located under the keyboard.

  13. Dell Inspiron 15-3567 Fan Replacement, Remove the Bottom Case: 步骤 13 中的图像 1,3 Dell Inspiron 15-3567 Fan Replacement, Remove the Bottom Case: 步骤 13 中的图像 2,3 Dell Inspiron 15-3567 Fan Replacement, Remove the Bottom Case: 步骤 13 中的图像 3,3
    • Slowly press the bottom case down using the hole on the upper case.

    • You should be able to hear some cracking sounds and have some gaps between the upper and bottom case.

    • Using those gaps, slowly separate the left part of your laptop.

  14. Dell Inspiron 15-3567 Fan Replacement, Overview of the Cases: 步骤 14 中的图像 1,1
    • The upper case is connected to the screen, and the bottom case could be completely separated from it.

  15. Dell Inspiron 15-3567 Fan Replacement, Remove Old Fan: 步骤 15 中的图像 1,2 Dell Inspiron 15-3567 Fan Replacement, Remove Old Fan: 步骤 15 中的图像 2,2
    • Carefully remove the fan cable from the connector.

    • It is possible that the cable and the connector are tight.

  16. Dell Inspiron 15-3567 Fan Replacement, Remove Screws - Fan: 步骤 16 中的图像 1,2 Dell Inspiron 15-3567 Fan Replacement, Remove Screws - Fan: 步骤 16 中的图像 2,2
    • Carefully remove the screws.

    • 2 M2.5 x 8mm screws on the fan.

    • You can then pick the old fan up after the screws and the cable are disconnected.

  17. Dell Inspiron 15-3567 Fan Replacement, Replace with a New Fan: 步骤 17 中的图像 1,3 Dell Inspiron 15-3567 Fan Replacement, Replace with a New Fan: 步骤 17 中的图像 2,3 Dell Inspiron 15-3567 Fan Replacement, Replace with a New Fan: 步骤 17 中的图像 3,3
    • Screw 2 M2.5 x 8mm screws back into the blue circle.

    • Connect the fan cable back into the connector.

  18. Dell Inspiron 15-3567 Fan Replacement, Put Things Back Together: 步骤 18 中的图像 1,2 Dell Inspiron 15-3567 Fan Replacement, Put Things Back Together: 步骤 18 中的图像 2,2
    • Follow the guide in reverse order, carefully reassembling the components, securing the cases, and tightening the screws back into place. Once you've completed the reassembly, it's time to power on your laptop and enjoy the benefits of your new fan!

终点

2等其他人完成本指南。

Ka Him Poon

于04/13/23注册

307 声望

撰写一个指南

0条评论

添加评论

浏览统计数据:

过去 24 小时: 0

过去 7 天: 4

过去 30 天: 13

总计 180