跳转到主内容

Dell Inspiron 15 5584 Display Assembly Replacement

你所需要的

  1. Dell Inspiron 15 5584 Display Assembly Replacement, Bottom Cover: 步骤 1 中的图像 1,1
    • Make sure to turn off and unplug your laptop before starting.

    • Turn over the laptop so that the bottom is facing upwards, and the Inspiron logo is upside-down.

  2. Dell Inspiron 15 5584 Display Assembly Replacement: 步骤 2 中的图像 1,3 Dell Inspiron 15 5584 Display Assembly Replacement: 步骤 2 中的图像 2,3 Dell Inspiron 15 5584 Display Assembly Replacement: 步骤 2 中的图像 3,3
    • Remove the seven 7 mm screws from the bottom using a Phillips #0 screwdriver.

    • Loosen the two captive back corner screws using a Phillips #0 screwdriver.

    • The two corner screws are not removable. A clicking sounds indicates that the screw is fully loosened.

  3. Dell Inspiron 15 5584 Display Assembly Replacement: 步骤 3 中的图像 1,2 Dell Inspiron 15 5584 Display Assembly Replacement: 步骤 3 中的图像 2,2
    • Slide an iFixit opening tool underneath the right side USB port and the keyboard.

    • Gently trace the iFixit opening tool along the entire outer rim of the laptop, carefully applying an upwards pressure.

    • Be careful not to force open the plate or push too much off without loosening the other sides. This can cause the bottom cover to crack.

  4. Dell Inspiron 15 5584 Display Assembly Replacement: 步骤 4 中的图像 1,2 Dell Inspiron 15 5584 Display Assembly Replacement: 步骤 4 中的图像 2,2
    • Gently pry off the bottom cover from the laptop.

    • Use the iFixit opening tool to loosen any spots you may have missed from Step 3.

  5. Dell Inspiron 15 5584 Display Assembly Replacement, Battery: 步骤 5 中的图像 1,2 Dell Inspiron 15 5584 Display Assembly Replacement, Battery: 步骤 5 中的图像 2,2
    • Remove the four 3.5 mm screws holding the battery down with a JIS #0 screwdriver.

  6. Dell Inspiron 15 5584 Display Assembly Replacement: 步骤 6 中的图像 1,3 Dell Inspiron 15 5584 Display Assembly Replacement: 步骤 6 中的图像 2,3 Dell Inspiron 15 5584 Display Assembly Replacement: 步骤 6 中的图像 3,3
    • Detach the motherboard connector tab from the top left of the battery.

    • Remove the battery from the device.

    • Be sure to carefully wiggle the connector out from the battery socket. Ripping it out too forcefully could damage the socket.

  7. Dell Inspiron 15 5584 Display Assembly Replacement, Fan: 步骤 7 中的图像 1,3 Dell Inspiron 15 5584 Display Assembly Replacement, Fan: 步骤 7 中的图像 2,3 Dell Inspiron 15 5584 Display Assembly Replacement, Fan: 步骤 7 中的图像 3,3
    • Loosen the four captive 3.5 mm screws securing the heat sink to the motherboard using a Phillips #0 screwdriver.

    • Remove the CPU plate cover from the motherboard and safely place it off to the side.

  8. Dell Inspiron 15 5584 Display Assembly Replacement: 步骤 8 中的图像 1,3 Dell Inspiron 15 5584 Display Assembly Replacement: 步骤 8 中的图像 2,3 Dell Inspiron 15 5584 Display Assembly Replacement: 步骤 8 中的图像 3,3
    • Remove the two 3.5 mm screws from the fan with a JIS #0 screwdriver.

    • Detach the fan connector from the motherboard using a pair of tweezers.

  9. Dell Inspiron 15 5584 Display Assembly Replacement: 步骤 9 中的图像 1,2 Dell Inspiron 15 5584 Display Assembly Replacement: 步骤 9 中的图像 2,2
    • Gently lift the fan from the device and de-thread the LCD display cable.

    • Remove the fan from the device.

  10. Dell Inspiron 15 5584 Display Assembly Replacement, DC Jack: 步骤 10 中的图像 1,2 Dell Inspiron 15 5584 Display Assembly Replacement, DC Jack: 步骤 10 中的图像 2,2
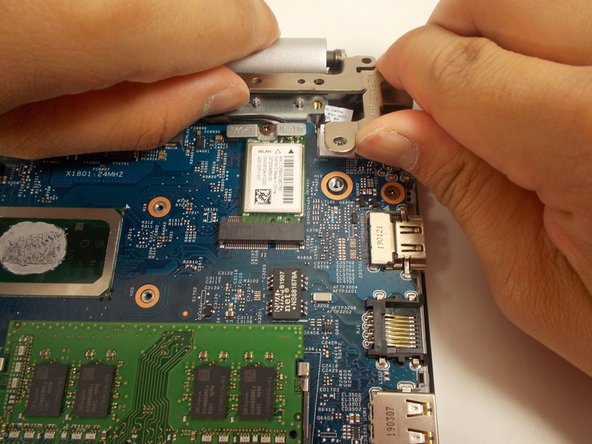
    • Remove the three 6 mm screws holding down the screen hinge in the upper right corner using a JIS #0 screwdriver.

  11. Dell Inspiron 15 5584 Display Assembly Replacement: 步骤 11 中的图像 1,2 Dell Inspiron 15 5584 Display Assembly Replacement: 步骤 11 中的图像 2,2
    • Grasp the screen hinge and lift it up.

  12. Dell Inspiron 15 5584 Display Assembly Replacement: 步骤 12 中的图像 1,3 Dell Inspiron 15 5584 Display Assembly Replacement: 步骤 12 中的图像 2,3 Dell Inspiron 15 5584 Display Assembly Replacement: 步骤 12 中的图像 3,3
    • Lift up the sticker covering the DC jack connector using tweezers.

    • Using tweezers, detach the motherboard connector and lift the jack out of place.

    • Remove the DC jack from the laptop.

  13. Dell Inspiron 15 5584 Display Assembly Replacement, Wi-Fi Card: 步骤 13 中的图像 1,3 Dell Inspiron 15 5584 Display Assembly Replacement, Wi-Fi Card: 步骤 13 中的图像 2,3 Dell Inspiron 15 5584 Display Assembly Replacement, Wi-Fi Card: 步骤 13 中的图像 3,3
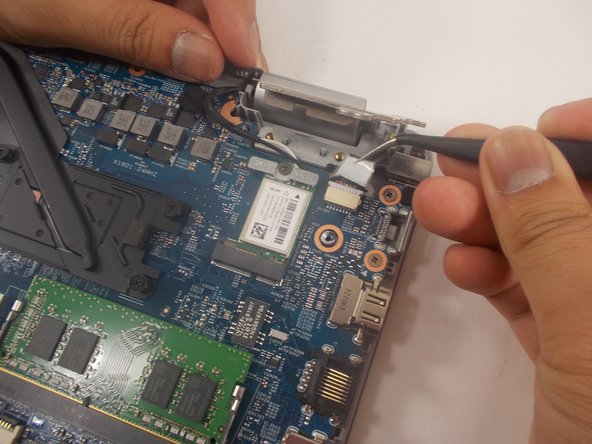
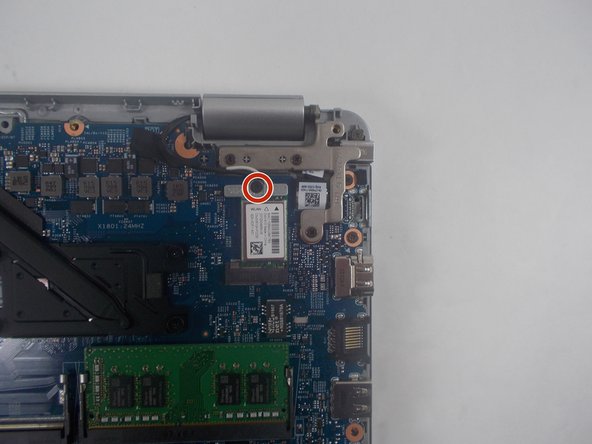
    • Remove the single 3 mm screw that holds down the Wi-Fi card using a Phillips #0 screwdriver.

    • Remove the Wi-Fi card from the motherboard.

  14. Dell Inspiron 15 5584 Display Assembly Replacement, Display Assembly: 步骤 14 中的图像 1,2 Dell Inspiron 15 5584 Display Assembly Replacement, Display Assembly: 步骤 14 中的图像 2,2
    • Remove the four 6 mm screws from the hinge in the upper left corner with a JIS #0 screwdriver.

  15. Dell Inspiron 15 5584 Display Assembly Replacement: 步骤 15 中的图像 1,2 Dell Inspiron 15 5584 Display Assembly Replacement: 步骤 15 中的图像 2,2
    • Grab the hinge and push upwards.

  16. Dell Inspiron 15 5584 Display Assembly Replacement: 步骤 16 中的图像 1,3 Dell Inspiron 15 5584 Display Assembly Replacement: 步骤 16 中的图像 2,3 Dell Inspiron 15 5584 Display Assembly Replacement: 步骤 16 中的图像 3,3
    • Use tweezers to peel off the sticky label covering the display cable port.

    • Use tweezers to unlatch the cable.

    • Grasp the display cable firmly and remove it.

  17. Dell Inspiron 15 5584 Display Assembly Replacement: 步骤 17 中的图像 1,2 Dell Inspiron 15 5584 Display Assembly Replacement: 步骤 17 中的图像 2,2
    • Lift the underside of the device and slightly open the laptop.

    • Pull the bottom half of the device off of the hinges.

结论

To reassemble your device, follow these instructions in reverse order.

Kristen Gismondi

于11/12/14注册

81,222 声望

创作了200篇指南

团队

iFixit iFixit 的会员

Staff

136 名成员

创作了16,573篇指南

0条评论

添加评论

浏览统计数据:

过去 24 小时: 0

过去 7 天: 0

过去 30 天: 2

总计 151