简介
(Warning: Dell Inspiron 14z was also a name for Inspiron N411z. However, this guide is for Inspiron 1470 only) Most laptops these days have an easy-to-access hard drive bay, which is a smart move by engineers, given the frequency with which laptop drives tend to fail. So, you can imagine my surprise when this Inspiron 1470 hit my desk for a hard drive replacement and I found no such thing. No nifty little sled with two screws to remove, or even a little hatch to open up. To get to this machine's drive, you'll have to dig a little deeper...
你所需要的
-
-
1 Phillips screwdriver (261/PHO x 75 works nicely)
-
Pry tool/spudger
-
Screws/parts bin
-
-
-
Unscrew the 2 screws from the memory and accessory bay doors, but do not try to remove them entirely, as they are held captive to the bay doors by a retaining clip. Using a spudger, pry around the sides of the memory bay door until you've released the plastic clips, the lift the door away from the casing and set it aside. No prying is necessary for the accessory bay door - just pull it away and set it aside.
-
Remove one small (2x3mm) screw securing the back end of the optical drive, just to the left of the memory/wireless card bay. Remove the optical drive by sliding it out away from the laptop casing and set it aside.
-
DO NOT remove the 2 (Blue) screws marked with a "D" as they are are for the "LCD" hinges. Remove 8 long (2.5x5mm) screws (green) from the bottom casing. Remove the 1 (pink) screw and note that it goes in at a different time when you are re-assembling.
-
-
-
Remove the memory modules one at a time (top first) by carefully prying the silver catches away from the sides of each module . Then simply pull each module out and away from its slot.
-
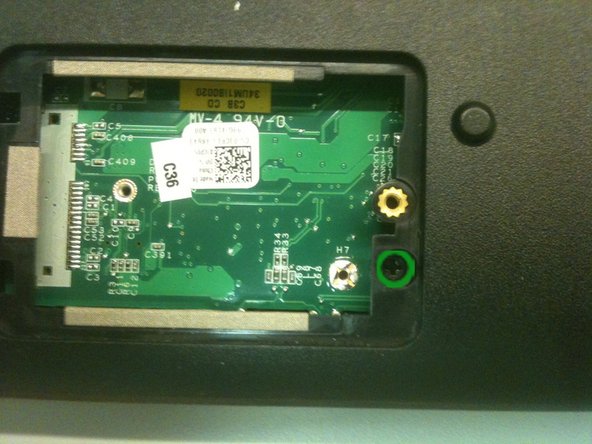
Detach the wireless antenna wires from the wireless card by carefully gripping the connector of each wire and gently but firmly pulling directly away from the card. Do not pull by the wire itself to avoid potentially damaging the card and/or connectors.
-
Remove one small (2x3mm) screw securing the wireless card. Remove the wireless card from the board by pulling out and away from its slot, and set it aside.
-
-
-
-
Turn the laptop over and open the lid wide. Gently but firmly grip the plastic molding just in front of the screen, where the battery would normally sit, and pull upward to release the plastic retaining clips there.
-
Slowly work your way around to the right side of this molding, and continue around the keyboard, releasing the retaining clips. Note that this is the top molding only, and that there is another larger molding underneath. A spudger or pry tool can come in handy here if you feel that pulling up with your hands isn't working well enough, or you don't trust your own strength.
-
-
-
Swing the front end of the molding up toward the top of the laptop lid rest the edges on the screen (don't worry, this plastic is very light and won't damage your LCD by just resting against it).
-
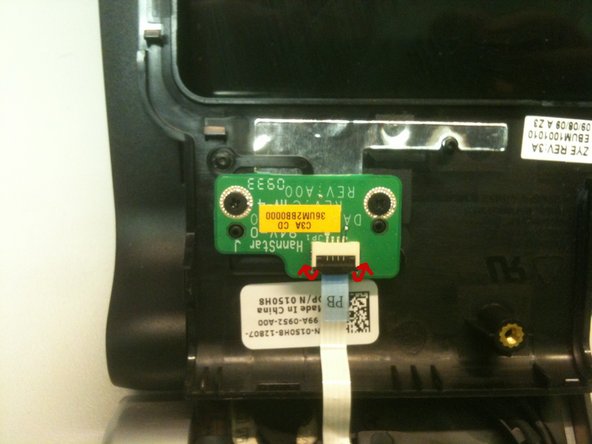
You should see a small cable coming up from the laptop casing and attached to a small connector at the left side of the molding you just pried up. Swing the bottom of that connector up and away from the board it's attached to, and remove the cable by tugging on the blue handle labled 'PB'. The molding is now completely detached, and can be set aside.
-
-
-
Remove the black fabric tape from the middle of the keyboard tray to reveal the wireless antenna wires we saw earlier. Set this tape aside.
-
Slowly and gently pull the wireless antenna wires through the top of the keyboard tray and out of their routing channels built into the top of the tray.
-
-
-
Using a spudger/pry tool, begin prying up the keyboard tray molding along the optical drive bay area. Work your way around to each side and pry up the molding to release all the retaining clips.
-
When you have released all clips, you can pull the keyboard tray molding away from the laptop casing and set it aside.
-
-
-
Remove the 4 long (2.5x5mm) screws securing the hard drive cage to the laptop casing.
-
Slide the hard drive cage away from it's connection point - that is, to the left in the picture - and slowly lift the drive from the left side and pull away from casing.
-
To remove the drive from the cage, simply remove 4 small (3x3mm) screws from the sides of the cage, and pull the drive out.
-


To reassemble your device, follow these instructions in reverse order.
To reassemble your device, follow these instructions in reverse order.
10等其他人完成本指南。
4条评论
Before paying or buying a laptop, make sure to check everything on it, im fixing my friends dell inspiron 1470, headache