跳转到主内容

Dell Inspiron 1300 Memory Modules Replacement

你所需要的

    • Follow the instructions in Before Working Inside Your Computer.

    • Ground yourself by touching one of the metal connectors on the back of the computer.

    • NOTE: If you leave the area, ground yourself again when you return to the computer.

  1. Dell Inspiron 1300 Memory Modules Replacement, Loosen the Screws: 步骤 2 中的图像 1,1
    • Turn the computer over, loosen the captive screws on the memory module/Mini PCI cover, and then remove the cover.

    • NOTICE: To prevent damage to the memory module connector, do not use tools to spread the memory-module securing clips.

  2. Dell Inspiron 1300 Memory Modules Replacement, Popping up the Memory Module: 步骤 3 中的图像 1,1
    • NOTICE: To prevent damage to the memory module connector, do not use tools to spread the memory-module securing clips.

    • Use your fingertips to carefully spread apart the securing clips on each end of the memory module connector until the module pops up.

  3. Dell Inspiron 1300 Memory Modules Replacement, Removing the Module: 步骤 4 中的图像 1,1
    • Remove the module from the connector.

  4. Dell Inspiron 1300 Memory Modules Replacement, Align the Notch: 步骤 5 中的图像 1,2 Dell Inspiron 1300 Memory Modules Replacement, Align the Notch: 步骤 5 中的图像 2,2
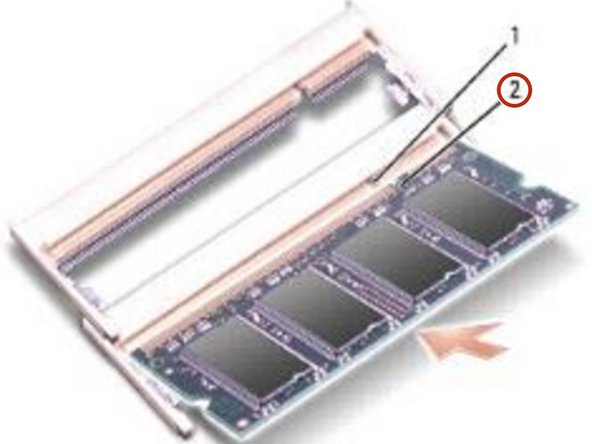
    • Align the notch in the module edge connector with the tab in the connector slot.

  5. Dell Inspiron 1300 Memory Modules Replacement, Installing the Memory Module: 步骤 6 中的图像 1,1
    • Slide the NEW module firmly into the slot at a 45-degree angle, and rotate the module down until it clicks into place. If you do not feel the click, remove the module and reinstall it.

  6. Dell Inspiron 1300 Memory Modules Replacement, Replacing the Module Cover: 步骤 7 中的图像 1,1
    • Replace the memory module/Mini PCI cover and tighten the screws.

    • NOTICE: If the cover is difficult to close, remove the module and reinstall it. Forcing the cover to close may damage your computer.

  7. Dell Inspiron 1300 Memory Modules Replacement, Inserting the Battery: 步骤 8 中的图像 1,1
    • Insert the battery into the battery bay, or connect the AC adapter to your computer and an electrical outlet.

结论

To reassemble your device, follow these instructions in reverse order.

Terrence15

于12/18/17注册

78,592 声望

创作了441篇指南

团队

Informative Technologies Inc. Informative Technologies Inc. 的会员

Community

38 名成员

创作了1,982篇指南

0条评论

添加评论

浏览统计数据:

过去 24 小时: 0

过去 7 天: 1

过去 30 天: 7

总计 164