跳转到主内容

Dell Inspiron 13-7359 WLAN Adaptor Replacement

你所需要的

  1. Dell Inspiron 13-7359 WLAN Adaptor Replacement, Battery: 步骤 1 中的图像 1,1
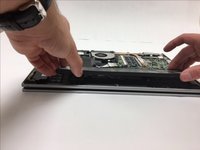
    • First flip over the laptop to expose the back panel

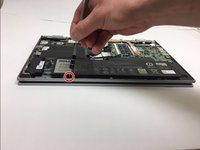
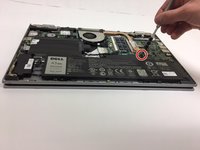
    • Use a Phillips #0 screwdriver to unscrew all ten 7mm Phillips head screws holding the back panel in place.

  2. Dell Inspiron 13-7359 WLAN Adaptor Replacement: 步骤 2 中的图像 1,1
    • With a plastic spudger, carefully remove the back panel by prying each corner off individually

    • Slowly pick up the panel and set it aside

  3. Dell Inspiron 13-7359 WLAN Adaptor Replacement: 步骤 3 中的图像 1,3 Dell Inspiron 13-7359 WLAN Adaptor Replacement: 步骤 3 中的图像 2,3 Dell Inspiron 13-7359 WLAN Adaptor Replacement: 步骤 3 中的图像 3,3
    • The battery will be the largest black component in the device located near the bottom edge. Using a Phillips #0 screwdriver, unscrew the two 3mm Phillips head screws holding in the battery.

  4. Dell Inspiron 13-7359 WLAN Adaptor Replacement: 步骤 4 中的图像 1,3 Dell Inspiron 13-7359 WLAN Adaptor Replacement: 步骤 4 中的图像 2,3 Dell Inspiron 13-7359 WLAN Adaptor Replacement: 步骤 4 中的图像 3,3
    • To remove the old battery, slightly lift the bottom edge of the battery with your hands

    • Now slowly pull the battery towards you to fully detach the battery

  5. Dell Inspiron 13-7359 WLAN Adaptor Replacement, WLAN Adaptor: 步骤 5 中的图像 1,1
    • Unhook both of the wires attached to the WLAN adaptor.

  6. Dell Inspiron 13-7359 WLAN Adaptor Replacement: 步骤 6 中的图像 1,1
    • Remove the 3.9mm Phillips screw using Phillips #0 screwdriver.

    • Once the screw is removed, one end of the WLAN adaptor will raise up.

  7. Dell Inspiron 13-7359 WLAN Adaptor Replacement: 步骤 7 中的图像 1,1
    • Gently remove the WLAN adaptor.

结论

To reassemble your device, follow these instructions in reverse order.

Bo Yi Lim

于04/02/19注册

205 声望

创作了2篇指南

团队

IUPUI, Team S3-G4, Harley Spring 2019 IUPUI, Team S3-G4, Harley Spring 2019 的会员

IUPUI-HARLEY-S19S3G4

3 名成员

创作了2篇指南

0条评论

添加评论

浏览统计数据:

过去 24 小时: 0

过去 7 天: 5

过去 30 天: 6

总计 159