跳转到主内容

Dell Inspiron 13-7353 Heat Sink Replacement

你所需要的

  1. Dell Inspiron 13-7353 Heat Sink Replacement, Flip the Computer: 步骤 1 中的图像 1,1
    • WARNING: Please read the safety information shipped with your computer and follow recommended steps before working inside your computer. When finished working inside your computer, follow the instructions included in the safety information.

    • Close the computer display and turn the computer over so that the base of the computer is facing up.

  2. Dell Inspiron 13-7353 Heat Sink Replacement, Secure the Base: 步骤 2 中的图像 1,1
    • Remove the ten screws that secure the base cover to the base of the computer.

  3. Dell Inspiron 13-7353 Heat Sink Replacement, Pry the Base cover: 步骤 3 中的图像 1,1
    • Using a plastic scribe (plastic opening tool), pry the base cover off of the base of the computer.

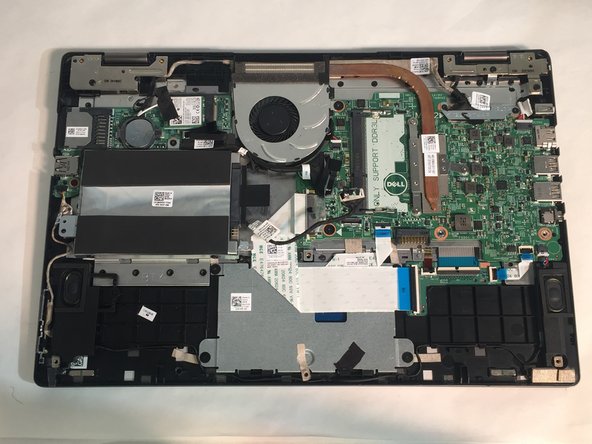
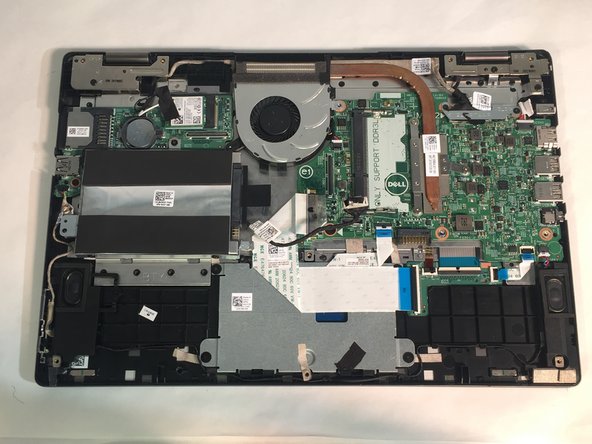
  4. Dell Inspiron 13-7353 Heat Sink Replacement, RAM: 步骤 4 中的图像 1,2 Dell Inspiron 13-7353 Heat Sink Replacement, RAM: 步骤 4 中的图像 2,2
    • Before opening your device, ensure that all data is backed up on a hard drive to prevent data loss.

    • Loosen and then unplug the hard drive cable.

  5. Dell Inspiron 13-7353 Heat Sink Replacement: 步骤 5 中的图像 1,2 Dell Inspiron 13-7353 Heat Sink Replacement: 步骤 5 中的图像 2,2
    • Remove the two M2 3mm screws attaching the battery using the Phillips #1 screwdriver.

    • Remove the battery.

  6. Dell Inspiron 13-7353 Heat Sink Replacement: 步骤 6 中的图像 1,3 Dell Inspiron 13-7353 Heat Sink Replacement: 步骤 6 中的图像 2,3 Dell Inspiron 13-7353 Heat Sink Replacement: 步骤 6 中的图像 3,3
    • Pry open the two clips.

    • Gently lift the RAM stick and pull it out of the motherboard.

  7. Dell Inspiron 13-7353 Heat Sink Replacement, Fan: 步骤 7 中的图像 1,3 Dell Inspiron 13-7353 Heat Sink Replacement, Fan: 步骤 7 中的图像 2,3 Dell Inspiron 13-7353 Heat Sink Replacement, Fan: 步骤 7 中的图像 3,3
    • Unplug the daughterboard cable in two places, then remove the daughterboard.

    • Unplug the fan cable.

  8. Dell Inspiron 13-7353 Heat Sink Replacement: 步骤 8 中的图像 1,2 Dell Inspiron 13-7353 Heat Sink Replacement: 步骤 8 中的图像 2,2
    • Remove two 3mm screws from the cooling fan using the Phillips #1 screwdriver.

    • Remove the cooling fan from the laptop.

  9. Dell Inspiron 13-7353 Heat Sink Replacement, Heat Sink: 步骤 9 中的图像 1,3 Dell Inspiron 13-7353 Heat Sink Replacement, Heat Sink: 步骤 9 中的图像 2,3 Dell Inspiron 13-7353 Heat Sink Replacement, Heat Sink: 步骤 9 中的图像 3,3
    • Remove three 2mm screws from the heat sink using a Phillips #0 screwdriver.

    • Remove the heat sink.

结论

To reassemble your device, follow these instructions in reverse order.

另外一个人完成了本指南。

0条评论

添加评论

浏览统计数据:

过去 24 小时: 0

过去 7 天: 0

过去 30 天: 1

总计 255