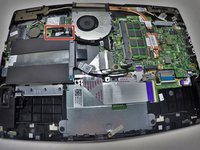
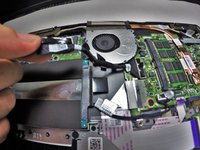
跳转到主内容

Dell Inspiron 13-7352 Cooling Fan Replacement

你所需要的

  1. Dell Inspiron 13-7352 Cooling Fan Replacement, Battery: 步骤 1 中的图像 1,3 Dell Inspiron 13-7352 Cooling Fan Replacement, Battery: 步骤 1 中的图像 2,3 Dell Inspiron 13-7352 Cooling Fan Replacement, Battery: 步骤 1 中的图像 3,3
    • Before you begin, be sure to turn off your laptop and unplug it from the outlet.

    • Use a Phillips screwdriver to remove the ten 7.5mm screws that securing the back panel.

    • Use the plastic opening tool to pry up and loosen the back panel.

    • Remove the back panel.

  2. Dell Inspiron 13-7352 Cooling Fan Replacement: 步骤 2 中的图像 1,2 Dell Inspiron 13-7352 Cooling Fan Replacement: 步骤 2 中的图像 2,2
    • Use a Phillips screwdriver to remove the two 3 mm screws securing the battery.

    • Unclip the hard drive wire from the battery.

  3. Dell Inspiron 13-7352 Cooling Fan Replacement: 步骤 3 中的图像 1,1
    • Gently remove the battery from the rest of the device.

  4. Dell Inspiron 13-7352 Cooling Fan Replacement, Cooling Fan: 步骤 4 中的图像 1,2 Dell Inspiron 13-7352 Cooling Fan Replacement, Cooling Fan: 步骤 4 中的图像 2,2
    • Remove the cord that runs from system board to the I/O board.

  5. Dell Inspiron 13-7352 Cooling Fan Replacement: 步骤 5 中的图像 1,2 Dell Inspiron 13-7352 Cooling Fan Replacement: 步骤 5 中的图像 2,2
    • Remove the 3mm and 4mm screws holding down fan with the Phillips #0 head.

    • Disconnect the fan wire from the system board.

  6. Dell Inspiron 13-7352 Cooling Fan Replacement: 步骤 6 中的图像 1,1
    • Lift the fan from the rest of the device by picking up a single side and separating it from device.

结论

To reassemble your device, follow these instructions in reverse order.

Chris Monte

于09/30/15注册

393 声望

创作了2篇指南

团队

0条评论

添加评论

浏览统计数据:

过去 24 小时: 0

过去 7 天: 0

过去 30 天: 3

总计 2,199