跳转到主内容

Dell Alienware M17x R4 Memory Modules Replacement

你所需要的

  1. Dell Alienware M17x R4 Memory Modules Replacement, Remove the Screws: 步骤 1 中的图像 1,1
    • WARNING: Before working inside your computer, read the safety information that shipped with your computer and follow the steps in Before You Begin.

    • Remove the screws that secure the memory-module cover to the palm rest assembly.

  2. Dell Alienware M17x R4 Memory Modules Replacement, Popping Up the Memory Module: 步骤 2 中的图像 1,1
    • CAUTION: To prevent damage to the memory-module connector, do not use tools to spread the memory module securing clips.

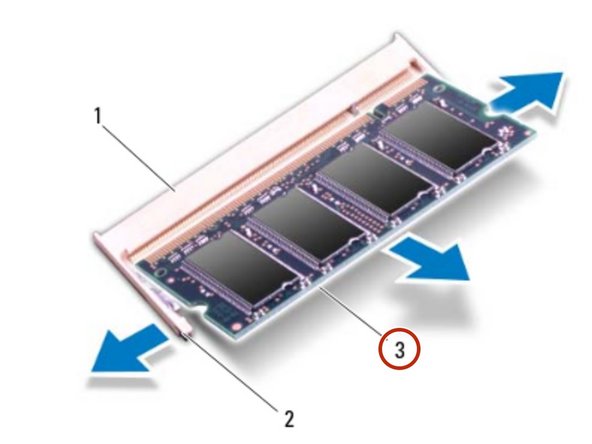
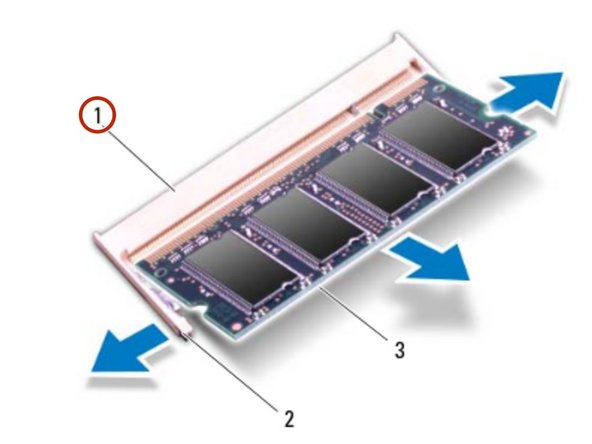
    • Use your fingertips to carefully spread apart the securing clips on each end of the memory-module connector until the memory module pops up.

  3. Dell Alienware M17x R4 Memory Modules Replacement, Removing the Memory Module: 步骤 3 中的图像 1,2 Dell Alienware M17x R4 Memory Modules Replacement, Removing the Memory Module: 步骤 3 中的图像 2,2
    • Remove the memory module from the memory-module connector.

  4. Dell Alienware M17x R4 Memory Modules Replacement, Align the Notch: 步骤 4 中的图像 1,1
    • NOTE: If you need to install memory modules in two connectors, install a memory module in the lower connector before you install a memory module in the upper connector.

    • Align the notch in the NEW memory module with the tab on the memory-module connector.

  5. Dell Alienware M17x R4 Memory Modules Replacement, Installing the Memory Module: 步骤 5 中的图像 1,1
    • Slide the memory module firmly into the connector at a 45-degree angle, and press the memory module down until it clicks into place. If you do not hear the click, remove the memory module and reinstall it.

  6. Dell Alienware M17x R4 Memory Modules Replacement, Align the Screw Holes: 步骤 6 中的图像 1,1
    • NOTE: If the memory module is not installed properly, the computer may not boot.

    • Align the screw holes on the memory-module cover with the screw holes on the palm rest assembly.

  7. Dell Alienware M17x R4 Memory Modules Replacement, Replace the Screws: 步骤 7 中的图像 1,1
    • Replace the screws that secure the memory-module cover to the palm rest assembly.

结论

To reassemble your device, follow these instructions in reverse order.

Terrence15

于12/18/17注册

79,034 声望

创作了441篇指南

团队

RampUP America, Inc. RampUP America, Inc. 的会员

Community

42 名成员

创作了1,985篇指南

0条评论

添加评论

浏览统计数据:

过去 24 小时: 0

过去 7 天: 0

过去 30 天: 5

总计 826