跳转到主内容

Dell Alienware 17 Third Hard-Drive Replacement

你所需要的

  1. Dell Alienware 17 Third Hard-Drive Replacement, Disconnecting the Battery Cable: 步骤 1 中的图像 1,1
  2. Dell Alienware 17 Third Hard-Drive Replacement, Remove the Screws: 步骤 2 中的图像 1,1
    • Remove the screws that secure the battery to the computer base.

  3. Dell Alienware 17 Third Hard-Drive Replacement, Releasing the Battery: 步骤 3 中的图像 1,2 Dell Alienware 17 Third Hard-Drive Replacement, Releasing the Battery: 步骤 3 中的图像 2,2
    • Using the battery cable, lift and release the battery from the tabs on the computer base.

  4. Dell Alienware 17 Third Hard-Drive Replacement, Opening the Display: 步骤 4 中的图像 1,1
    • Turn the computer over and open the display.

  5. Dell Alienware 17 Third Hard-Drive Replacement, Grounding the System Board: 步骤 5 中的图像 1,1
    • Press and hold the power button for five seconds to ground the system board.

  6. Dell Alienware 17 Third Hard-Drive Replacement, Slide the New Battery: 步骤 6 中的图像 1,1
    • Slide the NEW battery under the tabs on the computer base.

  7. Dell Alienware 17 Third Hard-Drive Replacement, Aligning the Screw Holes: 步骤 7 中的图像 1,1
    • Align the screw holes on the battery with the screw holes on the computer base.

  8. Dell Alienware 17 Third Hard-Drive Replacement, Replace the Screws: 步骤 8 中的图像 1,1
    • Replace the screws that secure the battery to the computer base.

  9. Dell Alienware 17 Third Hard-Drive Replacement, Connect the Battery Cable: 步骤 9 中的图像 1,1
    • Connect the battery cable to the system board.

  10. Dell Alienware 17 Third Hard-Drive Replacement, Remove the Screws: 步骤 10 中的图像 1,1
    • WARNING: Before working inside your computer, read the safety information that shipped with your computer and follow the steps in Before Working Inside Your Computer. After working inside your computer, follow the instructions in After Working Inside Your Computer.

    • CAUTION: To avoid data loss, do not remove the hard drive while the computer is On or in Sleep state.

    • CAUTION: Hard drives are extremely fragile. Exercise care when handling the hard drive.

    • NOTE: The media bay can accommodate an optical drive, a hard drive, or a solid-state drive.

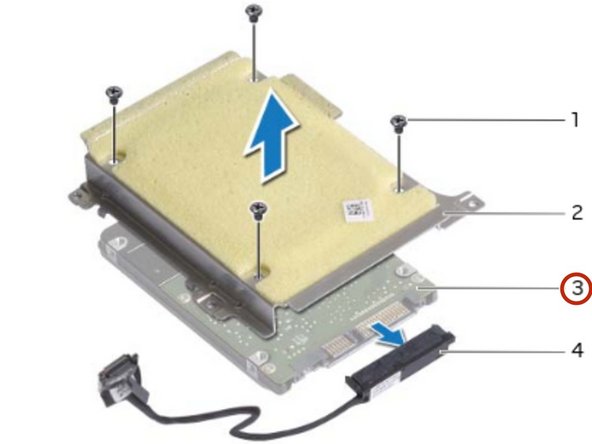
    • Remove the screws that secure the tertiary hard drive assembly to the computer base.

  11. Dell Alienware 17 Third Hard-Drive Replacement, Disconnecting the Hard-Drive Cable: 步骤 11 中的图像 1,1
    • Using the pull-tab, disconnect the hard-drive cable from the system board.

  12. Dell Alienware 17 Third Hard-Drive Replacement, Lifting the Hard-Drive Assembly: 步骤 12 中的图像 1,1
    • Lift the hard-drive assembly off the computer base.

  13. Dell Alienware 17 Third Hard-Drive Replacement, Disconnect the Interposer: 步骤 13 中的图像 1,2 Dell Alienware 17 Third Hard-Drive Replacement, Disconnect the Interposer: 步骤 13 中的图像 2,2
    • Disconnect the interposer from the hard drive.

  14. Dell Alienware 17 Third Hard-Drive Replacement, Remove the Screws: 步骤 14 中的图像 1,1
    • Remove the screws that secure the hard-drive bracket to the hard drive.

  15. Dell Alienware 17 Third Hard-Drive Replacement, Lifting the Hard-Drive Bracket: 步骤 15 中的图像 1,2 Dell Alienware 17 Third Hard-Drive Replacement, Lifting the Hard-Drive Bracket: 步骤 15 中的图像 2,2
    • Lift the hard-drive bracket off the hard drive.

  16. Dell Alienware 17 Third Hard-Drive Replacement, Align the Screw Holes: 步骤 16 中的图像 1,1
    • Align the screw holes on the NEW hard-drive bracket with the screw holes on the hard drive.

  17. Dell Alienware 17 Third Hard-Drive Replacement, Replace the Screws: 步骤 17 中的图像 1,1
    • Replace the screws that secure the hard-drive bracket to the hard drive.

  18. Dell Alienware 17 Third Hard-Drive Replacement, Connect the Interposer: 步骤 18 中的图像 1,1
    • Connect the interposer to the hard drive.

  19. Dell Alienware 17 Third Hard-Drive Replacement, Align the Screw Holes: 步骤 19 中的图像 1,1
    • Align the screw holes on the hard-drive assembly with the screw holes on the computer base.

  20. Dell Alienware 17 Third Hard-Drive Replacement, Replace the Screws: 步骤 20 中的图像 1,1
    • Replace the screws that secure the hard-drive assembly to the computer base.

  21. Dell Alienware 17 Third Hard-Drive Replacement, Connecting the Hard-Drive Cable: 步骤 21 中的图像 1,1
    • Connect the hard-drive cable to the system board.

结论

To reassemble your device, follow these instructions in reverse order.

Terrence15

于12/18/17注册

79,121 声望

创作了441篇指南

团队

RampUP America, Inc. RampUP America, Inc. 的会员

Community

42 名成员

创作了1,985篇指南

0条评论

添加评论

浏览统计数据:

过去 24 小时: 1

过去 7 天: 2

过去 30 天: 12

总计 1,051