跳转到主内容

Dell Alienware 13 R2 Base Panel Replacement

你所需要的

  1. Dell Alienware 13 R2 Base Panel Replacement, Turning Over the PC: 步骤 1 中的图像 1,1
    • WARNING: Before working inside your computer, read the safety information that shipped with your computer and follow the steps in Before Working Inside Your Computer After working inside your computer, follow the instructions in After Working Inside Your Computer For more safety best practices, see the regulatory compliance home page.

    • Close the display and turn the computer over.

  2. Dell Alienware 13 R2 Base Panel Replacement, Loosen the screws: 步骤 2 中的图像 1,1
    • Loosen the captive screws that secure the base panel to the computer base.

  3. Dell Alienware 13 R2 Base Panel Replacement, Releasing the Tabs: 步骤 3 中的图像 1,1
    • Using a plastic scribe, gently release the tabs that secure the base panel to the computer base.

  4. Dell Alienware 13 R2 Base Panel Replacement, Disconnecting the Battery Cable: 步骤 4 中的图像 1,2 Dell Alienware 13 R2 Base Panel Replacement, Disconnecting the Battery Cable: 步骤 4 中的图像 2,2
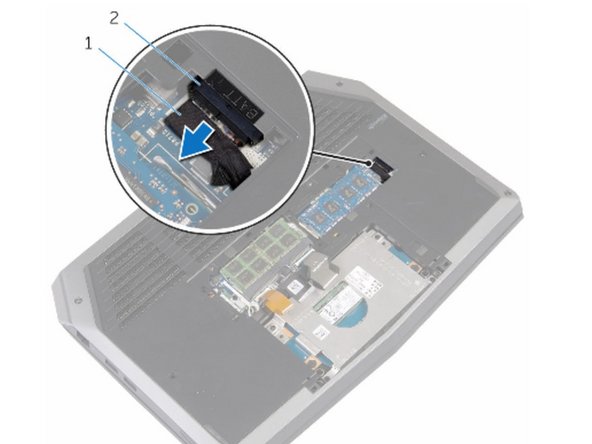
    • Disconnect the battery cable from the battery-cable connector.

    • Turn the computer over.

  5. Dell Alienware 13 R2 Base Panel Replacement, Power Button: 步骤 5 中的图像 1,1
    • Press and hold the power button for 5 seconds to ground the system board.

    • Connect the battery cable to the battery-cable connector.

  6. Dell Alienware 13 R2 Base Panel Replacement, Aligning the tabs: 步骤 7 中的图像 1,1
    • Align the tabs on the base panel with the slots on the computer base and snap the base panel into place.

  7. Dell Alienware 13 R2 Base Panel Replacement, Tighten the screws: 步骤 8 中的图像 1,1
    • Tighten the captive screws that secure the base panel to the computer base.

终点

Terrence15

于12/18/17注册

79,121 声望

创作了441篇指南

团队

RampUP America, Inc. RampUP America, Inc. 的会员

Community

42 名成员

创作了1,985篇指南

0条评论

添加评论

浏览统计数据:

过去 24 小时: 1

过去 7 天: 6

过去 30 天: 13

总计 254