简介
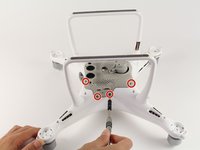
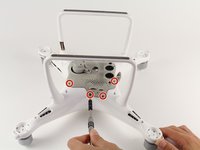
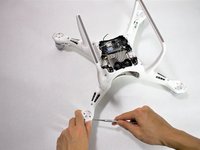
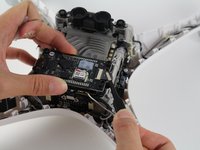
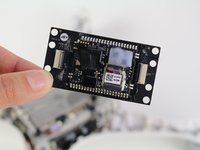
The flight controller houses sensors and firmware that are critical to the drone’s functionality. If your drone experiences in-flight drifting or errors with the IMU after calibration, your flight controller board may need to be replaced. To replace the board, you need a JIS #000 screwdriver, a 2mm hex bit, a 1.5mm hex bit, and a metal prying tool. Take special care when removing and installing the U.FL connector.
你所需要的
-
-
Use your finger tips to pinch the damaged propeller.
-
Twist the propeller counterclockwise and pull up to remove.
-
-
-
在这个步骤中使用的工具:Tweezers$4.99
-
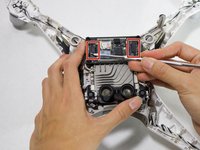
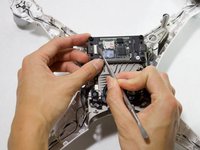
Peel the electrical tape off.
-
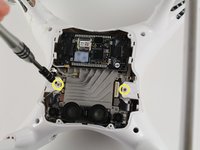
Unlock the connector by prying up on the black latch.
-
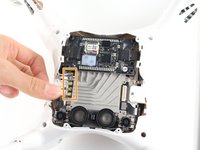
Pull the ribbon cable out with tweezers.
-


To reassemble your device, follow these instructions in reverse order.
To reassemble your device, follow these instructions in reverse order.
6等其他人完成本指南。
团队

Cal Poly, Team S15-G6, White Fall 2018 Cal Poly, Team S15-G6, White Fall 2018 的会员
CPSU-WHITE-F18S15G6
4 名成员
创作了6篇指南
4条评论
Great guide but there should have been step 14 to show how to put the control board back on top of the isolators.
Also I found it was not necessary to remove the bottom shell to remove and replace the control board. There is enough room to remove and replace with the shell in place and this will greatly decrease the time required to do the repair. I used the rounded edge of a small flat screw driver.
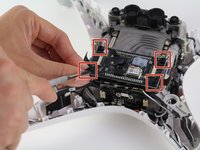
The replacement of the board is a challenge and that is where I got stuck. I used monofilament fishing line. Make a loop in the line and insert the loop through the mounting hole in the board. Pass the loop over the isolator ball and into the groove around it. Bring the mounting board into contact with the isolator ball and gently pull the fishing line loop and pull the isolator ball up into the mounting hole. If you are lucky, the ball will come through and flatten itself out as is is supposed to. If not, use tweezers to grab the ball and gently pull it up through the hole.
Excellent guide. This helped so much for me to replace my failed flight control board. I dropped one of the small screws and could not find it! I bought a DJI Phantom 4 fastener pack that has alot of these specialty screws. I only needed one screw, but now have lots of backups for future. An improvement to the instructions would be reassembly steps. It could help with some of the wire routing that I figured out the routing, but callouts would help. As a contribution to a possible update, I figured out a simple, reliable technique to push the dampener boots through the flight control board corners. Essentially use needle-nose pliers to squeeze the wide part of the dampener and push one end of the squished profile through the board hole. Use your other hand to pinch or roll the rest of the dampener through the hole. If allowed here is a link to a video showing how I did this: https://youtu.be/QHvy0n_iorE
Thanks for this. The visuals helped out a ton in knowing what to do. Like comments above mentioned, there is just enough room to do this without removing the entire shell. The dampeners were the hardest part to reinstall. I tried the fishing line trick commented above with no success so I brute forced it. I lined up the board with the dampeners, pushed down on the board to compress them and then took my tweezers and really forcefully grabbed them. Once one side was up, I dug my tweezers down into it to grab the opposite side through the hole. I got the rest of them done within 5 min doing it this way.