跳转到主内容

Core Assembly Removal

你所需要的

  1. Core Assembly Removal, Opening Procedure: 步骤 1 中的图像 1,1
    • Remove the four Tri-point #00 screws (4.2 mm length) on the backside of the watch.

  2. Core Assembly Removal: 步骤 2 中的图像 1,2 Core Assembly Removal: 步骤 2 中的图像 2,2
    • Use an opening tool to get between the back cover and the metal housing of the watch.

    • Carefully pry the plastic back cover open.

    • Don't remove the back cover yet. There is a flex cable running to the core assembly inside.

  3. Core Assembly Removal: 步骤 3 中的图像 1,2 Core Assembly Removal: 步骤 3 中的图像 2,2
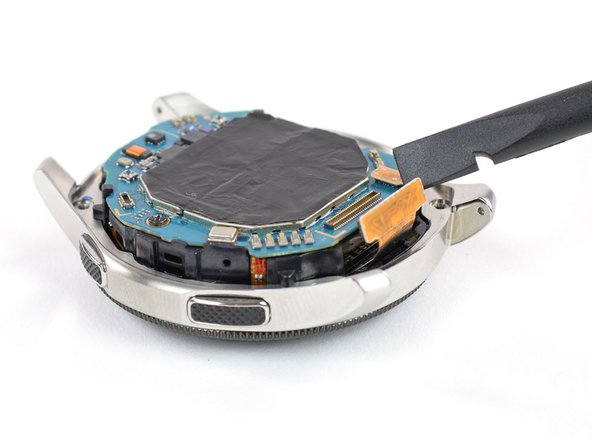
    • Lay down the watch and lift the back cover to access the sensor connector on the motherboard.

  4. Core Assembly Removal: 步骤 4 中的图像 1,2 Core Assembly Removal: 步骤 4 中的图像 2,2
    • Use a spudger to disconnect the sensor flex cable from the motherboard.

  5. Core Assembly Removal: 步骤 5 中的图像 1,3 Core Assembly Removal: 步骤 5 中的图像 2,3 Core Assembly Removal: 步骤 5 中的图像 3,3
    • Remove the back cover.

    • When closing the watch make sure the rubber gasket is undamaged or replace it with a new one.

  6. Core Assembly Removal, Core Assembly Removal: 步骤 6 中的图像 1,2 Core Assembly Removal, Core Assembly Removal: 步骤 6 中的图像 2,2
    • Use a spudger to disconnect the display flex cable from the motherboard.

  7. Core Assembly Removal: 步骤 7 中的图像 1,2 Core Assembly Removal: 步骤 7 中的图像 2,2
    • Lift the core unit out of the housing.

    • The core's plastic frame sits tight inside the housing.

    • Carefully thread the display flex cable through the gap of the core's plastic frame.

结论

To reassemble your device, follow these instructions in reverse order.

5等其他人完成本指南。

Tobias Isakeit

于03/31/14注册

117,426 声望

创作了188篇指南

团队

Master Techs Master Techs 的会员

Community

322 名成员

创作了2,528篇指南

3条评论

thanks, loved seeing this watch from the inside!

Crystal Blu - 回复

Great, but now I need to know how to get to the glass to replace it.

selwood.maria - 回复

添加评论

浏览统计数据:

过去 24 小时: 1

过去 7 天: 8

过去 30 天: 52

总计 2,915