跳转到主内容

Classique 087CQA Heating Element Replacement

你所需要的

  1. Classique 087CQA Heating Element Replacement, Heating Element: 步骤 1 中的图像 1,1
    • Begin with the side with switches

  2. Classique 087CQA Heating Element Replacement: 步骤 2 中的图像 1,2 Classique 087CQA Heating Element Replacement: 步骤 2 中的图像 2,2
    • Remove the Phillips PH0 bit

    • Insert the bit into the screwdriver

  3. Classique 087CQA Heating Element Replacement: 步骤 3 中的图像 1,1
    • Unscrew the shell screw (1) with the screw driver

    • 5mm Phillips flat-head screw

  4. Classique 087CQA Heating Element Replacement: 步骤 4 中的图像 1,1
    • Flip the hair dryer over to the side without switches

  5. Classique 087CQA Heating Element Replacement: 步骤 5 中的图像 1,1
    • Unscrew the shell screw (1) with the screwdriver

    • 5mm Phillips flat-head screw

  6. Classique 087CQA Heating Element Replacement: 步骤 6 中的图像 1,2 Classique 087CQA Heating Element Replacement: 步骤 6 中的图像 2,2
    • Remove the bit from the screwdriver and insert the Phillips PH2 bit

  7. Classique 087CQA Heating Element Replacement: 步骤 7 中的图像 1,1
    • Unscrew the remaining shell screws (5) with the screwdriver

    • 15mm Phillips round-head screws

  8. Classique 087CQA Heating Element Replacement: 步骤 8 中的图像 1,2 Classique 087CQA Heating Element Replacement: 步骤 8 中的图像 2,2
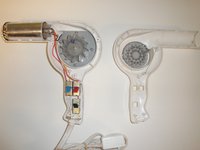
    • Gently pull the two sides apart

    • Separate each side

  9. Classique 087CQA Heating Element Replacement: 步骤 9 中的图像 1,1
    • Remove front grill

  10. Classique 087CQA Heating Element Replacement: 步骤 10 中的图像 1,2 Classique 087CQA Heating Element Replacement: 步骤 10 中的图像 2,2
    • Pull up and remove the heating element assembly

  11. Classique 087CQA Heating Element Replacement: 步骤 11 中的图像 1,1
    • Remove the outer sleeve and replace the heating element

结论

To reassemble your device, follow these instructions in reverse order.

Brandon Jestis

于01/31/17注册

1 声望

创作了2篇指南

0条评论

添加评论

浏览统计数据:

过去 24 小时: 0

过去 7 天: 5

过去 30 天: 10

总计 580