跳转到主内容

Cardinal Health Vela Ventilator Exhalation Valve Body Replacement

医疗设备
ifixit 或本维修指南均未获得医疗设备制造商的认可或与任何制造商存在附属关系。

你所需要的

精选文档

  1. Cardinal Health Vela Ventilator Exhalation Valve Body Replacement, Exhalation Valve Body: 步骤 1 中的图像 1,1
    • Use a screwdriver to remove the two Phillips #0 screws at the top of the plug guard.

    • Remove the plug guard and unplug the ventilator.

  2. Cardinal Health Vela Ventilator Exhalation Valve Body Replacement: 步骤 3 中的图像 1,1
    • Remove the four Phillips #0 screws on the back side of the ventilator.

  3. Cardinal Health Vela Ventilator Exhalation Valve Body Replacement: 步骤 4 中的图像 1,1
    • Remove all six small side panel screws along the bottom of each side of the top cover with the same screwdriver.

    • Slide the top cover towards the back side of the ventilator to remove it.

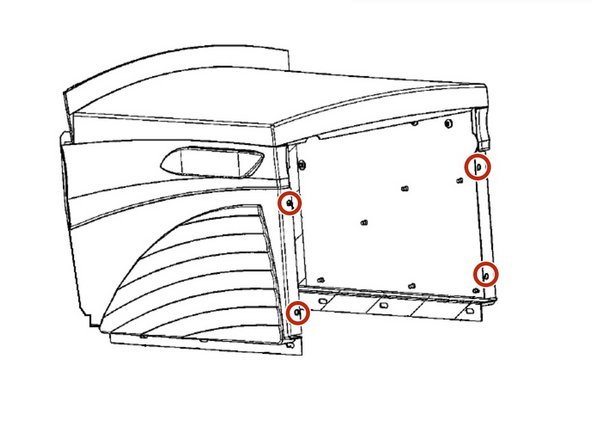
  4. Cardinal Health Vela Ventilator Exhalation Valve Body Replacement: 步骤 6 中的图像 1,1
    • Use your Phillips #0 screwdriver to unscrew the four Phillips screws positioned on each side of the battery tray.

    • Lift the battery tray out of the ventilator.

    • Caution: The wires connecting the batteries to the ventilator will still be connected so lift the battery tray carefully.

  5. Cardinal Health Vela Ventilator Exhalation Valve Body Replacement: 步骤 8 中的图像 1,1
    • Disconnect the batteries from the ventilator by pulling apart the Battery Connector.

  6. Cardinal Health Vela Ventilator Exhalation Valve Body Replacement: 步骤 9 中的图像 1,1
    • Remove the two Phillips countersink screws from the right side of the rear panel.

  7. Cardinal Health Vela Ventilator Exhalation Valve Body Replacement: 步骤 10 中的图像 1,1
    • Remove the single Phillips countersink screw in the upper front of the right panel.

  8. Cardinal Health Vela Ventilator Exhalation Valve Body Replacement: 步骤 11 中的图像 1,1
    • Remove the single Phillips screw in the lower center of the right panel.

  9. Cardinal Health Vela Ventilator Exhalation Valve Body Replacement: 步骤 12 中的图像 1,1
    • Gently lift out the panel and the power PCB. Lay the panel flat and make the following disconnections:

    • Remove the 2 Phillips countersink screws at the rear of the left panel.

    • Remove the 1 Phillips countersink screw in the upper front of the left panel.

    • Lift out the left panel.

    • Disconnect the following from the main PCB:

    • JP2 40-pin ribbon cable to JP1 on the SVGA out PCB

    • J301 12-pin to J301 on the blender PCB

  10. Cardinal Health Vela Ventilator Exhalation Valve Body Replacement: 步骤 15 中的图像 1,1
    • Disconnect the green oxygen nebulizer tube

    • Remove the 2 Phillips pan-head screws behind the front panel at the lower left and right.

    • Disconnect the 1/8” silicone tube #4 from P2 on the exhalation differential transducer.

    • Disconnect the 1/8” silicone tube #5 from P1 on the exhalation differential transducer.

    • Disconnect the 1/8” silicone tube #1 from the turbine.

    • Disconnect the 1/16” silicone tube from the front ports of the turbine outlet auto-zero solenoid that goes to the main tubing harness.

    • Disconnect the 1/16” silicone tube from the turbine inlet auto-zero solenoid that goes to the turbine.

    • Disconnect the 1/16” silicone tube from the airway pressure auto-zero solenoid that goes to the exhalation valve receptacle.

  11. Cardinal Health Vela Ventilator Exhalation Valve Body Replacement: 步骤 17 中的图像 1,1
    • Disconnect the following from the main PCB:

    • Disconnect the following from the FIO2 monitoring PCB:

    • J2 2-pin (clear conn.) to oxygen sensor

    • J3 2-pin (blue conn.) to oxygen inlet solenoid on blender assembly

    • J4 2-pin (red conn.) to nebulizer solenoid assembly on upper rear of blender

  12. Cardinal Health Vela Ventilator Exhalation Valve Body Replacement: 步骤 19 中的图像 1,1
    • Remove two Phillips pan-head screws on the valve cover.

    • Lift out the exhalation valve assembly.

结论

To reassemble your device, follow these instructions in reverse order.

附加文件

Ethan Nikcevich

于04/07/20注册

649 声望

创作了2篇指南

团队

Cal Poly, Team S11-G22, Paton Spring 2020 Cal Poly, Team S11-G22, Paton Spring 2020 的会员

CPSU-PATON-S20S11G22

2 名成员

创作了3篇指南

0条评论

添加评论

浏览统计数据:

过去 24 小时: 0

过去 7 天: 1

过去 30 天: 4

总计 286