跳转到主内容

Capresso Perfectea 260 Handle Replacement

你所需要的

  1. Capresso Perfectea 260 Handle Replacement, Lid: 步骤 1 中的图像 1,1
    • Lift the lid of the Perfectea

    • Remove the two 12mm Phillips #2 screws located at the brim of the pot.

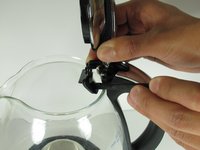
  2. Capresso Perfectea 260 Handle Replacement: 步骤 2 中的图像 1,3 Capresso Perfectea 260 Handle Replacement: 步骤 2 中的图像 2,3 Capresso Perfectea 260 Handle Replacement: 步骤 2 中的图像 3,3
    • Adhesive tape is left holding the lid to the glass pot.

    • Use the spudger for this step.

    • With one hand, firmly grip the lid while designating your other hand to wedge the spudger between the lid and the glass pot.

    • Working from the outside to the inside, gently pry the adhesive tape from the glass pot, detaching the lid.

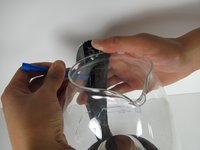
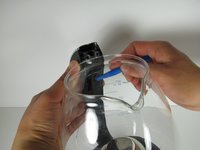
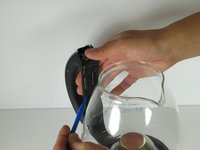
  3. Capresso Perfectea 260 Handle Replacement, Handle: 步骤 3 中的图像 1,3 Capresso Perfectea 260 Handle Replacement, Handle: 步骤 3 中的图像 2,3 Capresso Perfectea 260 Handle Replacement, Handle: 步骤 3 中的图像 3,3
    • Use the plastic opening tool for this step.

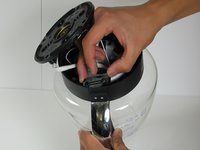
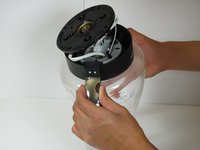
    • Firmly grip the glass pot with one hand while using the other to slip the flat end of the plastic opening tool between the glass pot and the adhesive tape holding the handle to the glass pot.

    • Gently pry the adhesive tape from the glass pot. Work your way around the handle until the handle is loose and not attached to the pot anymore.

  4. Capresso Perfectea 260 Handle Replacement: 步骤 4 中的图像 1,1
    • Once the handle is loose, locate the four 10 mm Phillips #2 screws from the base of the Perfectea and remove them.

    • Remove the base.

  5. Capresso Perfectea 260 Handle Replacement: 步骤 5 中的图像 1,1
    • Locate the two 10 mm Phillips #2 screws at the bottom of the handle and remove them.

  6. Capresso Perfectea 260 Handle Replacement: 步骤 6 中的图像 1,2 Capresso Perfectea 260 Handle Replacement: 步骤 6 中的图像 2,2
    • In order to free the bottom of the handle, remove the plastic piece that was held by the two screws

    • While firmly holding the glass pot, gently slide the bottom of the handle up and out of the base of the pot.

结论

To reassemble your device, follow these instructions in reverse order.

另外一个人完成了本指南。

Kenji Anzai

于04/14/15注册

588 声望

创作了4篇指南

团队

Cal Poly, Team 6-17, Maness Spring 2015 Cal Poly, Team 6-17, Maness Spring 2015 的会员

CPSU-MANESS-S15S6G17

4 名成员

创作了6篇指南

一条评论

This guide applies to the Capresso H2O kettle too. Thanks for the guide.

Giovanni Ciriani - 回复

添加评论

浏览统计数据:

过去 24 小时: 0

过去 7 天: 3

过去 30 天: 4

总计 557