跳转到主内容

Canon Powershot A720 IS LCD Screen Replacement

你所需要的

  1. Canon Powershot A720 IS LCD Screen Replacement, Removal of Batteries: 步骤 1 中的图像 1,2 Canon Powershot A720 IS LCD Screen Replacement, Removal of Batteries: 步骤 1 中的图像 2,2
    • Use your thumb to push up the battery lock on the bottom of the camera.

    • The battery compartment door will spring open and the batteries will slide out.

  2. Canon Powershot A720 IS LCD Screen Replacement, Battery Compartment Door Removal: 步骤 2 中的图像 1,1
    • Place the camera down so that the lens is facing up.

    • Remove the single 4 mm screw from the inside of the battery compartment using a Phillips #00 screwdriver.

    • Remove the door from the camera.

    • Always place screws on a magnetic mat and write the size and location of where they were removed to know where to place them back.

  3. Canon Powershot A720 IS LCD Screen Replacement, Unscrewing the Camera Case: 步骤 3 中的图像 1,3 Canon Powershot A720 IS LCD Screen Replacement, Unscrewing the Camera Case: 步骤 3 中的图像 2,3 Canon Powershot A720 IS LCD Screen Replacement, Unscrewing the Camera Case: 步骤 3 中的图像 3,3
    • Remove the six 4 mm screws from the sides and bottom of the camera with a Phillips #00 screwdriver.

  4. Canon Powershot A720 IS LCD Screen Replacement, Separating the Back Case Panel: 步骤 4 中的图像 1,3 Canon Powershot A720 IS LCD Screen Replacement, Separating the Back Case Panel: 步骤 4 中的图像 2,3 Canon Powershot A720 IS LCD Screen Replacement, Separating the Back Case Panel: 步骤 4 中的图像 3,3
    • Separate the back case panel from the rest of the camera by gently prying it open with your hands.

    • The gray rubber cover labeled DC IN DIGITAL A/V OUT may fall out.

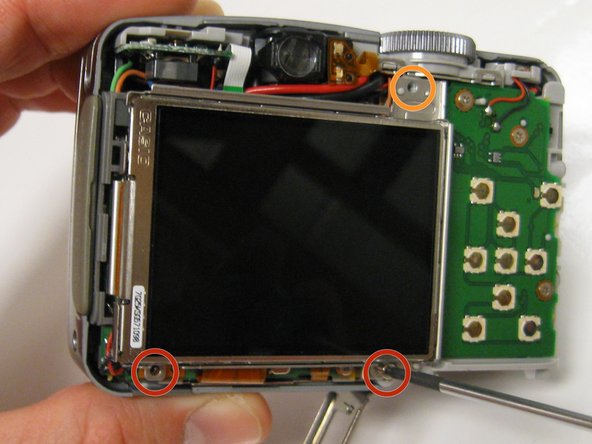
  5. Canon Powershot A720 IS LCD Screen Replacement, Unscrew the LCD Screen Mount: 步骤 5 中的图像 1,1
    • Remove the two 3 mm screws below the LCD screen mount with a Phillips #00 screwdriver.

    • Remove the top 4 mm screw with the Phillips #00 screwdriver.

  6. Canon Powershot A720 IS LCD Screen Replacement, Removing the LCD Screen from the Motherboard: 步骤 6 中的图像 1,3 Canon Powershot A720 IS LCD Screen Replacement, Removing the LCD Screen from the Motherboard: 步骤 6 中的图像 2,3 Canon Powershot A720 IS LCD Screen Replacement, Removing the LCD Screen from the Motherboard: 步骤 6 中的图像 3,3
    • Carefully lift and turn over the LCD screen so that you are able to see the motherboard.

    • Potential for device damage: Treat the motherboard with care since it is very sensitive to static discharge.

    • Carefully disconnect the LCD screen ribbon cable from its ZIF connector with your thumb and index finger.

    • Have your thumb and index finger cover as much of the ribbon's width and keep as close to the ZIF connector as possible without touching the motherboard, while pulling the ribbon cable out.

    • Potential for device damage: Be careful to not rip the ribbon wire when pulling it out.

    • Use the soldering iron to separate the black and red power wires from the motherboard.

    • Note the location of where each wire was attached. The black wire is the negative power wire and the red wire is the positive power wire. Replacing them incorrectly could lead to power outages and damage to the motherboard.

  7. Canon Powershot A720 IS LCD Screen Replacement, LCD Screen Removal from Mount: 步骤 7 中的图像 1,3 Canon Powershot A720 IS LCD Screen Replacement, LCD Screen Removal from Mount: 步骤 7 中的图像 2,3 Canon Powershot A720 IS LCD Screen Replacement, LCD Screen Removal from Mount: 步骤 7 中的图像 3,3
    • Insert the tip of the blue plastic opening tool between the LCD screen and the mount to unsnap the metal tabs.

    • Insert the flat end of the spudger underneath the LCD screen to break apart the glue that is attaching the LCD screen to the mount.

    • Potential for device damage: Avoid scraping against the power wires and ribbon wire. This may cause the ribbon wire to rip or detach the power wires.

    • Once you have separated the the glue, carefully pull out the LCD screen from the mount.

    • Pay attention to the wires and ribbon cable as you pull the LCD screen out of the mount. Make sure that you slide the ribbon wire through the slot to separate the LCD screen and mount.

结论

To reassemble your device, follow these instructions in reverse order.

Ismael R

于01/19/15注册

251 声望

创作了2篇指南

团队

USF Tampa, Team 17-4, Watkins Winter 2015 USF Tampa, Team 17-4, Watkins Winter 2015 的会员

USFT-WATKINS-W15S17G4

3 名成员

创作了8篇指南

0条评论

添加评论

浏览统计数据:

过去 24 小时: 1

过去 7 天: 8

过去 30 天: 32

总计 1,843