跳转到主内容

当前版本的文档还未经巡查,您可以查看最新的已查核版本

你所需要的

  1. 这个步骤还没有翻译 帮忙翻译一下

    : 步骤 1 中的图像 1,1
    • Open the battery compartment and remove the batteries.

    • Remove the two screws that are deep in the battery compartment with a Phillips #00 screwdriver.

  2. 这个步骤还没有翻译 帮忙翻译一下

    : 步骤 2 中的图像 1,2 : 步骤 2 中的图像 2,2
    • Open the CF compartment and remove the top screw with a Phillips #00 screwdriver.

    • The panel that holds the shutter button and zoom will come off.

    • Be careful! There are two small wires connecting the speaker to the body of the camera. These are very delicate so proceed with caution. Do not remove.

  3. 这个步骤还没有翻译 帮忙翻译一下

    : 步骤 3 中的图像 1,1
    • Unscrew the three small screws on the bottom of the camera with a Phillips #00 screwdriver.

    • Remove the wrist strap.

  4. 这个步骤还没有翻译 帮忙翻译一下

    : 步骤 4 中的图像 1,1
    • Remove the screw in the CF compartment with a Phillips #00 screwdriver.

  5. 这个步骤还没有翻译 帮忙翻译一下

    : 步骤 5 中的图像 1,3 : 步骤 5 中的图像 2,3 : 步骤 5 中的图像 3,3
    • Open the rubber Digital AV Out compartment flap.

    • Pry the battery with an opening tool.

    • Carefully pull out the battery with two fingers.

    • Remove the two screws that are now visible with a Phillips #00 screwdriver.

  6. 这个步骤还没有翻译 帮忙翻译一下

    : 步骤 6 中的图像 1,2 : 步骤 6 中的图像 2,2
    • Starting from the bottom, carefully pull the casing off.

    • The casing will now pivot at the top.

    • There are three catches that hold the back casing to the body.

    • You may have to pull with some force. The rear panel will make a snapping noise when it separates from the body.

  7. 这个步骤还没有翻译 帮忙翻译一下

    : 步骤 7 中的图像 1,1
    • The interior of the camera should look like this.

  8. 这个步骤还没有翻译 帮忙翻译一下

    : 步骤 8 中的图像 1,1
    • Remove the two screws at the top of the battery compartment with a Phillips #00 screwdriver.

  9. 这个步骤还没有翻译 帮忙翻译一下

    : 步骤 9 中的图像 1,2 : 步骤 9 中的图像 2,2
    • With your right thumb, pull back on the tab while using your left hand to pull the face of the camera away from the body.

  10. 这个步骤还没有翻译 帮忙翻译一下

    : 步骤 10 中的图像 1,1
    • After removing the front and rear panels, locate the viewfinder directly above the lens on top of the camera.

    • Three screws hold the viewfinder in place: two on the top and one on the lens side of the camera.

    • First, remove the screw in the bent corner of the viewfinder with a Phillips #00 screwdriver.

  11. 这个步骤还没有翻译 帮忙翻译一下

    : 步骤 11 中的图像 1,1
    • Remove the second screw directly across from the bent corner.

    • It may be hidden in the space under the orange circuitry with a Phillips #00 screwdriver.

  12. 这个步骤还没有翻译 帮忙翻译一下

    : 步骤 12 中的图像 1,1
    • Remove the final screw directly under the left side of the viewfinder (on the lens side) with a Phillips #00 screwdriver.

  13. 这个步骤还没有翻译 帮忙翻译一下

    : 步骤 13 中的图像 1,1
    • After removing the three screws, the only thing still holding the viewfinder in place is a small plastic peg.

    • Remove the viewfinder with a firm pull directly upwards.

  14. 这个步骤还没有翻译 帮忙翻译一下

    : 步骤 14 中的图像 1,1
    • Remove the two clearly visible screws from the control dial with a Phillips #00 screwdriver.

    • Remove the dial—it should come off easily.

  15. 这个步骤还没有翻译 帮忙翻译一下

    : 步骤 15 中的图像 1,2 : 步骤 15 中的图像 2,2
    • With tweezers, carefully unplug the two small wires from the green plug.

    • Carefully replace the broken speaker/shutter panel with a new one.

  16. 这个步骤还没有翻译 帮忙翻译一下

    : 步骤 16 中的图像 1,1
    • The removed panel should look like this.

  17. 这个步骤还没有翻译 帮忙翻译一下

    : 步骤 17 中的图像 1,1
    • Using a Phillips #00 screwdriver, remove the one visible screw that attaches the flex assembly to the back of the camera.

  18. 这个步骤还没有翻译 帮忙翻译一下

    : 步骤 18 中的图像 1,2 : 步骤 18 中的图像 2,2
    • Starting with the bottom-left corner (below the screen), lift the flex assembly away from the camera chassis.

  19. 这个步骤还没有翻译 帮忙翻译一下

    : 步骤 19 中的图像 1,1
    • Use your finger to release the small metal tab that attaches the flex assembly to the upper-right corner of the camera.

    • The tab is very small and may be hard to see.

  20. 这个步骤还没有翻译 帮忙翻译一下

    : 步骤 20 中的图像 1,1
    • Disconnect the black connector by lifting it up.

    • Potential for device damage: You may damage the flex assembly if you forcibly remove it without disconnecting the connector.

  21. 这个步骤还没有翻译 帮忙翻译一下

    : 步骤 21 中的图像 1,1
    • Gently pull the rest of the flex assembly away from the camera body until you reach the last connector.

  22. 这个步骤还没有翻译 帮忙翻译一下

    : 步骤 22 中的图像 1,2 : 步骤 22 中的图像 2,2
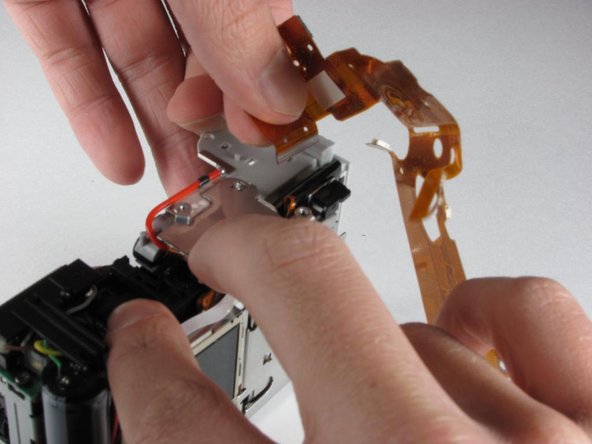
    • Hold the flex assembly gently but firmly, and pull it out of the connection with two fingers.

    • Be sure to pull straight up, not at an angle.

  23. 这个步骤还没有翻译 帮忙翻译一下

    : 步骤 23 中的图像 1,1
    • Remove the two screws from the bottom of the camera with a Phillips #00 screwdriver.

  24. 这个步骤还没有翻译 帮忙翻译一下

    : 步骤 24 中的图像 1,1
    • Remove the last screw located on the top of the camera with a Phillips #00 screwdriver.

  25. 这个步骤还没有翻译 帮忙翻译一下

    : 步骤 25 中的图像 1,2 : 步骤 25 中的图像 2,2
    • The screen should no longer be screwed to the body.

    • Gently push the screen down and then pull it away from the body of the camera.

    • It will swing away, because it is still plugged into the camera.

  26. 这个步骤还没有翻译 帮忙翻译一下

    : 步骤 26 中的图像 1,2 : 步骤 26 中的图像 2,2
    • Unplug the thin orange ribbon cable (located towards the bottom of the camera) by carefully pulling it away from the white connector.

  27. 这个步骤还没有翻译 帮忙翻译一下

    : 步骤 27 中的图像 1,1
    • Finally, repeat the previous step with the thick orange strip located on the side of the screen.

  28. 这个步骤还没有翻译 帮忙翻译一下

    : 步骤 28 中的图像 1,1
    • You have successfully removed the LCD screen. The camera is now ready for the replacement screen.

终点

Shalan Ertis

于01/26/10注册

68 声望

创作了3篇指南

团队

Cal Poly, Team 14-40, Regan Winter 2010 Cal Poly, Team 14-40, Regan Winter 2010 的会员

CPSU-REGAN-W10S14G40

5 名成员

创作了15篇指南

0条评论

添加评论

浏览统计数据:

过去 24 小时: 0

过去 7 天: 1

过去 30 天: 7

总计 8,520