跳转到主内容

Canon PowerShot SD500 Digital ELPH Image Sensor Replacement

你所需要的

  1. Canon PowerShot SD500 Digital ELPH Image Sensor Replacement, Battery: 步骤 1 中的图像 1,1
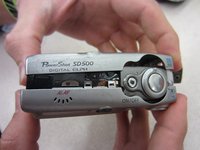
    • Slide open the battery cover.

    • Push the small orange tab to the side so the battery can be removed.

  2. Canon PowerShot SD500 Digital ELPH Image Sensor Replacement: 步骤 2 中的图像 1,2 Canon PowerShot SD500 Digital ELPH Image Sensor Replacement: 步骤 2 中的图像 2,2
    • Slide the battery out of the battery compartment.

  3. Canon PowerShot SD500 Digital ELPH Image Sensor Replacement, Front and Rear Casing: 步骤 3 中的图像 1,2 Canon PowerShot SD500 Digital ELPH Image Sensor Replacement, Front and Rear Casing: 步骤 3 中的图像 2,2
    • Two Phillips screws need to be removed using a #00 Phillips screwdriver. The upper screw is under the USB port cover, which can simply be pulled away gently from the casing. the lower screw is visible on the panel.

    • The screws are different sizes. The .125 inch screw is located under the USB port cover. The 0.85 inch screw goes in the lower hole on the panel.

    • When looking at the back of the camera, these two screws are on the right panel of the camera.

  4. Canon PowerShot SD500 Digital ELPH Image Sensor Replacement: 步骤 4 中的图像 1,1
    • Remove the right side cover from the camera casing.

  5. Canon PowerShot SD500 Digital ELPH Image Sensor Replacement: 步骤 5 中的图像 1,1
    • Remove a .07 inch Phillips screw using a #00 Phillips screwdriver.

  6. Canon PowerShot SD500 Digital ELPH Image Sensor Replacement: 步骤 6 中的图像 1,1
    • Remove two .085 inch Phillips screws from the left side of the camera using a #00 Philips screwdriver.

  7. Canon PowerShot SD500 Digital ELPH Image Sensor Replacement: 步骤 7 中的图像 1,1
    • Remove the left side cover from the camera.

  8. Canon PowerShot SD500 Digital ELPH Image Sensor Replacement: 步骤 8 中的图像 1,1
    • Remove three .15 inch Phillips screws from the bottom of the camera using a #00 Phillips screwdriver.

  9. Canon PowerShot SD500 Digital ELPH Image Sensor Replacement: 步骤 9 中的图像 1,2 Canon PowerShot SD500 Digital ELPH Image Sensor Replacement: 步骤 9 中的图像 2,2
    • Once the casing is unscrewed, hold the camera with one side facing down, and lift the opposite face of the casing to open it.

    • Remove the internal camera components and layout out all pieces on a clean surface.

    • The front and back cover may require gentle rocking to remove.

  10. Canon PowerShot SD500 Digital ELPH Image Sensor Replacement, Button Contact Panel: 步骤 10 中的图像 1,1
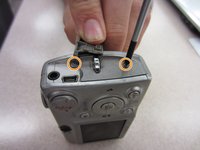
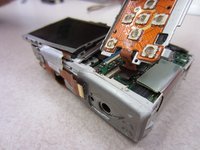
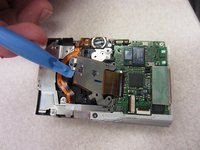
    • Carefully wedge the pry tool under the ribbon in the ribbon gate.

    • Gently remove the ribbon from the ribbon gate by pulling it away from the gate with the pry tool.

    • Be careful not to damage the ribbon.

  11. Canon PowerShot SD500 Digital ELPH Image Sensor Replacement: 步骤 11 中的图像 1,1
    • Gently press the ribbon back to get access to a Phillips screw behind it.

    • Be careful not to damage the ribbon.

    • Unscrew two .125 inch long Phillips screws using a #00 Philips screwdriver.

  12. Canon PowerShot SD500 Digital ELPH Image Sensor Replacement: 步骤 12 中的图像 1,3 Canon PowerShot SD500 Digital ELPH Image Sensor Replacement: 步骤 12 中的图像 2,3 Canon PowerShot SD500 Digital ELPH Image Sensor Replacement: 步骤 12 中的图像 3,3
    • Remove the ribbon with a pry tool by gently pulling it out of the ribbon gate tab.

    • Be careful not to damage the ribbon.

    • Pull the button board away from the rest of the camera.

  13. Canon PowerShot SD500 Digital ELPH Image Sensor Replacement, LCD: 步骤 13 中的图像 1,1
    • Unscrew one .113 inch Phillips screw using a #00 Phillips screwdriver.

  14. Canon PowerShot SD500 Digital ELPH Image Sensor Replacement: 步骤 14 中的图像 1,1
    • Lift the LCD screen up and away from the tab that holds it in place on the face of the camera.

    • Be careful, the LCD screen is still connect to the camera by a ribbon cable.

  15. Canon PowerShot SD500 Digital ELPH Image Sensor Replacement: 步骤 15 中的图像 1,2 Canon PowerShot SD500 Digital ELPH Image Sensor Replacement: 步骤 15 中的图像 2,2
    • Gently press the pry tool under the ribbon gate and lift up to free the ribbon connecting the LCD to the circuit board.

    • Be careful not to damage the ribbon.

    • The LCD can now be completely removed from the camera.

  16. Canon PowerShot SD500 Digital ELPH Image Sensor Replacement, Image Sensor: 步骤 16 中的图像 1,1
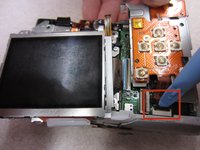
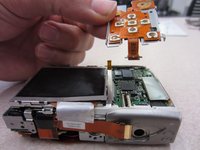
    • Place the pry tool under ribbon gate and gently lift it up, disconnecting the ribbon.

  17. Canon PowerShot SD500 Digital ELPH Image Sensor Replacement: 步骤 17 中的图像 1,1
    • Unscrew three .15 inch Phillips screws from the back of the camera using a #00 Phillips screwdriver.

  18. Canon PowerShot SD500 Digital ELPH Image Sensor Replacement: 步骤 18 中的图像 1,2 Canon PowerShot SD500 Digital ELPH Image Sensor Replacement: 步骤 18 中的图像 2,2
    • Use the pry tool to gently lift the image sensor away from the rest of the camera.

    • Be careful not to damage the image sensor as you pry it up.

结论

To reassemble your device, follow these instructions in reverse order.

Taylor Shields

于10/13/14注册

846 声望

创作了8篇指南

团队

Clemson, Team 2-1, Benson Fall 2014 Clemson, Team 2-1, Benson Fall 2014 的会员

CLEM-BENSON-F14S2G1

4 名成员

创作了9篇指南

0条评论

添加评论

浏览统计数据:

过去 24 小时: 0

过去 7 天: 0

过去 30 天: 2

总计 226