跳转到主内容

Canon PowerShot S400 Motherboard Replacement

你所需要的

  1. Canon PowerShot S400 Motherboard Replacement, LCD Screen: 步骤 1 中的图像 1,2 Canon PowerShot S400 Motherboard Replacement, LCD Screen: 步骤 1 中的图像 2,2
    • Unless stated otherwise, use a Phillips #00 screwdriver to remove all screws.

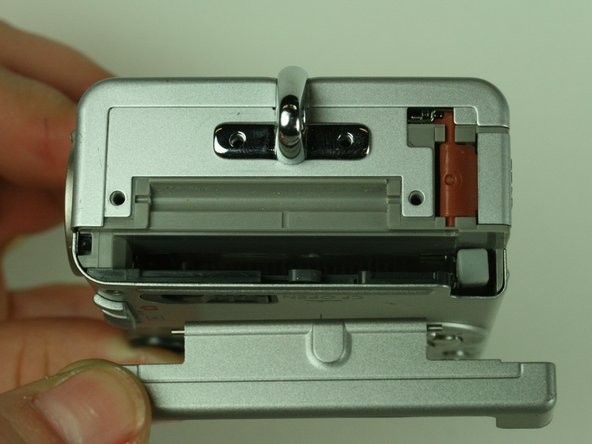
    • On the backside of the camera, remove the 4.75 mm screw that sits at the top right corner.

    • Remove the four 4.75 mm screws that sit at the bottom of the camera.

  2. Canon PowerShot S400 Motherboard Replacement: 步骤 2 中的图像 1,1
    • On the side of the camera, remove the two 4.75 mm screws that sit near the USB digital terminal.

  3. Canon PowerShot S400 Motherboard Replacement: 步骤 3 中的图像 1,3 Canon PowerShot S400 Motherboard Replacement: 步骤 3 中的图像 2,3 Canon PowerShot S400 Motherboard Replacement: 步骤 3 中的图像 3,3
    • On the side of the camera, remove the four 4.75 mm screws that sit near the wrist strap mount.

    • Remove the two small metal plates, which the four screws hold in place.

  4. Canon PowerShot S400 Motherboard Replacement: 步骤 4 中的图像 1,2 Canon PowerShot S400 Motherboard Replacement: 步骤 4 中的图像 2,2
    • When removing the casing, do not drop the small black plastic piece. This piece sits in a small gap above the lens, to the left of the flash, and underneath the camera case.

    • Remove the small black plastic piece and set it aside. If necessary, use tweezers to remove the small black plastic piece.

    • Detach the front case and back case.

  5. Canon PowerShot S400 Motherboard Replacement: 步骤 5 中的图像 1,1
    • Do not remove the metal plate this step refers to. Removal at this step may damage the ribbon cable. Wait until the next step to remove the plate.

    • Remove the 3.5 mm screw that sits on the metal plate at the bottom of the camera.

    • Remove the two other 3.5 mm screws that sit on the side, to the left of the screw you just removed.

    • In the image, we have already removed some of the screws.

  6. Canon PowerShot S400 Motherboard Replacement: 步骤 6 中的图像 1,3 Canon PowerShot S400 Motherboard Replacement: 步骤 6 中的图像 2,3 Canon PowerShot S400 Motherboard Replacement: 步骤 6 中的图像 3,3
    • A ribbon cable attaches to the metal plate and to the main circuit board, on the front of the camera.

    • Gently release the black latch.

    • Remove the ribbon cable and metal plate assembly.

  7. Canon PowerShot S400 Motherboard Replacement: 步骤 7 中的图像 1,2 Canon PowerShot S400 Motherboard Replacement: 步骤 7 中的图像 2,2
    • On the backside of the camera, remove the 3.5 mm screw that sits to the left of the viewfinder and above the LCD screen.

    • Remove the second 3.5 mm screw that sits directly above the LCD screen.

    • Gently detach the ribbon cable.

  8. Canon PowerShot S400 Motherboard Replacement: 步骤 8 中的图像 1,1
    • Locate the ribbon cable on the main circuit board, which sits below the lens.

    • Gently release the black latch on the ribbon cable connector and detach the ribbon cable.

  9. Canon PowerShot S400 Motherboard Replacement: 步骤 9 中的图像 1,2 Canon PowerShot S400 Motherboard Replacement: 步骤 9 中的图像 2,2
    • Remove the LCD screen and set it aside.

  10. Canon PowerShot S400 Motherboard Replacement, Motherboard: 步骤 10 中的图像 1,1
    • On the main circuit board, gently release the black latches of the four ribbon cables.

    • Gently detach the ribbon cables.

  11. Canon PowerShot S400 Motherboard Replacement: 步骤 11 中的图像 1,2 Canon PowerShot S400 Motherboard Replacement: 步骤 11 中的图像 2,2
    • Detach the white-capped and green-capped wires, which sit near the flash.

  12. Canon PowerShot S400 Motherboard Replacement: 步骤 12 中的图像 1,1
    • Using a spudger, gently detach the shutter button assembly from the camera.

  13. Canon PowerShot S400 Motherboard Replacement: 步骤 13 中的图像 1,1
    • Remove the four 3.5 mm screws that hold the main circuit board.

    • In the image, we have already removed some of the screws.

    • Do not remove the main circuit board yet.

  14. Canon PowerShot S400 Motherboard Replacement: 步骤 14 中的图像 1,2 Canon PowerShot S400 Motherboard Replacement: 步骤 14 中的图像 2,2
    • Do not completely remove the main circuit board from the camera. A soldered ribbon cable still attaches the board to the camera. Complete removal would break the soldering points.

    • In a hinge-like motion, gently lift the bottom of the main circuit board, which is the side without the soldering points.

    • Gently detach the white ribbon cable from the underside of the main circuit board.

  15. Canon PowerShot S400 Motherboard Replacement: 步骤 15 中的图像 1,2 Canon PowerShot S400 Motherboard Replacement: 步骤 15 中的图像 2,2
    • Do not attempt this next step unless you have soldering experience and feel comfortable desoldering. Otherwise you may damage the camera.

    • Gently desolder the two ribbon cables attached to the motherboard.

    • Remove the motherboard.

结论

To reassemble your device, follow these instructions in reverse order.

2等其他人完成本指南。

Ross Bryan

于01/21/11注册

359 声望

创作了3篇指南

团队

Cal Poly, Team 5-19, Amido Winter 2011 Cal Poly, Team 5-19, Amido Winter 2011 的会员

CPSU-AMIDO-W11S5G19

4 名成员

创作了6篇指南

0条评论

添加评论

浏览统计数据:

过去 24 小时: 0

过去 7 天: 1

过去 30 天: 7

总计 2,936