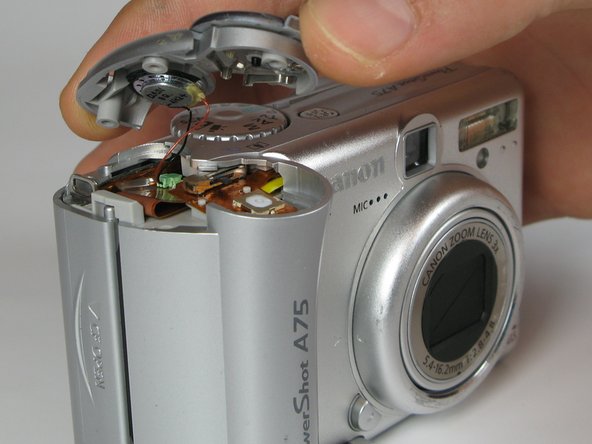
跳转到主内容

Canon PowerShot A75 Speaker Replacement

你所需要的

  1. Canon PowerShot A75 Speaker Replacement, Batteries: 步骤 1 中的图像 1,1
    • Turn the camera over and locate the "BATT OPEN" sliding switch.

  2. Canon PowerShot A75 Speaker Replacement: 步骤 2 中的图像 1,3 Canon PowerShot A75 Speaker Replacement: 步骤 2 中的图像 2,3 Canon PowerShot A75 Speaker Replacement: 步骤 2 中的图像 3,3
    • Slide the switch to the right.

    • The battery cover should slide down and spring open.

  3. Canon PowerShot A75 Speaker Replacement: 步骤 3 中的图像 1,3 Canon PowerShot A75 Speaker Replacement: 步骤 3 中的图像 2,3 Canon PowerShot A75 Speaker Replacement: 步骤 3 中的图像 3,3
    • Remove the 4 AA batteries.

    • Watch for the orientation of the batteries as they slide out.

    • The battery orientation is shown under the battery flap itself and on a sticker next to the battery flap.

  4. Canon PowerShot A75 Speaker Replacement, Speaker: 步骤 4 中的图像 1,2 Canon PowerShot A75 Speaker Replacement, Speaker: 步骤 4 中的图像 2,2
    • Open the memory card slot by sliding it laterally until you hear a click

    • Remove the 5.9mm screw in the upper corner of the memory card slot

  5. Canon PowerShot A75 Speaker Replacement: 步骤 5 中的图像 1,1
    • Remove the two 4.1mm screws at the bottom of the battery flap.

  6. Canon PowerShot A75 Speaker Replacement: 步骤 6 中的图像 1,2 Canon PowerShot A75 Speaker Replacement: 步骤 6 中的图像 2,2
    • Lift the shutter button and speaker part from the top of the camera.

    • Do not pull the part too hard because there is a plug connecting the speaker to the camera.

  7. Canon PowerShot A75 Speaker Replacement: 步骤 7 中的图像 1,3 Canon PowerShot A75 Speaker Replacement: 步骤 7 中的图像 2,3 Canon PowerShot A75 Speaker Replacement: 步骤 7 中的图像 3,3
    • Using a pair of tweezers, grab the plug that connects the speaker to the camera and gently pull it out.

  8. Canon PowerShot A75 Speaker Replacement: 步骤 8 中的图像 1,1
    • Do not proceed to the next step unless you have previous soldering experience because you can damage the flash unit if you are not careful.

    • Remove the glue and unsolder the speaker from the outer casing. Replace or repair the speaker as necessary.

结论

To reassemble your device, follow these instructions in reverse order.

Austin Fox

于04/11/12注册

1 声望

创作了2篇指南

团队

Cal Poly, Team 17-30, Amido Spring 2012 Cal Poly, Team 17-30, Amido Spring 2012 的会员

CPSU-AMIDO-S12S17G30

5 名成员

创作了12篇指南

0条评论

添加评论

浏览统计数据:

过去 24 小时: 0

过去 7 天: 0

过去 30 天: 1

总计 383