跳转到主内容

Canon PowerShot A2300 LCD Replacement

你所需要的

  1. Canon PowerShot A2300 LCD Replacement, Front Cover: 步骤 1 中的图像 1,1
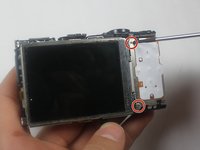
    • Open the A/V Out Digital port cover on the function button side to reveal a screw.

  2. Canon PowerShot A2300 LCD Replacement: 步骤 2 中的图像 1,3 Canon PowerShot A2300 LCD Replacement: 步骤 2 中的图像 2,3 Canon PowerShot A2300 LCD Replacement: 步骤 2 中的图像 3,3
    • Remove all 6 screws(2.70 mm), 2 on each side and 2 on the bottom.

    • Screws are small and very easily lost.

  3. Canon PowerShot A2300 LCD Replacement: 步骤 3 中的图像 1,2 Canon PowerShot A2300 LCD Replacement: 步骤 3 中的图像 2,2
    • Open the card/battery latch by sliding the cover away from the camera in the direction indicated by the arrow.

    • Doing this gives a spot to grip on the bottom of the front cover. This will make it easier to handle when removing.

  4. Canon PowerShot A2300 LCD Replacement: 步骤 4 中的图像 1,1
    • Gently lift the bottom of the front cover to roughly a 30 degree angle.

  5. Canon PowerShot A2300 LCD Replacement: 步骤 5 中的图像 1,1
    • Pull the top of the front cover away from the camera by gripping the top of the front cover by the corners where the cover is still attached to the body.

  6. Canon PowerShot A2300 LCD Replacement, Back Cover: 步骤 6 中的图像 1,1
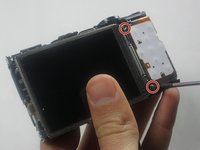
    • Hold the camera in your hands with both thumbs on the screen with the screen faced up.

    • Keep close to the table top in case the camera falls out of your hands.

  7. Canon PowerShot A2300 LCD Replacement: 步骤 7 中的图像 1,1
    • Pull the the bottom left corner of the cover up about an inch to the point shown in the picture.

    • Do not completely remove the back cover by pulling on the side as shown. The cover is still attached on the top of the camera.

  8. Canon PowerShot A2300 LCD Replacement: 步骤 8 中的图像 1,1
    • Pry the top off by sliding the spudger under the On/Off button.

  9. Canon PowerShot A2300 LCD Replacement: 步骤 9 中的图像 1,1
    • Slide the cover to the right and off the camera.

    • Gently pry using the spudger on the right side if necessary.

    • The A/V OUT DIGITAL cover will sometimes become loose and disconnect from the cover

  10. Canon PowerShot A2300 LCD Replacement, LCD: 步骤 10 中的图像 1,2 Canon PowerShot A2300 LCD Replacement, LCD: 步骤 10 中的图像 2,2
    • Remove the 2 screws(1.95 mm) by the top right and bottom right of the screen.

  11. Canon PowerShot A2300 LCD Replacement: 步骤 11 中的图像 1,1
    • Remove the screw(3.57 mm) next to the A/V OUT Digital port.

    • This screw connects the function button metal plate to the circuit board.

  12. Canon PowerShot A2300 LCD Replacement: 步骤 12 中的图像 1,1
    • Raise the screen by wedging the spudger between the bottom of the screen and the mount hole.

  13. Canon PowerShot A2300 LCD Replacement: 步骤 13 中的图像 1,1
    • Remove the metal sheet that is under the screen.

  14. Canon PowerShot A2300 LCD Replacement: 步骤 14 中的图像 1,1
    • Wedge the flat end of the spudger between the camera and the function buttons plate to push the plate out from under the hooks that attach the left side of the plate.

    • The plate will still be attached at the top of the camera.

    • This will allow the bottom of the function button plate to be raised in order to get to where the ribbon cable attaches to the circuit board.

    • Make sure all 3 screws have been removed.

  15. Canon PowerShot A2300 LCD Replacement: 步骤 15 中的图像 1,1
    • Raise the bottom of the function button plate with your thumb.

    • Use one side of the tweezers to raise the black retaining flap that holds the orange ribbon cable to the zero insertion force (ZIF) connector.

    • The latch is approximately as long as the width of the electric tape

  16. Canon PowerShot A2300 LCD Replacement: 步骤 16 中的图像 1,1
    • Gently remove the ribbon cable from the ZIF connector using the tweezers

  17. Canon PowerShot A2300 LCD Replacement: 步骤 17 中的图像 1,1
    • With the bottom of the function button plate still raised pull the screen out to the left until the ribbon cable is out from underneath the function button plate.

结论

To reassemble your device, follow these instructions in reverse order.

2等其他人完成本指南。

Ashley Fincher

于03/23/15注册

477 声望

创作了3篇指南

团队

Baylor, Team 7-14, Williams Spring 2015 Baylor, Team 7-14, Williams Spring 2015 的会员

BU-WILLIAMS-S15S7G14

4 名成员

创作了10篇指南

0条评论

添加评论

浏览统计数据:

过去 24 小时: 0

过去 7 天: 7

过去 30 天: 35

总计 1,781