跳转到主内容

Canon ImageCLASS MF4350d Scanner light Replacement

你所需要的

  1. Canon ImageCLASS MF4350d Scanner light Replacement, Scanner Disassembly: 步骤 1 中的图像 1,1
    • If at any point you see glass that seems cracked or broken, handle with care. Broken glass is sharp and can cause serious damage.

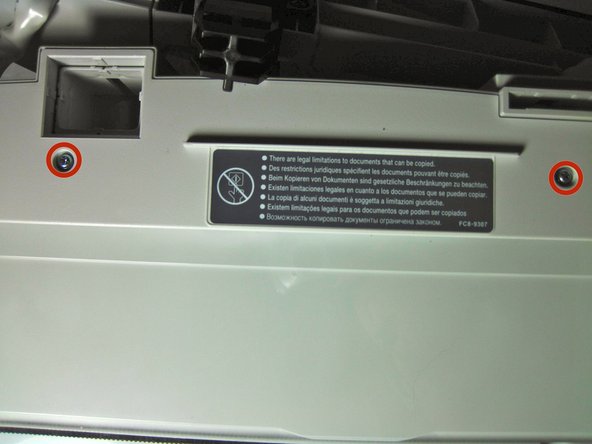
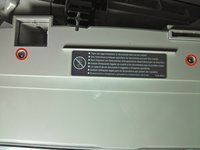
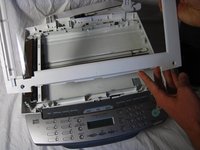
    • Lift up the lid. Then be sure to examine the glass. If there are any cracks or broken fragments handle with extreme care.

  2. Canon ImageCLASS MF4350d Scanner light Replacement: 步骤 2 中的图像 1,3 Canon ImageCLASS MF4350d Scanner light Replacement: 步骤 2 中的图像 2,3 Canon ImageCLASS MF4350d Scanner light Replacement: 步骤 2 中的图像 3,3
    • Locate the black and white hinges.

    • Gently lift out the black and white hinges.

  3. Canon ImageCLASS MF4350d Scanner light Replacement: 步骤 3 中的图像 1,3 Canon ImageCLASS MF4350d Scanner light Replacement: 步骤 3 中的图像 2,3 Canon ImageCLASS MF4350d Scanner light Replacement: 步骤 3 中的图像 3,3
    • Next, locate and remove the four 10mm screws.

  4. Canon ImageCLASS MF4350d Scanner light Replacement: 步骤 4 中的图像 1,1
    • Gently, pry off the top plate, starting from the back of the printer.

  5. Canon ImageCLASS MF4350d Scanner light Replacement: 步骤 5 中的图像 1,2 Canon ImageCLASS MF4350d Scanner light Replacement: 步骤 5 中的图像 2,2
    • After you have taken off the plate, check to make sure that there is no broken glass. If there is broken glass handle it with gloves. Broken glass, if handled improperly, can cause physical injury.

  6. Canon ImageCLASS MF4350d Scanner light Replacement, Scanner light: 步骤 6 中的图像 1,3 Canon ImageCLASS MF4350d Scanner light Replacement, Scanner light: 步骤 6 中的图像 2,3 Canon ImageCLASS MF4350d Scanner light Replacement, Scanner light: 步骤 6 中的图像 3,3
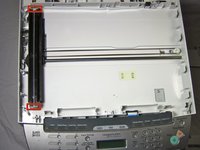
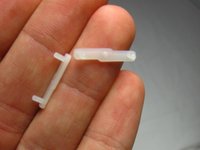
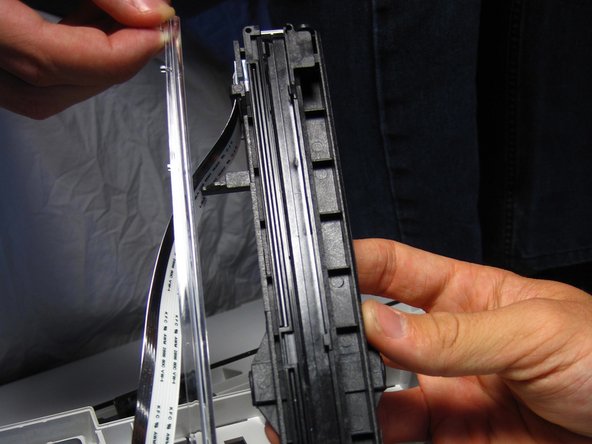
    • Two white tabs are located on the sides of the black component that houses the scanner light. Pull these tabs out, and set them aside.

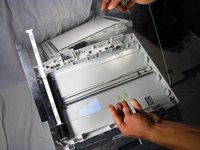
    • Remove black component by gently pulling it up from the black scanner belt.

  7. Canon ImageCLASS MF4350d Scanner light Replacement: 步骤 7 中的图像 1,2 Canon ImageCLASS MF4350d Scanner light Replacement: 步骤 7 中的图像 2,2
    • When removing the light, you should be careful not to snap the plastic. If you do snap the plastic, handle with gloves and use extreme precaution, because the plastic may be sharp.

    • The light is in the middle of the black component. Remove the light by prying up one side with the plastic opening tool and working your way to the other side of the light.

    • You may hear a snapping sound as the light detaches from the component.

    • Once you have taken out the damaged light, replace it with a new light.

结论

To reassemble your device, follow these instructions in reverse order.

另外一个人完成了本指南。

团队

Cal Poly, Team 13-1, Forte Fall 2013 Cal Poly, Team 13-1, Forte Fall 2013 的会员

CPSU-FORTE-F13S13G1

5 名成员

创作了16篇指南

7条评论

While I appreciate the instructions on how to change the scanner bulb, what would be more useful is some info on where to find/buy the actual bulb itself.

I have intensively searched for this item and it appears that Canon does not even sell it, and that unless it also fits another scanner/copier, it is not available at all. Can you comment on this or tell me where I might find one?

tjgraylaw - 回复

here is where you can get them they ship worldwide and you dont need to wait that long.

http://www.coinchange.co.nz/auctions/ele...

timber kitsets -

Unfortunately the www.coinchange.co.nz link is no longer valid. Is there another source for the bulb? Thanks in advance!

bobsbbcards - 回复

I opened up my Canon MF-8580CDW scanner which is the same. As I was putting it back I found two springs laying in the base and cannot find where they go. Can you or anyone help me by telling me where they go? (I know about the belt spring tensioner. This is not that spring)

Bob Johnson - 回复

Was it determined where the springs go? I am having the same issue.

Kevin's Problems -

添加评论

浏览统计数据:

过去 24 小时: 0

过去 7 天: 4

过去 30 天: 23

总计 5,759