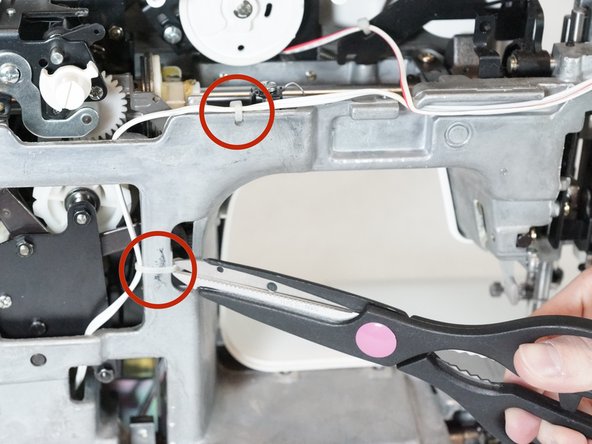
跳转到主内容

Brother XR-40 Lightbulb Replacement

你所需要的

  1. Brother XR-40 Lightbulb Replacement, Back Panel: 步骤 1 中的图像 1,1
    • Place the machine on a solid surface.

    • Remove the 14mm Phillips #2 screw holding on the face cover.

  2. Brother XR-40 Lightbulb Replacement: 步骤 2 中的图像 1,1
    • Remove the two 14mm Phillips #2 screws and two 22mm Phillips #2 screws that secure the rear casing.

  3. Brother XR-40 Lightbulb Replacement: 步骤 3 中的图像 1,1
    • Lay the machine on its side.

    • Remove the four 10mm Phillips #2 screws that hold the bottom panel in place.

    • The feet will come off with the screws.

  4. Brother XR-40 Lightbulb Replacement: 步骤 4 中的图像 1,1
    • Remove the bottom panel.

  5. Brother XR-40 Lightbulb Replacement: 步骤 5 中的图像 1,1
    • Place the machine upright.

    • Remove the rear casing.

    • You may have to wiggle the panel and pull at the same time.

  6. Brother XR-40 Lightbulb Replacement, Lightbulb: 步骤 6 中的图像 1,1
    • Using scissors, clip the two zip ties securing the lightbulb wire.

  7. Brother XR-40 Lightbulb Replacement: 步骤 7 中的图像 1,1
    • Place the machine on its side, with access to the bottom.

    • Gently pull out the white wire connecting the bulb to the machine.

  8. Brother XR-40 Lightbulb Replacement: 步骤 8 中的图像 1,1
    • Move the wire out from under the plastic hook.

  9. Brother XR-40 Lightbulb Replacement: 步骤 9 中的图像 1,1
    • Place the machine upright.

    • Using the flathead screwdriver, remove the 5mm Flathead screw holding on the lightbulb bracket.

  10. Brother XR-40 Lightbulb Replacement: 步骤 10 中的图像 1,1
    • Remove the lightbulb assembly.

结论

To reassemble your device, follow these instructions in reverse order.

另外一个人完成了本指南。

Kevin Bickers

于02/05/14注册

673 声望

创作了4篇指南

团队

Cal Poly, Team 2-12, Amido Winter 2014 Cal Poly, Team 2-12, Amido Winter 2014 的会员

CPSU-AMIDO-W14S2G12

4 名成员

创作了12篇指南

0条评论

添加评论

浏览统计数据:

过去 24 小时: 0

过去 7 天: 1

过去 30 天: 5

总计 3,051