简介
I recently encountered the problem, that my Brother printer would not start or react at all when pressing the power button. Disconnecting the power cord, waiting for some seconds and reconnecting resulted in the startup of the printer, but it would immediately shut down with the message that all "All functions will be disabled". In the comments of a Youtube video I found a workaround (https://www.youtube.com/watch?v=Gi7cl588...) namely to remove the paper tray before reconnecting the power cord and reinserting it not until the printer asks for it. That workaround did work for, but that was not a permanent nor a convenient solution.
Since the warranty of the printer was not expired, Brother sent me a technician who replaced a capacitor. After two or three restarts of the printer, on which the printer still misbehaved, the printer started working normally again.
As with all guides, you do that at your own risk. You should know how to solder and be at experienced in disassembling and reassembling things.
你所需要的
-
-
Disconnect the power cord of the printer
-
Open the printer as you would to access the USB port.
-
Pull out the rear end of the hood holder (see picture two). After that you can remove the top part of the hood holder.
-
Now remove the hood holder completely.
-
-
-
Next remove the cover on the left side of the printer (lift the right side of the cover first).
-
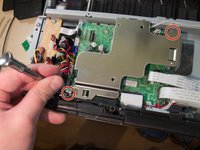
Unplug the black ribbon cable, the blue and the white plugs from its sockets and unscrew the cable which is attached with a screw (see second image)
-
Remove the red and white plugs from its sockets as shown in picture three.
-
-
-
Flip the plastic part shown in picture one up to the top part of the printer
-
Now you can easily remove the top of the printer by pushing it away from the printer (not up).
-
-
-
-
Remove the screws connecting the black plastic cover to the printer (see image)
-
Remove the cover
-
-
-
Remove the little PCB as shown in image one by lifting it up. Be careful not to damage the pins connecting the PCB with the motherboard
-
Unscrew the two screws fixing the metal cover to the motherboard as shown in picture two.
-
Remove the metal cover to get full access to the motherboard
-
-
-
On the right side of the motherboard there is a coin shaped capacitor. In picture two you can see a detailed view of the capacitor (5.5V 0.22F).
-
Note which polarity of the capacitor is facing which side on a piece of paper.
-
Remove the capacitor.
-
Looking at you piece of paper, solder the new capacitor in THE RIGHT DIRECTION (POLARITY) to the remaining wires from the removed capacitor.
-
-
-
After reassembling the printer, reconnect the power cord.
-
The first few times you start you may encounter the same behaviour as before the repair. After two or three restarts my printer worked fine again.
-
I hope this guide helps. Happy repairing. If something is unclear or you have suggestions how to phrase things better (engl. is not my mother tongue) please leave a comment.
-


37等其他人完成本指南。

43指南评论
How does one make sure that the new capacitor lasts longer than the original? This doesn’t look like a procedure I would want to repeat every 2 years. Did Brother use low quality capacitors on these printers? I don’t know how to tell if a capacitor is low quality or high quality.
I could imagine that the voltage tolerances are a bit wider than the maximum 5.5V the capacitor is specified for. So I would go for a 6+V 0.22F cap if it is available in the same housing.
try to use a higher capacity e.g. 1F, that might last longer.
Fabulous guide, thank you! Used on my MFC-J4510DW. I went as far as removing the printed circuited board all the way to be able to properly de-solder the failed capacitor and then put the new capacitor legs in the thru-holes on the board. Else the capacitor would sit too high and the metal shield over the board would not fit. The new NEC capacitor is considerably bigger (still 5.5V 0.22F). Hopefully it will last longer. I’m hoping it will also fix the WiFi disconnection problem that is often reported. So far, so good.
Brilliant advice and clarity for the repair. My MFC J4420DW won’t power up and all the indicators suggest the ‘power supply’ is faulty.
Does anyone know if I change the Capacitors on this board, will it resolve the issue? Any comments extremely appreciated.