简介
After several years of use, does your Blackvue dashcam show the incorrect date and time for recordings? If so it’s possible that the Real Time Clock (RTC) battery in the dashcam has died. This guide shows how to replace the battery for only a few dollars and less than an hour of work. Disassembly of other models of Blackvue dashcams appears to be very similar, so if you have a different model than the 650GW-2CH, these instructions may still help you.
The replacement battery is a Seiko MS621FE FL11E 3V 5.5mAHr Rechargeable Battery. I purchased mine on Amazon, only C$7.70 for 2.
你所需要的
-
-
Using a small jeweller's flat bladed screwdriver, carefully pry up one corner of the plastic window covering the WiFi LED on the end of the dashcam.
-
Once you've pried the window slightly, you can use a plastic spudger to gently lift up the window without damaging it.
-
Remove the window and set it aside.
-
-
-
Near the opposite end of the dashcam from where you removed the plastic window, you'll see a small opening on the side of the end-cap.
-
Using a small flat bladed screwdriver, press on the plastic tab that you find inside that opening.
-
Pressing on that tab should release the plastic end-cap so that you can slide it off the end of the dashcam's cylindrical body.
-
The 3rd photo shows the end-cap after it's been removed.
-
-
-
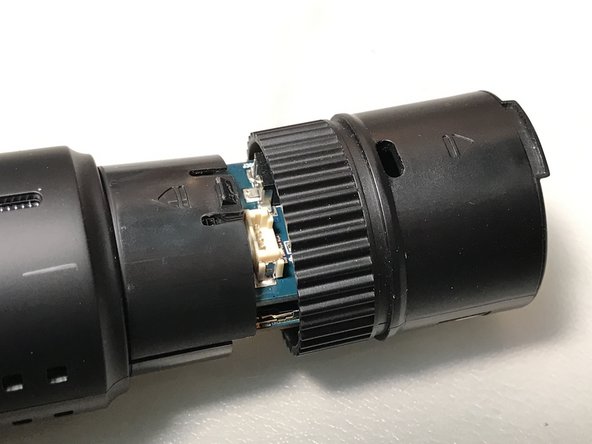
Next step is to separate the two halves of the cylindrical dashcam body. I used an old credit card as well as a spudger tool for this step.
-
Starting from the right end, work your way carefully along the horizontal crack between the two halves using a spudger and/or credit card. Be patient, don't use too much force or you may break one or more of the internal plastic tabs.
-
Once you've loosened the tabs holding one side of the body, turn the dashcam over and loosen the other side.
-
In the 3rd photo, you can see the location of 2 of the internal tabs holding the body together, in the small opening betwen halves. There are 4 of these internal tabs on each side.
-
-
-
-
Once both sides are loosened, you can separate the top and bottom halves of the dashcam body.
-
-
-
Inside the dashcam, there are two stacked circuit boards. Using a plastic pry or spudger tool, gently pry the top circuit board up from the bottom circuit board.
-
There are 3 connectors between the 2 circuit boards holding them together. In the 2nd photo, for reference you can see these 3 connectors (outlined in red), once the boards have been separated. You can also see the bottom side of the upper circuit board here, where the RTC battery is found.
-
-
-
Once you've separated the 2 circuit boards, you'll see the RTC battery mounted on the bottom side of the upper board. In the first photo you'll see it's covered by a piece of clear rubber tubing, for insulation.
-
Carefully slide off the clear rubber tubing/insulation, and set it aside for replacement later.
-
The 2nd photo shows the RTC battery after the insulation has been removed.
-
-
-
Using a soldering iron and desoldering pump, carefully heat the 2 battery terminals and suck off the solder.
-
Remove the old battery and clean off any excess solder from the circuit board battery terminals.
-
-
-
Position the new battery over the circuit board so its terminals line up with the corresponding pads on the circuit board.
-
Solder the new battery to the circuit board, being careful not to overheat the circuit board traces nor create any shorts.
-
Slide the rubber tubing/insulation onto the new battery.
-
Carefully align and reconnect the 3 connectors between the two stacked circuit boards together, then reassemble the dashcam body and you're done!
-


To reassemble your device, follow these instructions in reverse order.
To reassemble your device, follow these instructions in reverse order.
2等其他人完成本指南。
2条评论
Nice job on this. I soldered 2 wires to where the battery was and ran them to a spot above the circuit board where a ML2032 battery would fit. The ML2032 is a rechargeable version of the standard CR2032, with 10 times the capacity of the original battery. I used metal tape to tape the wires to the battery so I can easily change the battery again without soldering. A piece of scotch tape over the entire battery electrically insulates it. Works great. Thank you for showing me how to disassemble the camera.
Excellent 5 star guide.
The date/time is also lost when a firmware upgrade is done. There is a Blackvue time setting patch here: https://blackvue.com/download/time-setti...