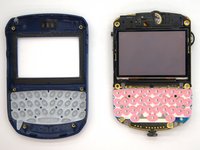
跳转到主内容

BlackBerry 7280 Keypad Replacement

你所需要的

  1. BlackBerry 7280 Keypad Replacement, Battery: 步骤 1 中的图像 1,3 BlackBerry 7280 Keypad Replacement, Battery: 步骤 1 中的图像 2,3 BlackBerry 7280 Keypad Replacement, Battery: 步骤 1 中的图像 3,3
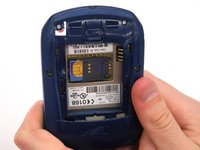
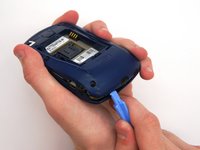
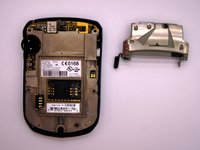
    • With your thumb press down on the locking- button on the back of the BlackBerry 7280.

    • Slide the battery cover off the device.

  2. BlackBerry 7280 Keypad Replacement: 步骤 2 中的图像 1,2 BlackBerry 7280 Keypad Replacement: 步骤 2 中的图像 2,2
    • Remove the lithium-ion battery from the back of the device using your index finger.

  3. BlackBerry 7280 Keypad Replacement, SIM Card: 步骤 3 中的图像 1,3 BlackBerry 7280 Keypad Replacement, SIM Card: 步骤 3 中的图像 2,3 BlackBerry 7280 Keypad Replacement, SIM Card: 步骤 3 中的图像 3,3
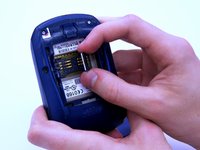
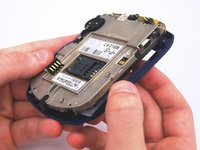
    • Hold the device with both hands.

    • Lift the SIM card holder using your thumb and index finger.

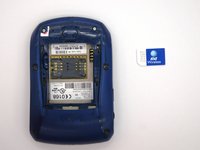
    • Remove the SIM card from the device.

  4. BlackBerry 7280 Keypad Replacement, Back Case: 步骤 4 中的图像 1,2 BlackBerry 7280 Keypad Replacement, Back Case: 步骤 4 中的图像 2,2
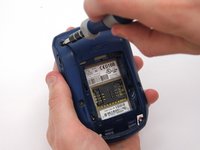
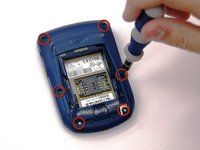
    • Using a Torx T6 screwdriver, remove all six 1/8 inch screws (marked in red) from the back case. Set screws aside.

    • The SIM card has been removed here to prevent damage to the card. This is recommended, but not not required.

  5. BlackBerry 7280 Keypad Replacement: 步骤 5 中的图像 1,2 BlackBerry 7280 Keypad Replacement: 步骤 5 中的图像 2,2
    • Use the plastic opening tool to pry the back case away from the front case.

  6. BlackBerry 7280 Keypad Replacement, Front Case: 步骤 6 中的图像 1,2 BlackBerry 7280 Keypad Replacement, Front Case: 步骤 6 中的图像 2,2
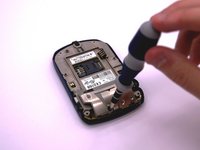
    • Using a Torx T6 screwdriver, remove the lone 1/8 inch screw that holds the upper metal bracket onto the larger metal bracket. Set aside the screw and the bracket.

  7. BlackBerry 7280 Keypad Replacement: 步骤 7 中的图像 1,2 BlackBerry 7280 Keypad Replacement: 步骤 7 中的图像 2,2
    • Remove the front plastic case from the metal bracket.

  8. BlackBerry 7280 Keypad Replacement, Keypad: 步骤 8 中的图像 1,1
    • The keypad sits in the keyboard slots on the front cover. Simply peel the keyboard off and replace.

结论

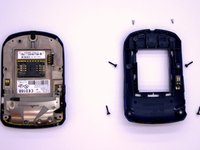
To reassemble your device, follow these instructions in reverse order.

另外一个人完成了本指南。

团队

Clemson, Team 12-2, Benson Spring 2013 Clemson, Team 12-2, Benson Spring 2013 的会员

CLEM-BENSON-S13S12G2

4 名成员

创作了11篇指南

0条评论

添加评论

浏览统计数据:

过去 24 小时: 0

过去 7 天: 0

过去 30 天: 1

总计 214