跳转到主内容

Bissell ION Rechargeable Vacuums Lithium Ion battery pack schematic

你所需要的

  1. 注意:步骤 1-5 源自标记为进行中的 指南

    Bissell ION Rechargeable Vacuums Lithium Ion battery pack schematic, Battery: 步骤 1 中的图像 1,2 Bissell ION Rechargeable Vacuums Lithium Ion battery pack schematic, Battery: 步骤 1 中的图像 2,2
    • Push the silver button to disconnect the dirt dish from the handheld vacuum.

  2. Bissell ION Rechargeable Vacuums Lithium Ion battery pack schematic: 步骤 2 中的图像 1,2 Bissell ION Rechargeable Vacuums Lithium Ion battery pack schematic: 步骤 2 中的图像 2,2
    • Remove the four 4 .4cm screws using your P0 screwdriver head and screwdriver.

    • Remove the Bissell sign to remove the two 4.4cm screws, using your P0 screwdriver head and screwdriver.

  3. Bissell ION Rechargeable Vacuums Lithium Ion battery pack schematic: 步骤 3 中的图像 1,3 Bissell ION Rechargeable Vacuums Lithium Ion battery pack schematic: 步骤 3 中的图像 2,3 Bissell ION Rechargeable Vacuums Lithium Ion battery pack schematic: 步骤 3 中的图像 3,3
    • Using the metal spudger, insert and lift up to remove the frame from the body.

    • Move along the line and repeat on the other side.

  4. Bissell ION Rechargeable Vacuums Lithium Ion battery pack schematic: 步骤 4 中的图像 1,2 Bissell ION Rechargeable Vacuums Lithium Ion battery pack schematic: 步骤 4 中的图像 2,2
    • Remove the orange frame

    • Remove the 3 screws on the right side of the vacuum.

  5. Bissell ION Rechargeable Vacuums Lithium Ion battery pack schematic: 步骤 5 中的图像 1,3 Bissell ION Rechargeable Vacuums Lithium Ion battery pack schematic: 步骤 5 中的图像 2,3 Bissell ION Rechargeable Vacuums Lithium Ion battery pack schematic: 步骤 5 中的图像 3,3
    • With metal spudger remove the metal clip on both sides.

    • Pull device apart using great force

  6. Bissell ION Rechargeable Vacuums Lithium Ion battery pack schematic, Battery Pack Schematic: 步骤 6 中的图像 1,1
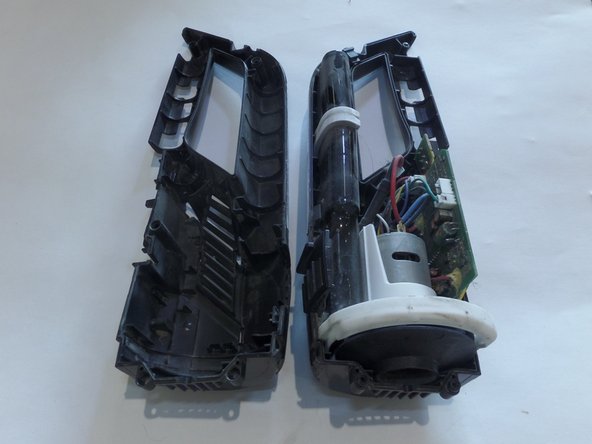
    • Three wires lead to a female connector, probably for cell balancing, voltage sensing, etc. They are blue, yellow and white (the black wire in this schematic.)

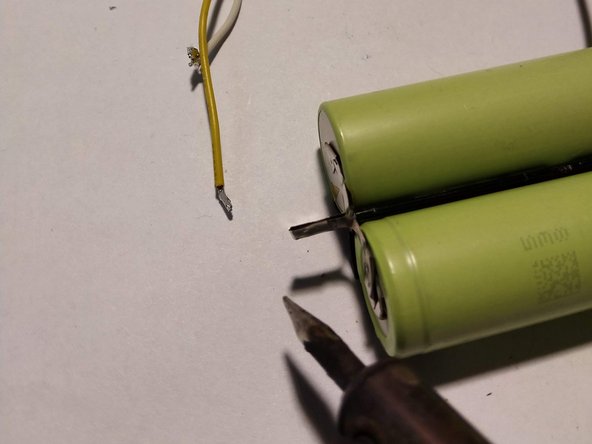
    • The batteries are 18650 Li-Ion, LG MG1: 2850 mAh, 10A 3.62v

    • The inline fuse on the (+) positive lead is F16AH250VP

  7. Bissell ION Rechargeable Vacuums Lithium Ion battery pack schematic, Assembling the battery pack: 步骤 7 中的图像 1,3 Bissell ION Rechargeable Vacuums Lithium Ion battery pack schematic, Assembling the battery pack: 步骤 7 中的图像 2,3 Bissell ION Rechargeable Vacuums Lithium Ion battery pack schematic, Assembling the battery pack: 步骤 7 中的图像 3,3
    • Detach old battery pack (photo 1) from circuit board. My power leads were crimped, and easily de-crimped with a needle nose pliers.

    • Gently pry 3-wire female plug from circuit board.

    • Disassemble/desolder old pack. Loose assemble the new batteries. I used the old holding bracket (photo 2) and wires.

    • Solder batteries together according to schematic (photo 3.) Wrap completed pack in shrink wrap or electrical tape.

    • Connect (+) and (-) leads with crimps, solder, or small wire nuts. I used wire nuts.

    • Reconnect 3-wire plug to circuit board.

    • Place battery pack in handle location, and reassemble vacuum.

结论

There are no replacement battery packs available for the Bissell Bolt-ION series of rechargeable vacuum cleaners. Shame.

But making your own is easy if you have moderate soldering skills.

Get replacement batteries with soldering tabs. Four new ones should be about $25.

Breikke Pelto

于04/02/20注册

85 声望

撰写一个指南

0条评论

添加评论

浏览统计数据:

过去 24 小时: 0

过去 7 天: 2

过去 30 天: 5

总计 347